Hints and Tips for User Installed Software
This section contains hints and tips intended to help users install and run software themselves. If you do not find the information you need, you are of course very welcome to contact us at support@hpc2n.umu.se.
There are many reasons why users or groups of users may choose to install software on their own, for instance:
- License for the software does not permit a site-wide installation.
- Software is expensive to buy for site-installation, and is not deemed of interest to enough users to justify the expense.
- User needs a different version/modified version of software.
- Software is only of interest to one or a few users.
List of software
If you are interested in software which is not installed at HPC2N, and which is not listed on our software pages, and which is not among the ones discussed here, please contact us at support@hpc2n.umu.se. We may either make a site-install of the software, or help you install it in your own directory.
StarCCM
Prerequisites
For versions older than 8.02.008-R8, these instructions does not work.
Procuring the software
Installing
Follow the installation instructions that comes with StarCCM itself.
We recommend installing in a directory under your project storage.
If you wish to use the graphical frontends for adjusting StarCCM projects we recommend that you install and use the software when connected via the ThinLinc graphical interface to our clusters. You may need to load a Java module (Java/11 or Java/1.8).
There are several environment variables that may be needed when installing the software:
CHECK_DISK_SPACE=OFFIATEMPDIR, setting it to an existing directory with 10GB+ free space
There are some command line options to the installer that avoids installing things we don’t want and avoids the GUI installer:
-i console-DINSTALLFLEX=false-DADDSYSTEMPATH=false-DINSTALLDIR=/proj/nobackup/yourproj/you/starccm
All versions
The submitfile should always contain the following:
Version 8 and 9
The submitfile should contain the following:
Use these arguments to starccm+
Submitfile example
This is an example of the important parts of a working submitfile.
#!/bin/bash
#SBATCH -A <your-project-id>
#SBATCH -n 28
#SBATCH --ntasks-per-node=14
#SBATCH -t 2:00:00
hostlist --expand --append=':' --append-slurm-tasks=$SLURM_TASKS_PER_NODE $SLURM_JOB_NODELIST > machinefile
module add GCC/5.4.0-2.26 OpenMPI/1.6.5
export OMPI_MCA_btl_tcp_if_exclude=lo,ib0
STARDIR=<path-to-your-starccm-installation>
$STARDIR/star/bin/starccm+ -machinefile machinefile -mpi openmpi -np $SLURM_NTASKS -cpubind off -nbuserdir <path-to-your-starccm-user-dir> <any-other-starccm-parameters>
If whole nodes are allocated one can use other cpubind arguments, see your starccm documentation for options.
Version 11
Version 11 (at least 11.06.011-R8) is built with a too old GCC compiler to be able to use one of the site installed OpenMPI versions, therefore one must use the Intel MPI packaged with Star-CCM+ itself. There is also a problem with the default fabric choosen by that MPI version and the TCP fabric must be explicitly selected.
The important flags are therefore:
Submit file example
#!/bin/bash
#SBATCH -A <your-project-id>
#SBATCH -J star-ccm-v11
#SBATCH -n 56
#SBATCH -t 1:00:00

hostlist --expand --append=':' --append-slurm-tasks=$SLURM_TASKS_PER_NODE $SLURM_JOB_NODELIST > machinefile

STARDIR=<path-to-your-starccm-installation>

$STARDIR/star/bin/starccm+ -machinefile machinefile -mpi intel -mpiflags -slurm -np $SLURM_NTASKS -fabric TCP -nbuserdir <path-to-your-starccm-user-dir> <any-other-starccm-parameters>
Perl/CPAN
Installing Perl/CPAN software in your user account
CPAN is the place and tool to install Perl modules. The problem is that CPAN likes to install stuff where normal users don’t have permissions to write, so we have to configure CPAN to use other directories.
Installing
First we decide where to have the CPAN modules installed. Let’s assume that we want to install them under ~/Public/perl. Any place can do, but it is best if you have it under ~/Public or in your project storage if you want to use them from batch jobs.
Then add these lines to your ~/.bashrc:
If you choose to install under ~/Public directly, you can skip setting the PATH. If you have already set PERL5LIB you will have to modify the line appropriately.
Be aware that cpan will overwrite anything under bin, lib, and man under your install directory.
Run and configure
Next we have to run and configure cpan. To run cpan, you use the command cpan (or you could use perl -MCPAN -e shell).
If this is the first time you run cpan, cpan will ask if you want it to configure things automatically. Just let it do it. If you have already run it, and wants a fresh start, you can either remove ~/.cpan/CPAN/MyConfig.pm or (from within cpan) run ‘o conf init’.
Assuming the initial run has been done, we need to set some configuration variables. The first two controls where things get installed and the third one makes it ask less questions for dependencies. The last one is not an option, it just saves your configuration.
o conf makepl_arg INSTALL_BASE=~/Public/perl
o conf mbuildpl_arg "--install_base ~/Public/perl"
o conf prerequisites_policy follow
o conf commit</pre>
Note: the o is part of the command and not a bullet point.)
You can now quit cpan.
From now on the actual installation of a CPAN module will be quite easy, just use:
cpan -i module
There might be some questions asked but you can usually just press return on all of them.
R/CRAN
Installing R/CRAN add-ons in your user account
R is a free software environment for statistical computing and graphics. There exists a large number of R add-on packages. The R modules at HPC2N have around 750 of the most common installed and several more in R-bundle-Bioconductor (see our main R page). If you need more than those, the quickest and sometimes best solution is to install those add-ons on your own account.
Preparations
We need create a place for the add-ons to be and tell R where to find them. The initial setup only needs to be done once, but separate package directories need to be created for each R version used:
- R reads the
$HOME/.Renvironfile to setup its environment. It should be created by R on first run, or you can create it with the command: touch $HOME/.Renviron - NOTE: In this example we are going to assume you have chosen to place the R packages in a directory under your home directory. You will need separate ones for each R version.
- Since the environment file probably is empty now, tell R where your chosen add-on directory is with the command line:
- However if it is not empty, you can edit
$HOME/.Renvironwith your favorite editor so thatR_LIBScontain the path to your chosen add-on directory. It should look something like this when you are done:
- NOTE: Replace “
/home/u/user” with the value of$HOME. Run ‘echo $HOME’ to see its value. - NOTE: The
%Vshould be written as-is, it is substituted at runtime with the active R version.
- NOTE: Replace “
- For each version of R you are using, create a directory matching the pattern used in
.Renvironto store your packages in. This example is shown for R version 3.6.0:
Installing R add-ons
There are two ways to install an R add-on from CRAN, which is not installed on our system. You can either choose the one that automatically downloads the add-on and handles all the dependencies, or one that is somewhat simpler and does not handle dependencies.
Automatic download and install
Example
In this example we use the plyr add-on, mostly because it has a dependency (Rcpp).
- Load the R module first. This example loads the R version 3.5.1:
- Tell R to install the plyr add-on from the CRAN repo in Sweden (chosen from CRAN mirror list). We ask R to be quiet and don’t bother saving and restoring the environment.
You get a warning about ‘lib’ being unspecified. You can safely ignore that.
Note
If the package has dependencies that come from more than one repo it will not work. You either run the “install.packages” interactively in R or use the manual method.
Manual download and install
- Download the add-on of interest from the CRAN Package site.
- Install from inside R with
R CMD INSTALL -l
Example
- In this case we download http://cran.r-project.org/src/contrib/ash_1.0-9.tar.gz (it has no dependencies):
- Load the R module. Here we use R version 3.5.1:
- Tell R to install it into your chosen add-on directory:
Using your package
To use your installed add-ons, start R and just use the following R expression to load the plyr add-on (replacing “plyr” with your add-on):
More information
For more information about installing and using your own packages see the offical FAQ (http://cran.r-project.org/doc/FAQ/R-FAQ.html), particularly How can add-on packages be installed and How can add-on packages be used?.
Python packages
Python packages can usually be installed through python, with the tool ‘python setup.py’, but some packages can be difficult, and are easier to install in a stand-alone environment.
 In these cases we suggest using Venv or Virtualenv.
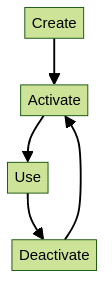
Whatever environment manager you use, this is the workflow:
- You create the isolated environment
- You activate the environment
- You work in the isolated environment. Here you install (or update) the environment with the packages you need (only install once)
- You deactivate the environment after use
Note
Virtual environments are a great way to make sure you are using the same packages and versions each time you run something in your project; just activate and deactivate the virtual environment in question. You can have as many virtual environments as you want, with different versions and different packages, but only one virtual environment can be active at a time.
Venv and Virtualenv are almost completely interchangeable. The difference being that virtualenv supports older python versions and has a few more minor unique features, while venv is in the standard library.
Note
Always check first if a package is already site-installed as part of a module. If that is the case, load that first before installing the rest of your packages.
In order to check which packages are available, there are some options:
- Type this on the command line:
module -r spider “.*Python.*“- And this, to get packages with all spellings of Python:
module -r spider “.*python.*“
- And this, to get packages with all spellings of Python:
- Other option is to load a Python module and its prerequisites, then do
pip list. This is also gives you the version, which can be useful if you are trying to determine if the Python package you want to install is compatible with the Python modules already installed.
Load Python 3.11.3 and checking for packages
As you can see, there is very little installed with the base Python module, but there are several other Python packages installed as modules. These are some of the more common ones:
ASE
Biopython
Flask
Horovod
IPython
JupyterLab
Keras
PyTorch
Python-bundle-PyPI
SciPy-bundle (Bottleneck, deap, mpi4py, mpmath, numexpr, numpy, pandas, scipy, etc.)
TensorFlow
Theano
dask
geopandas
matplotlib
pip
scikit-learn
scikit-image
scipy
sympy
Cython
Note
This is NOT and exhaustive list and they are also not all installed for all versions of Python (send us a mail on support@hpc2n.umu.se if a package is missing for a specific version - we will often install it.)
Example: Checking which packages are available when Python 3.11.3 and a compatible SciPy-bundle are loaded
b-an01 [~]$ ml GCC/12.3.0 Python/3.11.3
b-an01 [~]$ ml SciPy-bundle/2023.07
b-an01 [~]$ pip list
Package                           Version
--------------------------------- -----------
alabaster                         0.7.13
appdirs                           1.4.4
asn1crypto                        1.5.1
atomicwrites                      1.4.1
attrs                             23.1.0
Babel                             2.12.1
backports.entry-points-selectable 1.2.0
backports.functools-lru-cache     1.6.5
beniget                           0.4.1
bitstring                         4.0.2
blist                             1.3.6
Bottleneck                        1.3.7
CacheControl                      0.12.14
cachy                             0.3.0
certifi                           2023.5.7
cffi                              1.15.1
chardet                           5.1.0
charset-normalizer                3.1.0
cleo                              2.0.1
click                             8.1.3
cloudpickle                       2.2.1
colorama                          0.4.6
commonmark                        0.9.1
crashtest                         0.4.1
cryptography                      41.0.1
Cython                            0.29.35
deap                              1.4.0
decorator                         5.1.1
distlib                           0.3.6
distro                            1.8.0
docopt                            0.6.2
docutils                          0.20.1
doit                              0.36.0
dulwich                           0.21.5
ecdsa                             0.18.0
editables                         0.3
exceptiongroup                    1.1.1
execnet                           1.9.0
filelock                          3.12.2
flit_core                         3.9.0
fsspec                            2023.6.0
future                            0.18.3
gast                              0.5.4
glob2                             0.7
html5lib                          1.1
idna                              3.4
imagesize                         1.4.1
importlib-metadata                6.7.0
importlib-resources               5.12.0
iniconfig                         2.0.0
intervaltree                      3.1.0
intreehooks                       1.0
ipaddress                         1.0.23
jaraco.classes                    3.2.3
jeepney                           0.8.0
Jinja2                            3.1.2
joblib                            1.2.0
jsonschema                        4.17.3
keyring                           23.13.1
keyrings.alt                      4.2.0
liac-arff                         2.5.0
lockfile                          0.12.2
markdown-it-py                    3.0.0
MarkupSafe                        2.1.3
mdurl                             0.1.2
mock                              5.0.2
more-itertools                    9.1.0
mpmath                            1.3.0
msgpack                           1.0.5
netaddr                           0.8.0
netifaces                         0.11.0
numexpr                           2.8.4
numpy                             1.25.1
packaging                         23.1
pandas                            2.0.3
pastel                            0.2.1
pathlib2                          2.3.7.post1
pathspec                          0.11.1
pbr                               5.11.1
pexpect                           4.8.0
pip                               23.1.2
pkginfo                           1.9.6
platformdirs                      3.8.0
pluggy                            1.2.0
ply                               3.11
pooch                             1.7.0
psutil                            5.9.5
ptyprocess                        0.7.0
py                                1.11.0
py-expression-eval                0.3.14
pyasn1                            0.5.0
pybind11                          2.11.1
pycparser                         2.21
pycryptodome                      3.18.0
pydevtool                         0.3.0
Pygments                          2.15.1
pylev                             1.4.0
PyNaCl                            1.5.0
pyparsing                         3.1.0
pyrsistent                        0.19.3
pytest                            7.4.0
pytest-xdist                      3.3.1
python-dateutil                   2.8.2
pythran                           0.13.1
pytoml                            0.1.21
pytz                              2023.3
rapidfuzz                         2.15.1
regex                             2023.6.3
requests                          2.31.0
requests-toolbelt                 1.0.0
rich                              13.4.2
rich-click                        1.6.1
scandir                           1.10.0
scipy                             1.11.1
SecretStorage                     3.3.3
semantic-version                  2.10.0
setuptools                        67.7.2
setuptools-scm                    7.1.0
shellingham                       1.5.0.post1
simplegeneric                     0.8.1
simplejson                        3.19.1
six                               1.16.0
snowballstemmer                   2.2.0
sortedcontainers                  2.4.0
Sphinx                            7.0.1
sphinx-bootstrap-theme            0.8.1
sphinxcontrib-applehelp           1.0.4
sphinxcontrib-devhelp             1.0.2
sphinxcontrib-htmlhelp            2.0.1
sphinxcontrib-jsmath              1.0.1
sphinxcontrib-qthelp              1.0.3
sphinxcontrib-serializinghtml     1.1.5
sphinxcontrib-websupport          1.2.4
tabulate                          0.9.0
threadpoolctl                     3.1.0
toml                              0.10.2
tomli                             2.0.1
tomli_w                           1.0.0
tomlkit                           0.11.8
typing_extensions                 4.6.3
tzdata                            2023.3
ujson                             5.8.0
urllib3                           1.26.16
versioneer                        0.29
virtualenv                        20.23.1
wcwidth                           0.2.6
webencodings                      0.5.1
wheel                             0.40.0
xlrd                              2.0.1
zipfile36                         0.1.3
zipp                              3.15.0
Hint
To make it easier for your colleagues to copy/use the same environment as you, it is a good idea to use pip freeze to save a copy of which python packages you are using/have installed. You can either make a list of all of them (including site-packages), or just the ones you have installed yourself.
-
Create a file named “requirements.txt” containing ALL the Python packages you have in your virtual environment:
pip freeze > requirements.txt. -
Create a file named “requirements.txt” containing ONLY the Python packages you have installed yourself in your virtual environment:
pip freeze –local > requirements.txt.
Venv
Most newer versions of Python has venv in the standard library.
This is how you would use venv with HPC2N’s Python modules.
Working with venv
- Load the Python module (and prerequisites) containing the version you want to use.
- Create a
venvwith:python -m venv –system-site-packages MYVENV, where MYVENV is the name you give your virtual environment.- If you are creating the venv in another directory, give the full path in front of the name of the virtual environment.
- Activate the virtual environment with:
source PATH-TO/MYVENV/bin/activate. - Install Python packages with
pip. We recommend usingpip install --no-cache-dir --no-build-isolation MYPACKAGEin order to reuse site-installations etc. - Deactivate the virtual environment with
deactivate
Then, when you want to use the virtual environment again (or install more packages to it), just load the same modules and then activate it.
Example
- In this example, we:
- load Python 3.11.3 and the compatible SciPy-bundle and matplotlib.
- create a virtual environment, named “myvenv”
- activate the virtual environment (notice that the prompt now changes to include the name of the virtual environment)
- install a package (lightgbm) to it
- check that the newly installed package can be loaded (with
pip listor from import inside Python) - deactivate the virtual environment
b-an01 [~]$ ml GCC/12.3.0 Python/3.11.3
b-an01 [~]$ ml SciPy-bundle/2023.07
b-an01 [~]$ ml matplotlib/3.7.2

b-an01 [~]$ python -m venv --system-site-packages myvenv

b-an01 [~]$ source myvenv/bin/activate
(myvenv) b-an01 [~]$

(myvenv) b-an01 [~]$ pip install --no-cache-dir --no-build-isolation lightgbm
Collecting lightgbm
  Downloading lightgbm-4.3.0-py3-none-manylinux_2_28_x86_64.whl (3.1 MB)
     ━━━━━━━━━━━━━━━━━━━━━━━━━━━━━━━━━━━━━━━━ 3.1/3.1 MB 54.7 MB/s eta 0:00:00
Requirement already satisfied: numpy in /hpc2n/eb/software/SciPy-bundle/2023.07-gfbf-2023a/lib/python3.11/site-packages (from lightgbm) (1.25.1)
Requirement already satisfied: scipy in /hpc2n/eb/software/SciPy-bundle/2023.07-gfbf-2023a/lib/python3.11/site-packages (from lightgbm) (1.11.1)
Installing collected packages: lightgbm
Successfully installed lightgbm-4.3.0

[notice] A new release of pip available: 22.3.1 -> 24.0
[notice] To update, run: pip install --upgrade pip

(myvenv) b-an01 [~]$ python
Python 3.11.3 (main, Apr  2 2024, 14:00:42) [GCC 12.3.0] on linux
Type "help", "copyright", "credits" or "license" for more information.
>>> import lightgbm
>>> exit()
(myvenv) b-an01 [~]$

(myvenv) b-an01 [~]$ deactivate
b-an01 [~]$
Virtualenv
How to use Virtualenv with HPC2N Python modules:
-
Virtualenv is installed with each of the loadable Python modules and is accessible after the Python module is loaded. It is highly recommended to use these versions of Virtualenv instead of installing yourself.
-
First load the module containing the Python version that you want to use, see the section on the module system if you are unfamiliar with it.
-
It is advisable to also load any modules that provide any requirements for the python module you are going to install, this includes python-module requirements, like numpy/scipy (from SciPy-bundle) and many others.
-
Using “
ml spider python-module-name” will show if there is one installed at all, if there is one but not for the Python version you want to use, ask support@hpc2n.umu.se to install it, specifying which module and for which Python version.
Working with Virtualenv
- Now (after loading the Python module) you want to create your first virtual environment. Here I call it ‘vpyenv’, and put it in your Public, but you can call it anything, of course.
- Run the following to initialize the environment:
virtualenv --system-site-packages $HOME/Public/vpyenv - Installing modules in Virtualenv:
- In order to install Python modules in the environment, you first need to activate it. Change directory to the environment you created before, and run:
source bin/activate - You can deactivate it with
deactivate
- In order to install Python modules in the environment, you first need to activate it. Change directory to the environment you created before, and run:
- It will now look like this (remember I called my environment ‘vpyenv’, and put it in my Public directory):
(vpyenv)t-mn01 [~/Public/vpyenv]$ - Load any modules that contain pre-installed dependencies for your software.
- You can also save that set of modules as a collection to make it easy to use the virtual environment later. You do that with
ml save mymodulecollection.
- You can also save that set of modules as a collection to make it easy to use the virtual environment later. You do that with
- You can now install python modules like this (example,
spacy):
pip install --no-cache-dir --no-build-isolation spacy - The package will be downloaded and installed.
- The
“--no-cache-dir”option is required to avoid it from reusing earlier installations from the same user in a different environment. - The
“--no-build-isolation”is to make sure that it uses the loaded modules from the module system when building any Cython libraries.
- The
Installing with setup.py
Aside from building and installing, you will usually need to set the correct environment before you can use the python package. There may be specifics to building a certain package (including dependencies or possibly running a configuration script), so you should always check if there is an INSTALL or README file included with the package.
General example
- Download the python module and untar it.
- Load any site modules needed (OpenMPI, Lapack, BLAS…). You should use the gcc-versions if such exist.
- Also load any python-module requirements as per point 3 under “Accessing Virtualenv” above.
- cd into the python package source directory and run:
python setup.py build - Install the python package. A good choice is to install the python module(s) in
/proj/nobackup/YOUR-STORAGE-DIR/python-packages, that way they are easy to keep track of:
python setup.py install --prefix=PATH/TO/YOUR/INSTALLDIR - Add this line to your
~/.bashrc(change as needed - set to where you have installed the module):
export PYTHONPATH=$PYTHONPATH:PATH/TO/YOUR/INSTALLDIR/lib/python3.11/site-packages
NOTE that the version of Python will change the location, as you see above. - Check the installation. You need to first open a new shell. Then launch python and type:
import PYTHONPACKAGE.