Connection guides
This guide will show you how to connect to Kebnekaise’s login nodes, with specifics dependent on the operating system you are using.
There are several ways to connect:
- Through ThinLinc (client and web)
- Through Open OnDemand
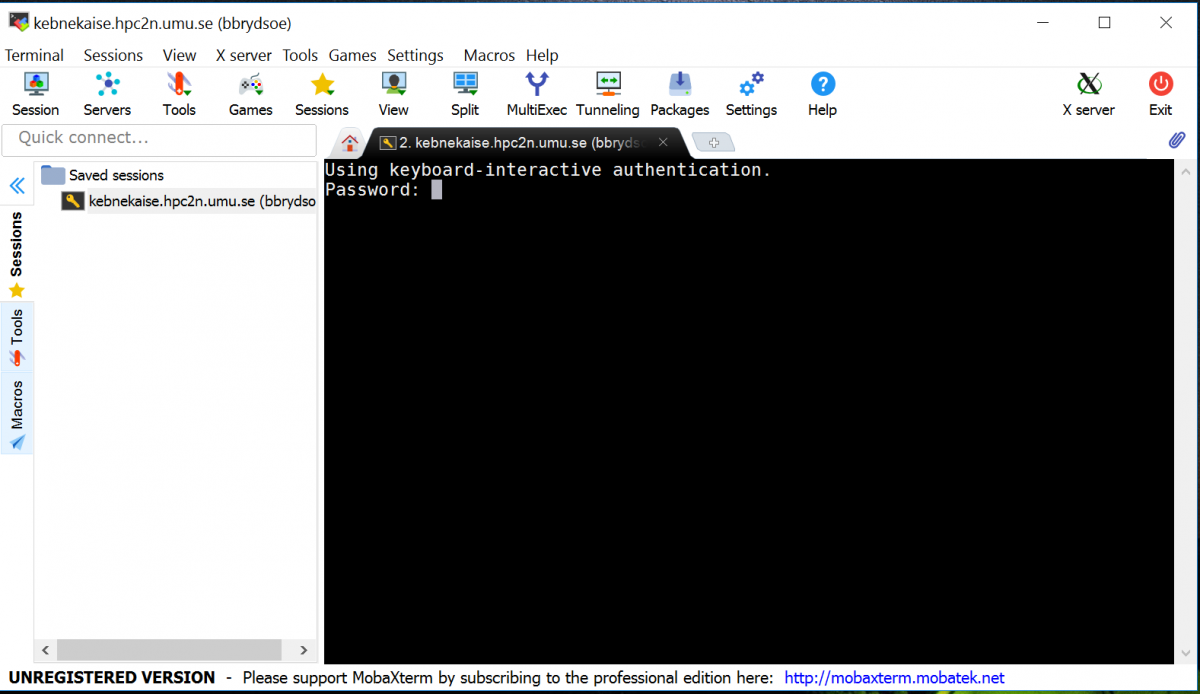
- Through regular SSH (Windows) (macOS) (Linux/Unix)
The two former are best if you want a graphical interface, while the latter is best for text-based interaction.
Login nodes
Since Kebnekaise is a heterogenous system, the different architectures often have different software (versions). In order to see what is available, and to compile for the correct architecture, there are a few login nodes available.
In addition, there are different login nodes for regular SSH and for access through ThinLinc.
Kebnekaise main SSH login node
Kebnekaise ThinLinc login node
Kebnekaise AMD Zen3 login node
Kebnekaise ThinLinc AMD Zen3 login node
URL for Open OnDemand
ThinLinc can be used as a stand-alone client and through a web browser. See below for details.
Note
Remember that the accounts at HPC2N and SUPR are separate. In the welcome mail you got when your HPC2N account was created there was a link to create a first, temporary password. When you have logged in using that, please change the password.
ThinLinc
ThinLinc is a cross-platform remote desktop server developed by Cendio AB. You can access Kebnekaise through ThinLinc.
ThinLinc is especially useful when you need to use software with a graphical interface, like INTEL VTune or MATLAB. Look at our MATLAB page for information about running MATLAB.
ThinLinc can be used as a standalone application and also through a browser with the Web Access desktop.
ThinLinc standalone client
The full capabilities of ThinLinc can be obtained with the standalone version. Here, you need to follow the next steps for installing ThinLinc.
Download and Install instructions
Download the ThinLinc client from https://www.cendio.com/thinlinc/downloadto your own workstation/laptop and install it.
Login to cluster login node
- Start the ThinLinc client (ThinLinc client, tlclient depending on your platform)
- Enter the name of the server: kebnekaise-tl.hpc2n.umu.se and then enter your own username at HPC2N under “Username”:
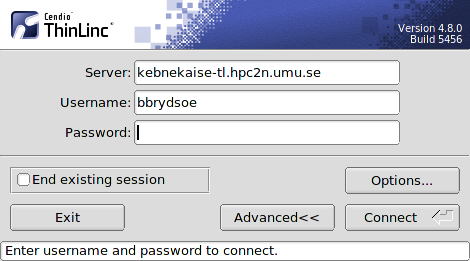
- If you don’t see the Options button, click on Advanced
- Go to “Options” -> “Security” and check that authentication method is set to “password”.
- Go to “Options” -> “Display” and mark “Windowed”
- Go to “Options” -> “Local Devices” and uncheck Sound, Serial ports, Drives, Printer, Smart card readers
- Enter your HPC2N password.
- Click “Connect”
- Click “Continue” when you are being told that “the server’s host key is not in the registry”.
- After a short time, the ThinLinc desktop opens, running Mate. It is fairly similar to the Gnome desktop.
- All your files on HPC2N should now be available.
Web Access desktop
On your local web browser, enter https://kebnekaise-tl.hpc2n.umu.se:300/ in the address bar. This will display the login box:
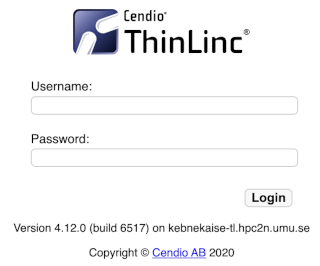
Here, you can type the username and password for HPC2N. This web browser version can be handy to get started with ThinLinc or if you do not want to install another software in your machine. Also, if you are working mainly with a tablet.
Note
Some things you need to keep in mind with this version:

- direct copy and paste does not work. One can use the clipboard at the bottom (enclosed in a red square) of the Toolbar that appear on a side of the browser session (see picture)
- features like multiple sessions are not fully supported
- In addition to this, some key bindings are not supported. Workarounds for this and more information on the ThinLinc Web Access can be found in the ThinLinc documentation: https://www.cendio.com/resources/docs/tag/tlwebaccess_usage.html
General ThinLinc usage (both versions)
Opening a Linux terminal in the ThinLinc desktop
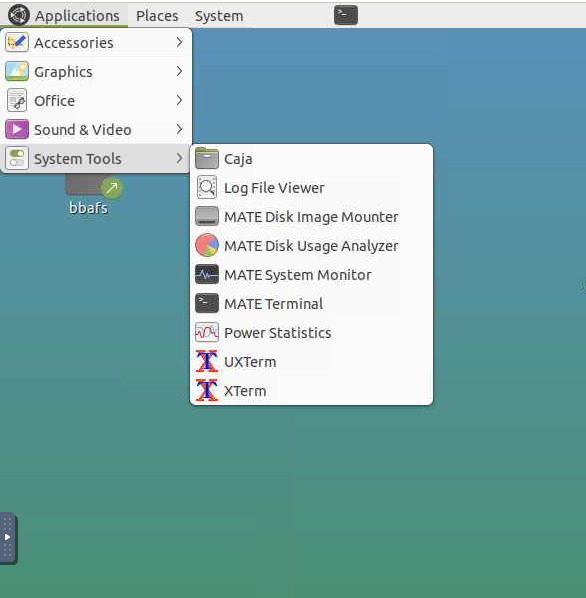
To start a terminal window, go to the menu at the top. Click “Applications” → “System Tools” → “MATE Terminal”.
Disconnect or logout from the ThinLinc desktop
When you want to shutdown the ThinLinc connection, this can be done in two ways, either Disconnect or Logout.
- Disconnect
- Keeps your thinlinc session running on the login node, making it possible for you to return to the same spot when you reconnect.
- Only use this when you are actively working in e.g. Matlab over a few days, otherwise use “Logout”. Doing this keeps the login node quick and fast for active users.
- Note! Always save your work before leaving since the login nodes will reboot now and then due to OS and security updates.
- The following two ways are equivalent, both uses the top menu bar. Use one of them
- “Applications” → “HPC2N” → “Disconnect ThinLinc Session”
- “The blueish HPC2N icon to the right” → “Disconnect ThinLinc Session”
- In the Web Access version, there is a button in the Toolbar to disconnect the session
- Keeps your thinlinc session running on the login node, making it possible for you to return to the same spot when you reconnect.
- Logout
- Will terminate your ThinLinc session on the login node.
- Note! This does not affect any jobs in the batch queue or jobs running on the cluster, and any finished jobs will be available when you login again.
- The following two ways are equivalent, both uses the top menu bar. Use one of them
- “Applications” → “HPC2N” → “Logout ThinLinc Session”
- “The blueish HPC2N icon to the right” → “Logout ThinLinc Session”
Reconnecting to an older ThinLinc session
If you have a running ThinLinc session (that you disconnected from) and there is a problem with the ThinLinc session when you connect again. The best way to solve this is to:
- Logout from the current ThinLinc session
- Open the client or the Web Access desktop again, but this time specify “End existing session” in the dialog or through the command options.
- Do the final step and login
Open OnDemand
Open OnDemand is a web service that allows HPC users to schedule jobs, run notebooks and work interactively on a remote cluster from any device that supports a modern browser. The Open OnDemand project was funded by NSF and is currently maintained by the Ohio SuperComputing Centre. Read more about OpenOndemand.org.
There is a YouTube video covering parts of this documentation as well. You can find it here: How to use OpenOnDemand to connect to HPC2N’s Kebnekaise cluster.
Access
- In order to access the HPC2N OnDemand Web Portal, point your browser to
The page will look something like this
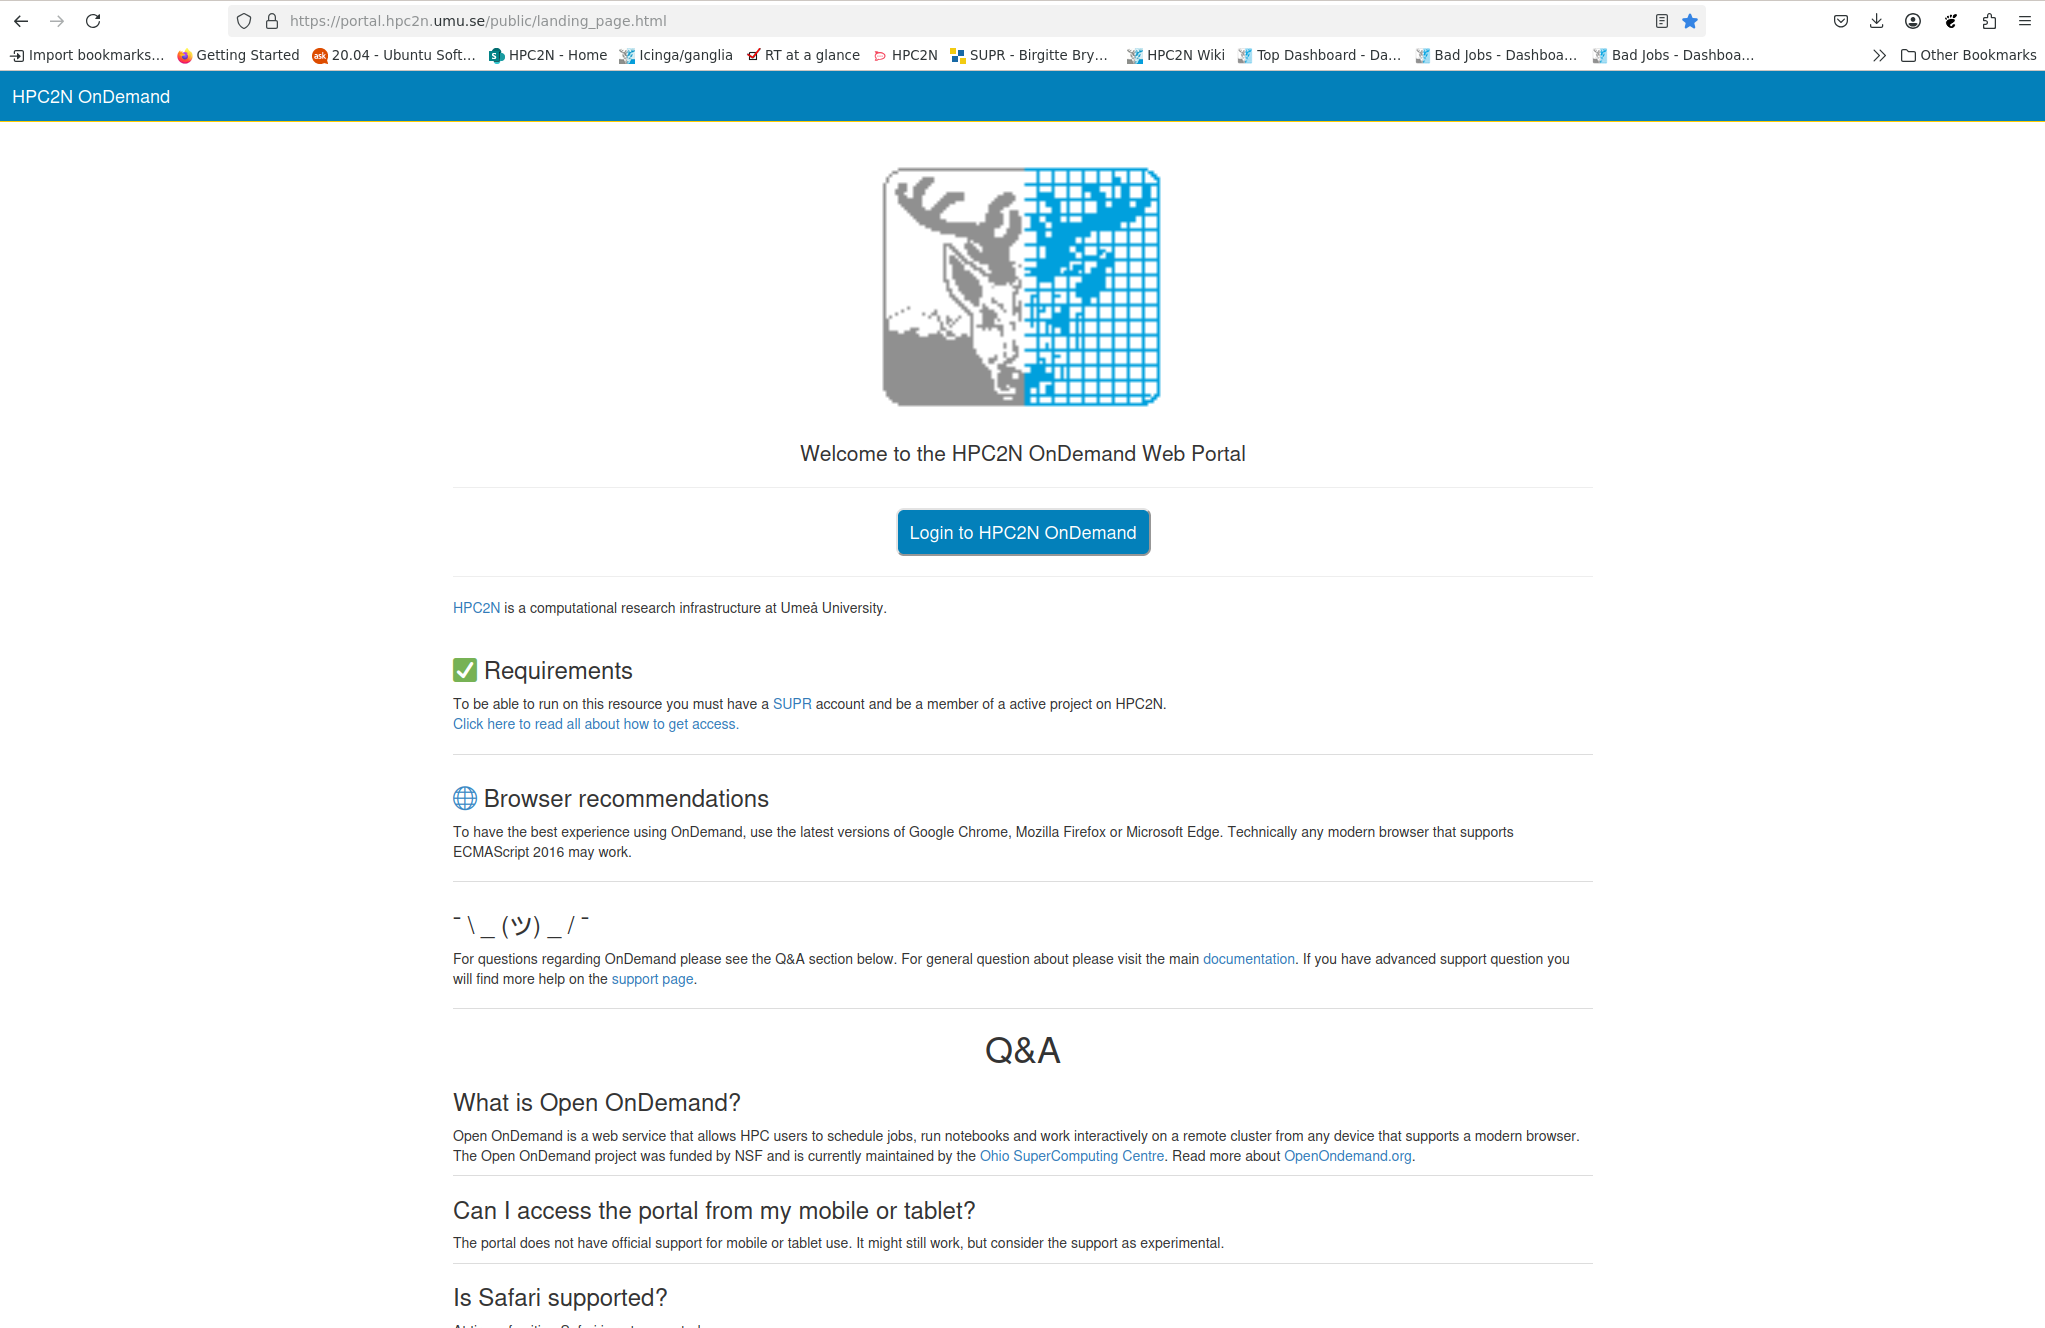
- Click the blue button labeled “Login to HPC2N OnDemand”
- You are sent to the login window. Put your HPC2N username and password, then click “Sign In”
- You will now be on the HPC2N Open OnDemand dashboard. The top of it looks like this:

Overview - dashboard
Looking at the top of the HPC2N Open OnDemand dashboard
you find several menu points:
- Files: Links to a file browser that starts in either your home directory or in (one of) your project storage directories
- Jobs: Links to a list of your “Active Jobs” and to a “Job Composer” to create new jobs
- Clusters: the submenu is for shell access (does not currently work)
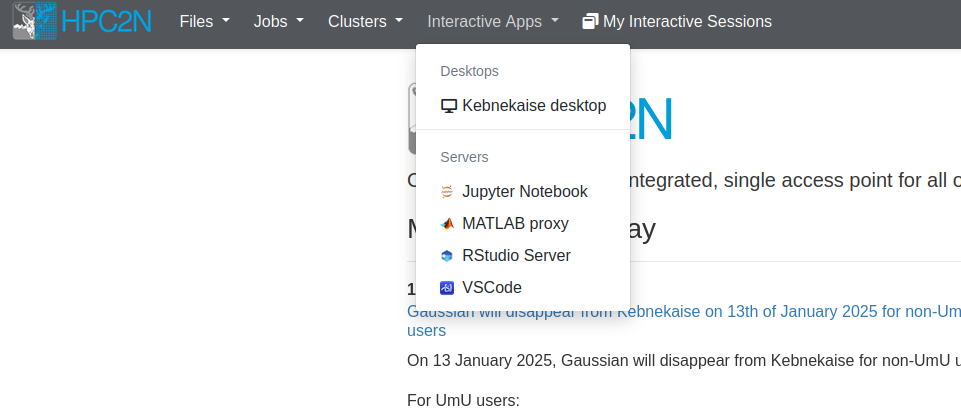
- Interactive Apps: a list of apps that can be started directly from the dashboard (currently Jupyter, MATLAB, RStudio, VSCode)
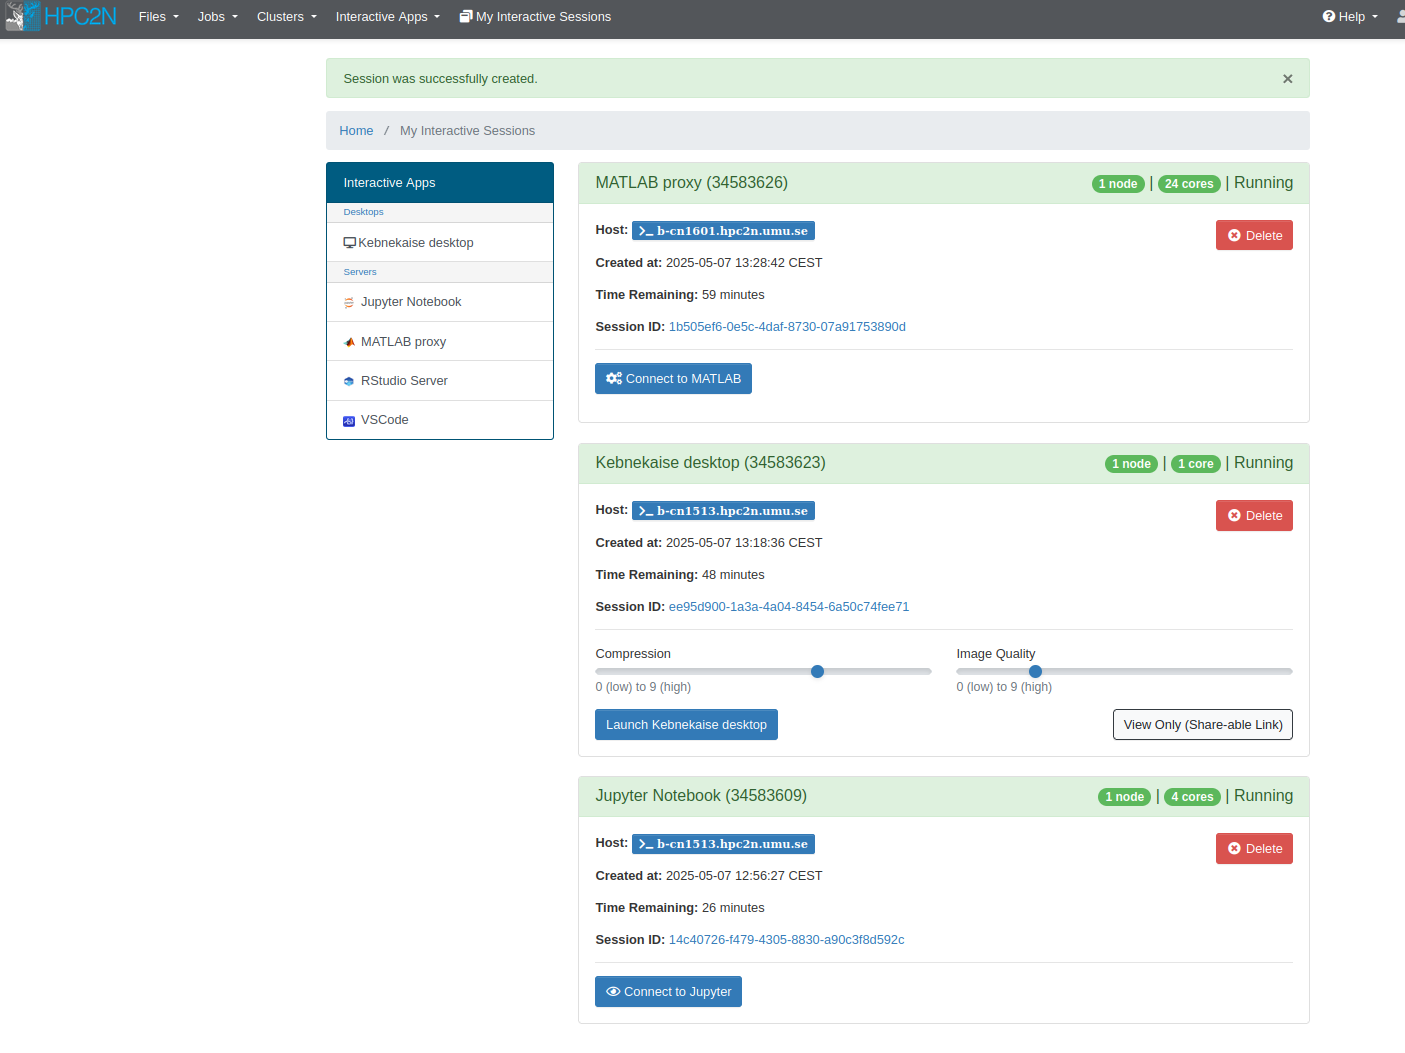
- My Interactive Sessions: here you find your active interactive sessions, for instance Jupyter, MATLAB, etc. You can enter them again as long as they are active, and you can delete them. It could look like this if you have active sessions of MATLAB, the Kebnekaise desktop, and Jupyter notebook:
- as well as a logout button to the right in the menu.
Now let us look a little closer at how to use the various Interactive Apps in the Open OnDemand desktop. Right now there are: Kebnekaise desktop, Jupyter notebook, MATLAB, RStudio, and VS Code, but that may change in the future.
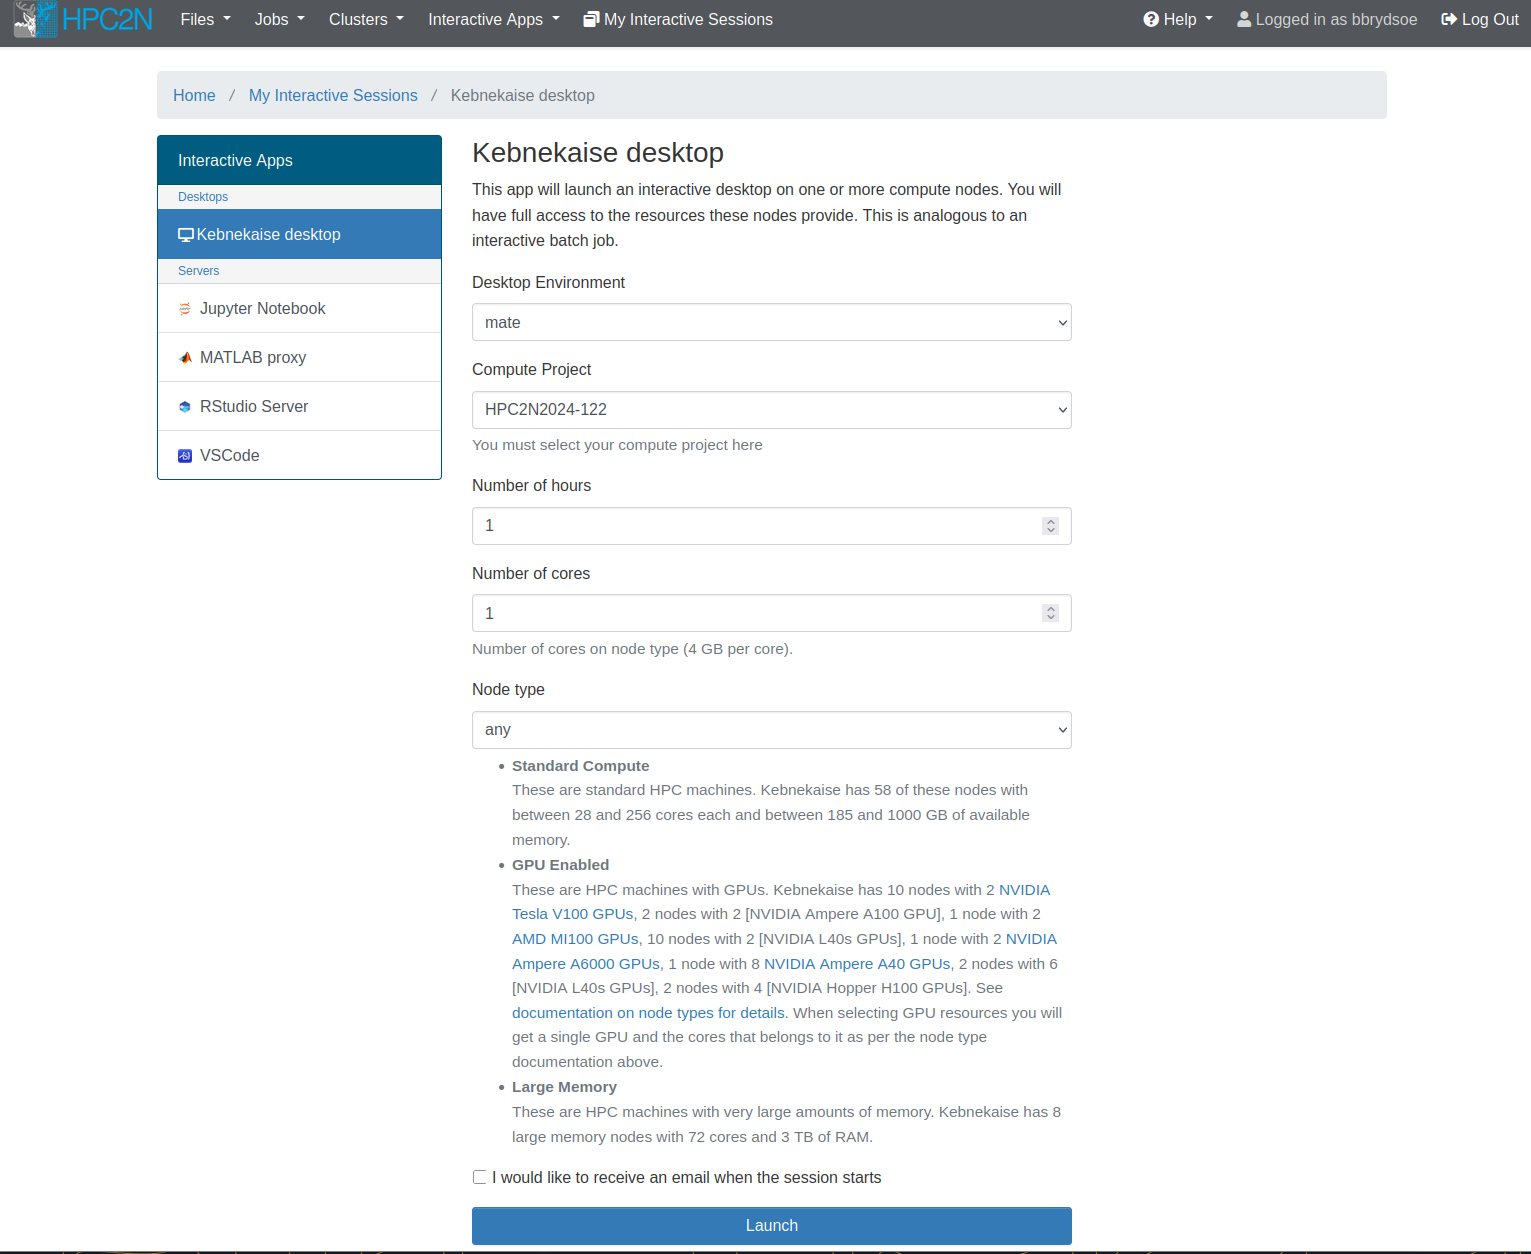
Interactive Apps - Kebnekaise desktop
This is the first submenu point, under “Interactive Apps” -> “Desktops”. After clicking it, you will after a few moments get this:
Note
This is used to start a desktop on one of the compute nodes after you have allocated resources.
This means you will be able to work as if on that node. That means that anything you run from the desktop immediately runs on the allocated resources, without you having to start (another) job.
Very useful if you want to work interactively with one of the installed pieces of software or your own code.
In addition to starting programs from the terminal, there are various applications available directly from the menu, like Libreoffice and Firefox.
Let us look at the options for launching this, one by one:
- Desktop Environment: Here you can choose either “mate” (resembles Gnome 2/classic) or “xfce” (lightweight and fast). Personal preferrence.
- Compute Project: Dropdown menu where you can choose (one of) your compute projects to launch with.
- Number of hours: How long you want the job available for. Here you can choose 1-12 hours, but beware that it is a bad idea to pick longer than you need. Not only will it take longer to start, but it will also use up your allocation even if you are not actively doing anything on the desktop. Pick as long as you need to do your job.
- Number of cores: How many cores you want access to. You can choose 1-28 and they each have 4GB memory. This is only a valid field to choose if you pick “any” or “Large memory” for the “Node type” selection.
- Node type: Here you can choose “any”, “any GPU”, or “Large memory”. If you pick “any GPU” you will not pick anything for “Number of cores”.
You can tick the box “I would like to receive an email when the session starts” if you want that. Depending on your choices (mainly number of hours and number of cores), it can take longer or shorter to launch your job.
Note that you cannot choose type of CPU or type of GPU here.
After you have made the choices, click “Launch”.
You can find all the active sessions under “My Interactive Sessions” and you can shut one down with “Delete”. You can also shut it down from inside the desktop.
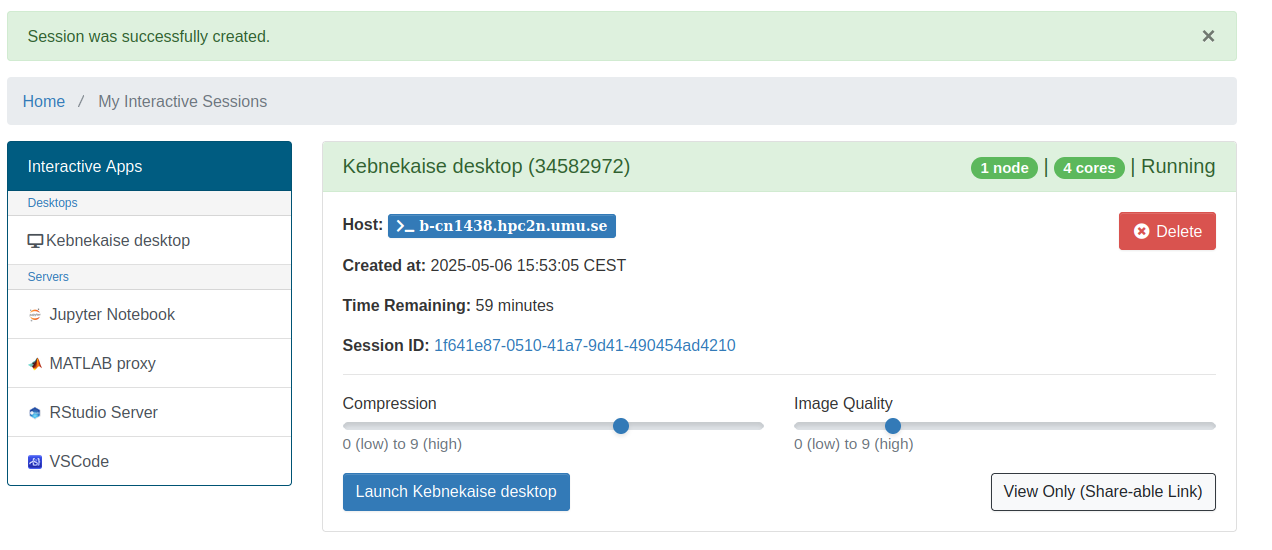
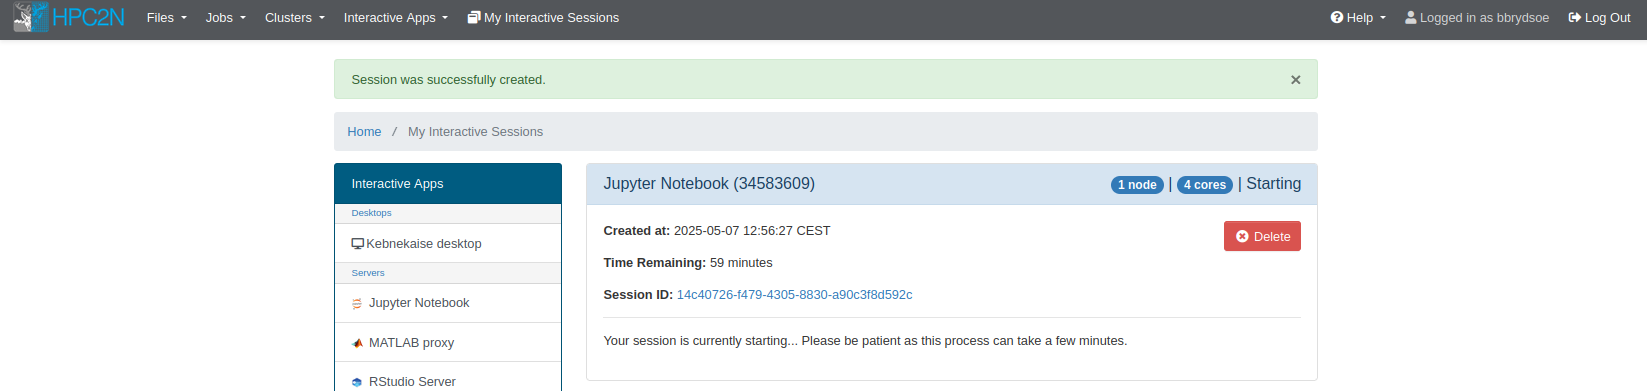
Example
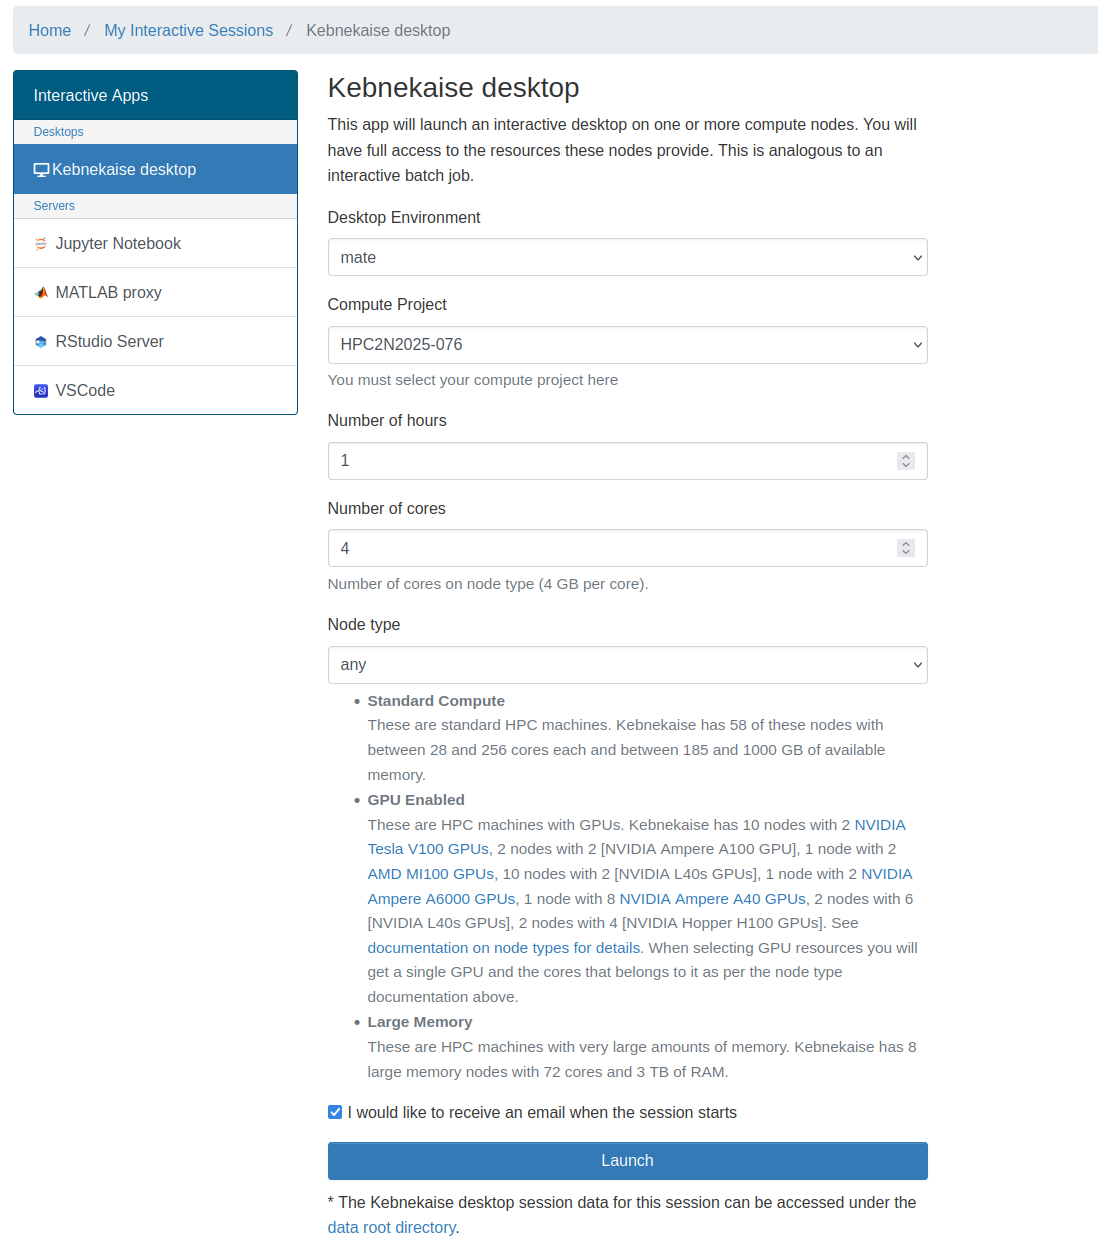
In this example we start a desktop for 1 hour, and with 4 cores.
Filling options
This is how it could look, for 1 hour, 4 cores
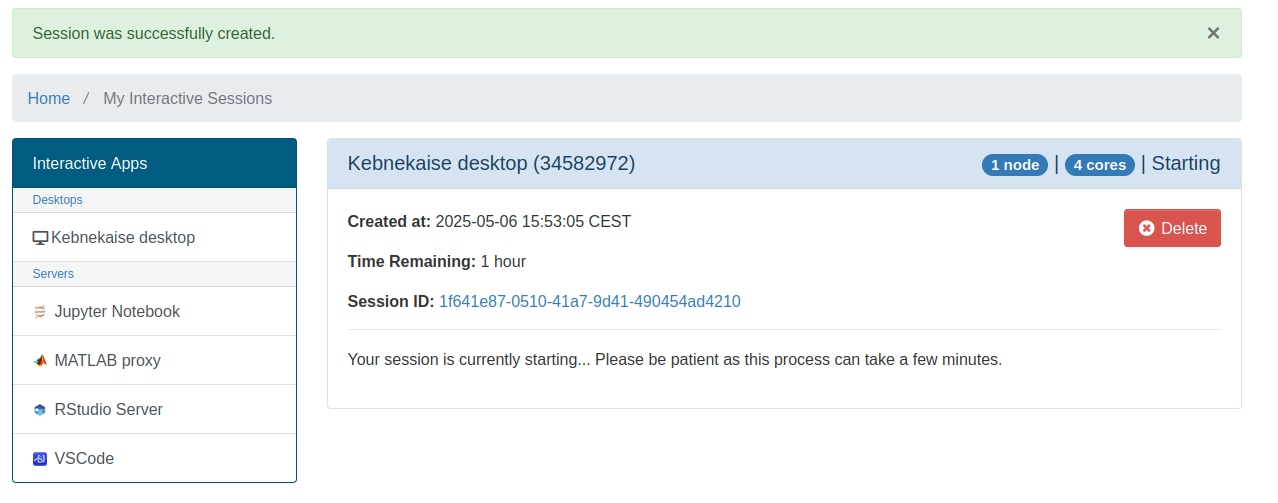
Waiting to launch
Then, this is how it looks while it is waiting to start/sitting in queue
Ready
Then, when the resources have been allocated and you can go to the desktop
Desktop - mate
This is how the desktop could look, running “mate” desktop environment

When you have a desktop open on the allocated resources, you have the option to run
- one of the applications that can be launched from the menu
- Libreoffice
- Firefox
- editors
- a terminal/shell to load modules and start programs
- a terminal/shell where you can
- run your own code
- load modules and run installed software
Start a terminal to run something
You can now work as normal, from a desktop on the resources you allocated. Anything you run there will run on those resources, and they are available for the time you asked for.
To start a terminal, for instance, you find “MATE terminal” in the menu:
Since we have 4 cores allocated, let us try run something on them.
Let us first see that we did get the four cores:
b-cn1517 [~]$ srun /bin/hostname
b-cn1517.hpc2n.umu.se
b-cn1517.hpc2n.umu.se
b-cn1517.hpc2n.umu.se
b-cn1517.hpc2n.umu.se
I will run this Python script as a test: mmmult.py.
First I load some modules:
b-cn1517 [~]$ module load GCC/12.3.0
b-cn1517 [~]$ module load Python/3.11.3
b-cn1517 [~]$ module load SciPy-bundle/2023.07
Now let us run mmmult.py
b-cn1517 [~]$ python mmmult.py
This is matrix A:
 [[ 2318  1636 -2882 ...  -227 -3924  1979]
 [ 3069   435  3025 ...   728  3257 -2446]
 [ 1890 -2961  3835 ... -3071 -2949  -214]
 ...
 [ 3227 -3088  3030 ...  3213  1721 -1234]
 [-3966 -1899  3627 ...  2835  -526  3421]
 [ -805  1987 -3289 ...  2178 -3185  -765]]
The shape of matrix A is  (1024, 512)

This is matrix B:
 [[-2136  -595 -3375 ...  -655  -509  3732]
 [ 1491  1187   835 ...  2665  -306  -807]
 [ -416   258  -990 ...  -600  1960  2774]
 ...
 [-1003  3205  2598 ... -1636    19 -2998]
 [-3700 -2150 -1159 ... -2486  3687  2903]
 [-3218 -2997  2757 ... -3529   313  2796]]
The shape of matrix B is  (512, 512)

Doing matrix-matrix multiplication...

The product of matrices A and B is:
 [[  49486980  103461814 -117631503 ... -108846834   41010684 -139620836]
 [ -96734464  161139192  134600312 ...   99850009   21346359   41858142]
 [  11259501  168047528  -32237508 ... -110635619  129483079 -303047294]
 ...
 [-168782795 -187369405   80437659 ...   55378363   50071222  -81638625]
 [ 289552718  -20697142  -28517135 ...  113819387  148940233  151167784]
 [ -23002353  -27489963  -96396293 ... -182708952 -198664534  146521479]]
The shape of the resulting matrix is  (1024, 512)

Time elapsed for generating matrices and multiplying them is  0.8399104890413582
For this example I need some modules:
b-cn1517 [~]$ module load GCC/12.3.0
b-cn1517 [~]$ module load Python/3.11.3
b-cn1517 [~]$ module load SciPy-bundle/2023.07
b-cn1517 [~]$ module load GCC/12.3.0
b-cn1517 [~]$ module load Python/3.11.3
b-cn1517 [~]$ module load SciPy-bundle/2023.07
b-cn1517 [~]$ module load GCC/12.3.0
b-cn1517 [~]$ module load matplotlib/3.7.2
b-cn1517 [~]$ module load Tkinter/3.11.3
Now let us start Python and plot something, using this dataset (scottish_hills.csv:
import pandas as pd
import matplotlib
import matplotlib.pyplot as plt
matplotlib.use('TkAgg')
dataframe = pd.read_csv("scottish_hills.csv")
x = dataframe.Height
y = dataframe.Latitude
plt.scatter(x, y)
plt.show()
Which looks like this:
To compare, I started a job and asked for 1 core. I then ran the same Python script, after loading modules and checking I got 1 core (the type of node is the same in both cases: Intel Skylake):
b-cn1420 [~]$ module load GCC/12.3.0
b-cn1420 [~]$ module load Python/3.11.3
b-cn1420 [~]$ module load SciPy-bundle/2023.07
b-cn1420 [~]$ srun /bin/hostname
b-cn1420.hpc2n.umu.se
b-cn1420 [~]$ python mmmult.py
This is matrix A:
 [[ 2318  1636 -2882 ...  -227 -3924  1979]
 [ 3069   435  3025 ...   728  3257 -2446]
 [ 1890 -2961  3835 ... -3071 -2949  -214]
 ...
 [ 3227 -3088  3030 ...  3213  1721 -1234]
 [-3966 -1899  3627 ...  2835  -526  3421]
 [ -805  1987 -3289 ...  2178 -3185  -765]]
The shape of matrix A is  (1024, 512)

This is matrix B:
 [[-2136  -595 -3375 ...  -655  -509  3732]
 [ 1491  1187   835 ...  2665  -306  -807]
 [ -416   258  -990 ...  -600  1960  2774]
 ...
 [-1003  3205  2598 ... -1636    19 -2998]
 [-3700 -2150 -1159 ... -2486  3687  2903]
 [-3218 -2997  2757 ... -3529   313  2796]]
The shape of matrix B is  (512, 512)

Doing matrix-matrix multiplication...

The product of matrices A and B is:
 [[  49486980  103461814 -117631503 ... -108846834   41010684 -139620836]
 [ -96734464  161139192  134600312 ...   99850009   21346359   41858142]         [  11259501  168047528  -32237508 ... -110635619  129483079 -303047294]
 ...
 [-168782795 -187369405   80437659 ...   55378363   50071222  -81638625]
 [ 289552718  -20697142  -28517135 ...  113819387  148940233  151167784]
 [ -23002353  -27489963  -96396293 ... -182708952 -198664534  146521479]]
The shape of the resulting matrix is  (1024, 512)

Time elapsed for generating matrices and multiplying them is  0.8590587209910154
b-cn1420 [~]$
Ending the session
The session is active for as long as you allocated it for (number of hours), or you can end it earlier if you do not need it longer.
- From the desktop, you can exit it by clicking “System” -> “Log Out
” -
If you left the desktop running, you can enter it again with “Launch Kebnekaise desktop” from the “My Interactive Sessions” menu point.
-
Or you can shut it down by clicking “Delete”
Interactive Apps - Jupyter Notebook
If you choose “Interactive Apps” -> “Jupyter Notebook”, you will get an app that can launch a Jupyter Notebook server on one or more nodes.

Note
This is used to start a Jupyter Notebook on one (or more) of the compute nodes after you have allocated resources.
This means you will be able to work as if on those resources. That means that anything you run from inside the Jupyter notebook immediately runs on the allocated resources, without you having to start (another) job.
Very useful if you want to work interactively.
NOTE: another way to start Jupyter at Kebnekaise is through a batch job inside ThinLinc.
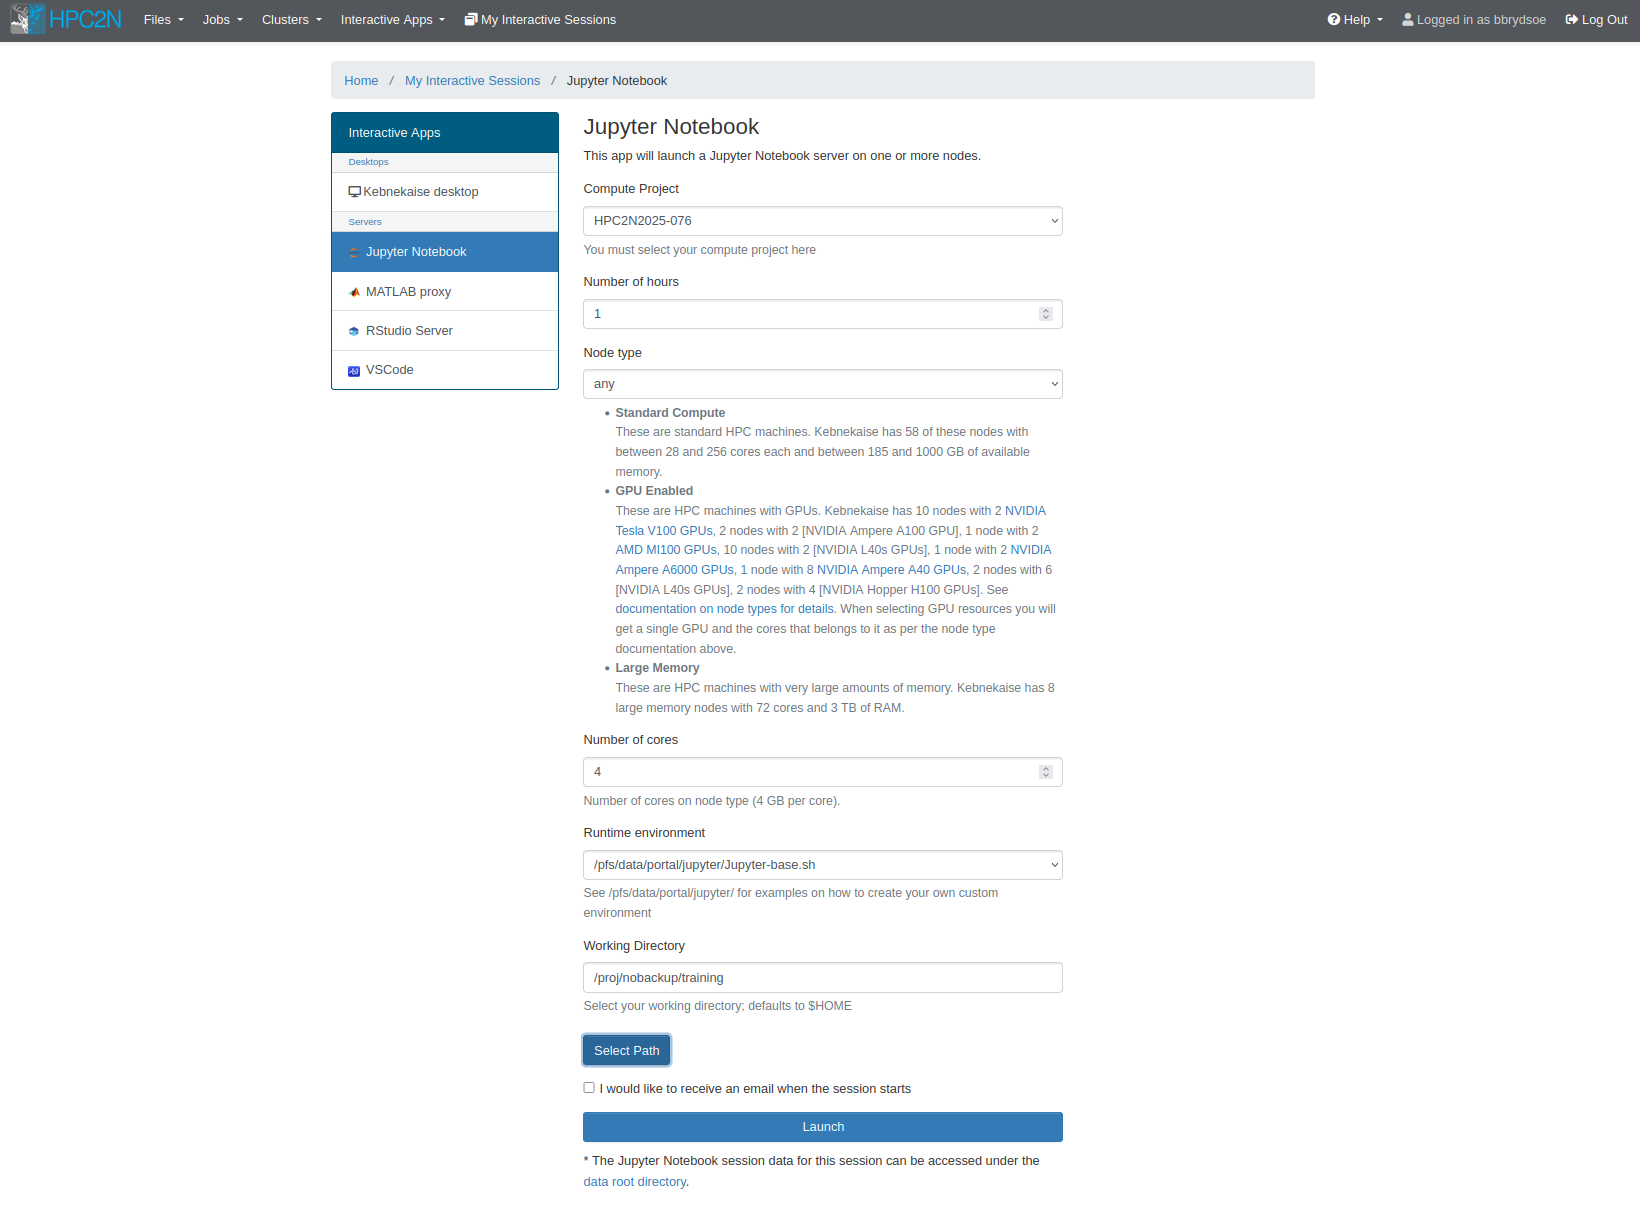
Let us look at the options for launching this, one by one:
- Compute Project: Dropdown menu where you can choose (one of) your compute projects to launch with.
- Number of hours: How long you want the job available for. Here you can choose 1-12 hours, but beware that it is a bad idea to pick longer than you need. Not only will it take longer to start, but it will also use up your allocation even if you are not actively doing anything in Jupyter. Pick as long as you need to do your job.
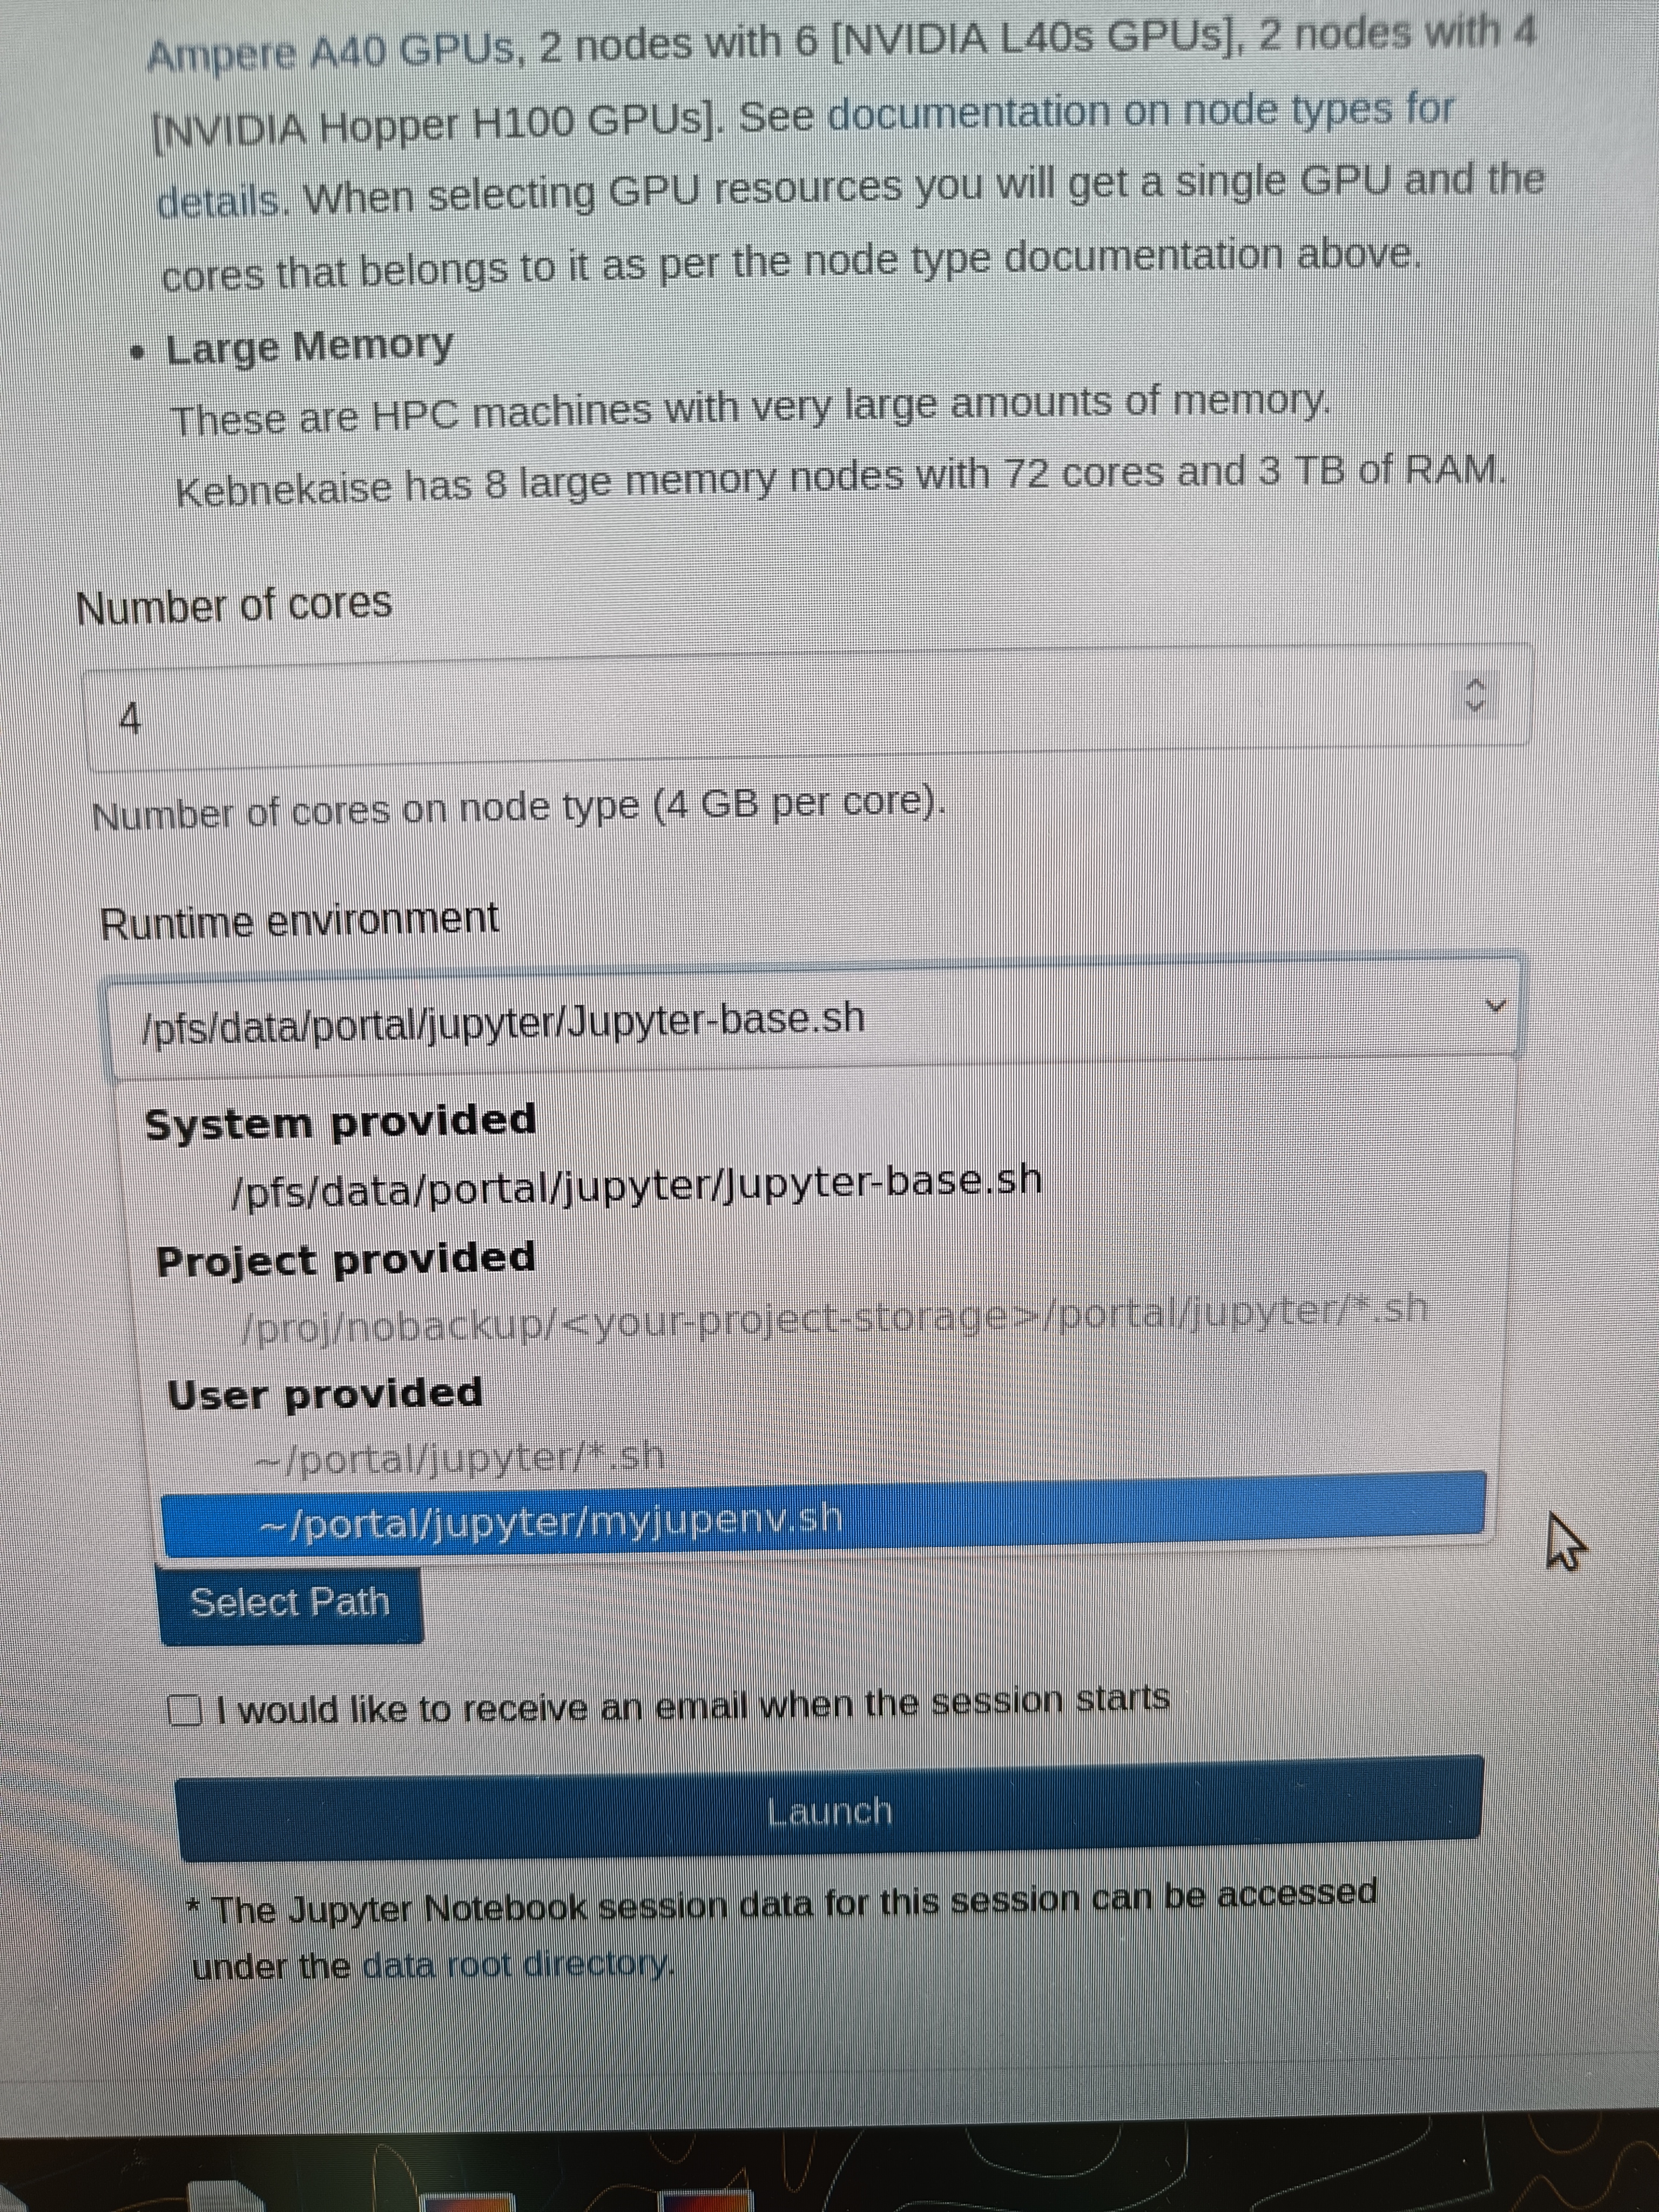
- Node type: “any”, “any GPU”, or “Large memory”. If you pick “any GPU” you cannot also chose “Number of cores”. The other options (for any CPU or for large memory nodes) means you also pick number of cores. Possibe to pick between 1-28.
- Number of cores: This is only shown if you pick “any” or “Large memory” fo r “Node type”. You can pick 1-28 cores.
- Runtime environment: Here you can pick “System provided”, “Project provided”, or “User provided”. If you or your project do not have a custom Jupyter environment (for instance with specific Python packages or such), then just go with the “System provided”. See examples in the directory at the path
/pfs/data/portal/jupyter/for how to create your own. - Working Directory: Pick the working directory to start in. This will be
$HOMEunless you pick something else (for instance, maybe you prefer to start in your project storage directory). You can either type in the path or you can click the button “Select Path” and choose from the directory tree.
You can tick the box “I would like to receive an email when the session starts” if you want that. Depending on your choices (mainly number of hours and number of cores), it can take longer or shorter to launch your job.
Simple example
In this example we start a Jupyter Notebook for 1 hour, and with 4 cores.
Filling options
This is how it could look, for 1 hour, 4 cores. Using the system runtime environment and chosing a project storage directory of mine.
Waiting to launch
Then, this is how it looks while it is waiting to start/sitting in queue
Ready
Then, when the resources have been allocated and you can go to the Jupyter notebook. As you can see, a host node is assigned.

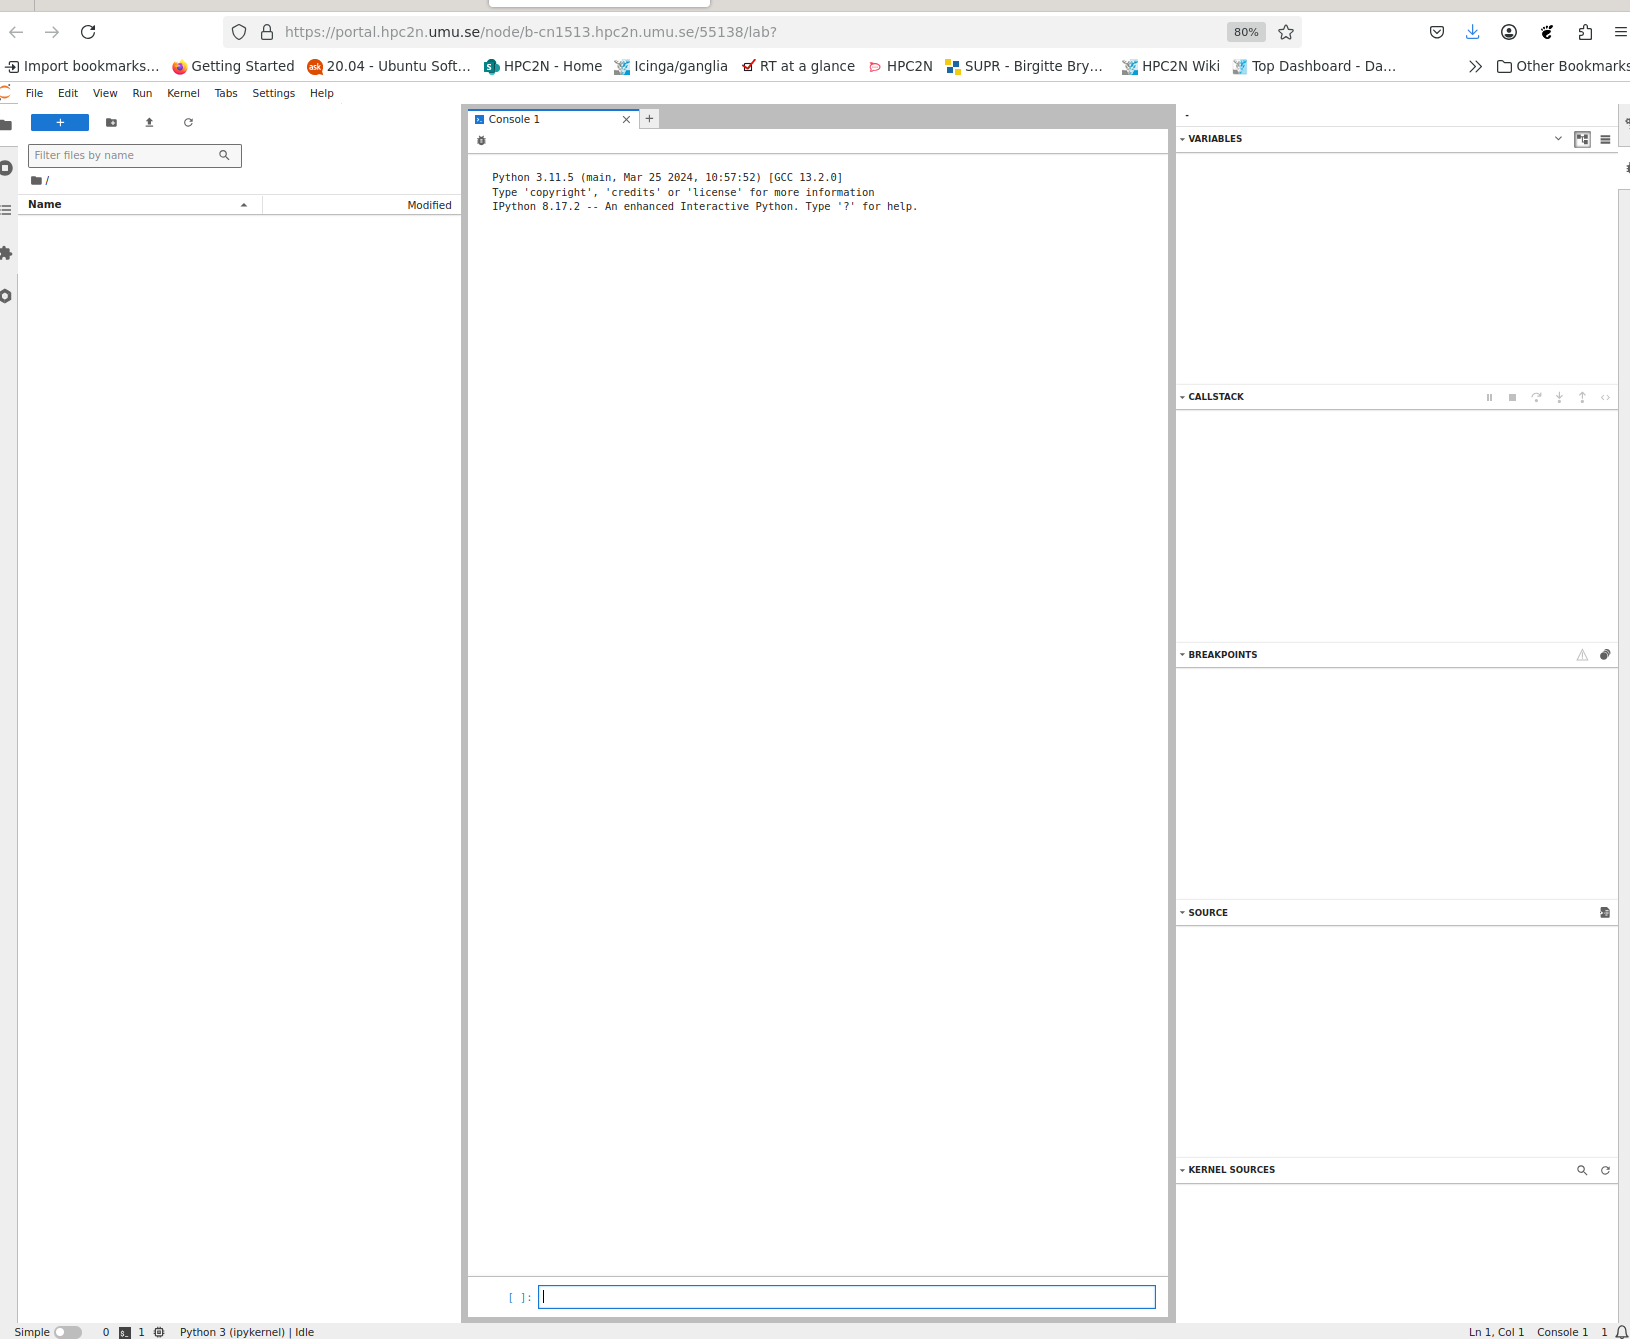
Click “Connect to Jupyter” to go to the notebook.
Go to Jupyter notebook
After connecting, you will have a Jupyter notebook to work in.
NOTE: you may get an error message about “Error Starting Kernel” if you have previously run Jupyter notebook started through a batch job. - If so, then just click OK and then pick the correct kernel from the pop-up box “Select Kernel”. - Most likely the one you want is “Start Other Kernel” -> “Python 3 (ipykernel)”. - Pick that and click “Select”.
Shutting down Jupyter
You will at most keep the connection for as long as you asked for when you launched it.
However, if you want to shut down Jupyter notebook before that, you can choose “File” -> “Shut Down” from the menu.
If you just close the window, then the sessions can be found under “My Interactive Sessions” for as long as you asked for when you started it, and you can re-enter the notebook by just clicking “Connect to Jupyter” again.
Example - Jupyter with extra modules
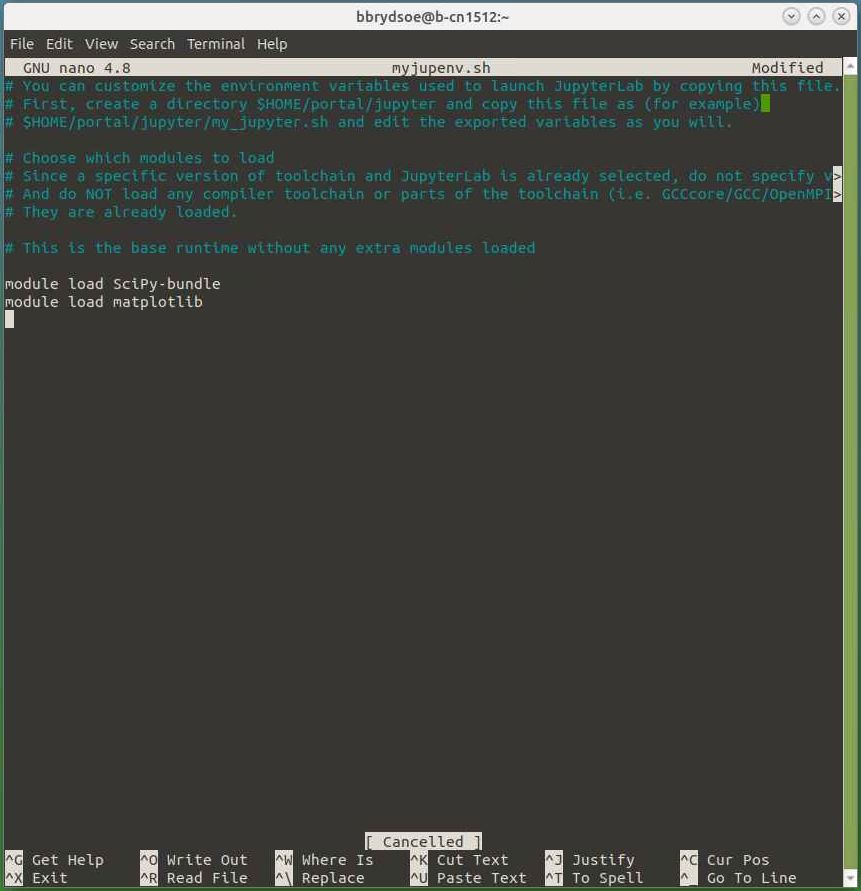
For this example we will create a Jupyter environment with some modules we need, and then use that when we start Jupyter.
- Login to Kebnekaise (either of SSH, ThinLinc, Kebnekaise desktop through Open OnDemand)
- Open a terminal if you did not login with SSH.
- Copy
/pfs/data/portal/jupyter/jupyter-base.shto $HOME/portal/jupyter (and rename it to something easy to remember):mkdir -p $HOME/portal/jupyter;cp /pfs/data/portal/jupyter/jupyter-base.sh $HOME/portal/jupyter/myjupenv.sh - Edit it (with nano for instance) to contain the modules you need. Note a specific Jupyter notebook compatible with Python/3.11.5 is loaded! Do not specify versions here! I will add these:
- SciPy-bundle
- matplotlib
- Now start a new Jupyter Notebook session in Open OnDemand, choosing your own environment:
- When it is ready, connect to Jupyter. Remember: you may get an error message about “Error Starting Kernel” if you have previously run Jupyter notebook started through a batch job.
- If so, then just click OK and then pick the correct kernel from the pop-up box “Select Kernel”.
- Most likely the one you want is “Start Other Kernel” -> “Python 3 (ipykernel)”.
- Pick that and click “Select”.
- You can now run something which requires, say, pandas and matplotlib.
- You can find an example to try (from the “Intro to Pandas” part of the course “Using Python in an HPC environment) here: pandas-example.ipynb. It needs the file exoplanets_5250_EarthUnits.csv in the same directory.
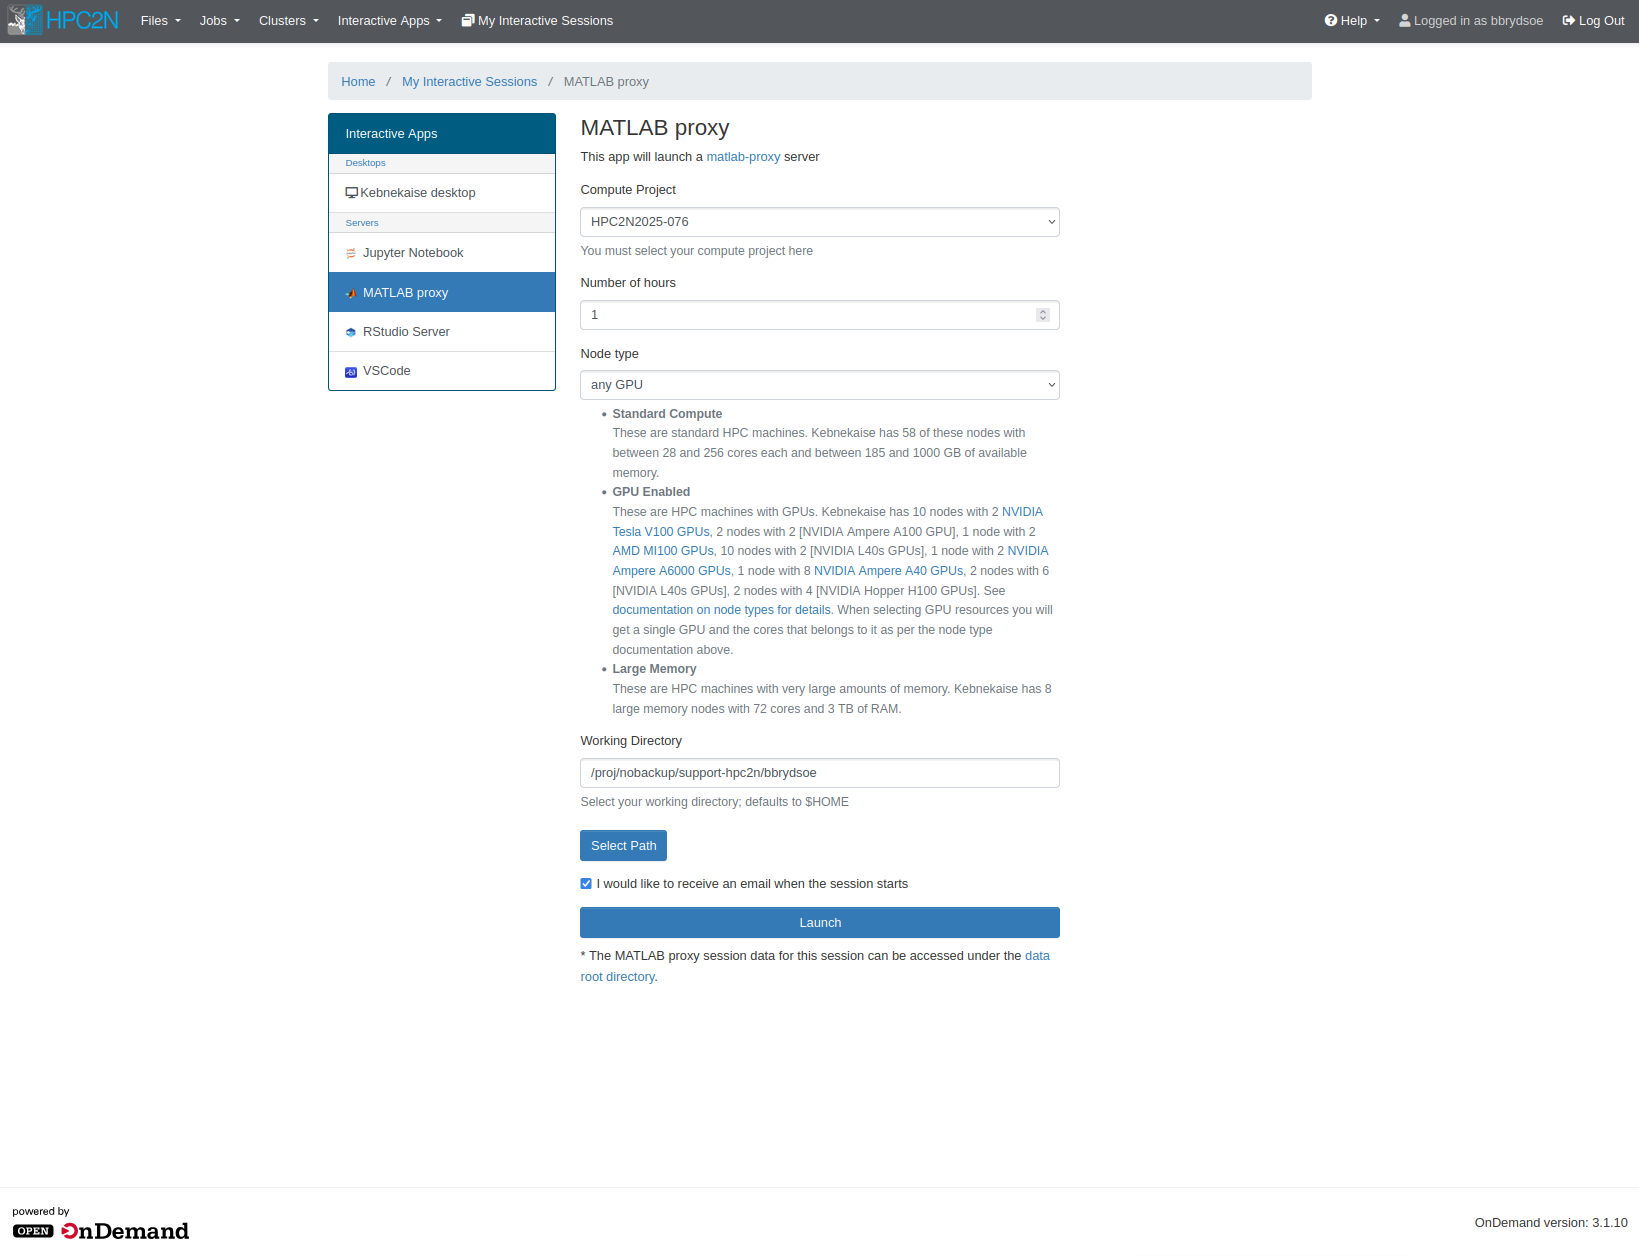
Interactive Apps - MATLAB proxy
If you choose “Interactive Apps” -> “MATLAB proxy”, you will get an app that can launch MATLAB server on one or more nodes.
Note
This is used to start MATLAB on one (or more) of the compute nodes after you have allocated resources.
This means you will be able to work as if on those resources. That means that anything you run from inside this MATLAB immediately runs on the allocated resources, without you having to start (another) job.
Very useful if you want to work interactively.
NOTE: it is also possible to run MATLAB in a shell or from a batch script or the GUI also in ThinLinc.
Let us look at the options for launching this, one by one:
- Compute Project: Dropdown menu where you can choose (one of) your compute projects to launch with.
- Number of hours: How long you want the job available for. Here you can choose 1-12 hours, but beware that it is a bad idea to pick longer than you need. Not only will it take longer to start, but it will also use up your allocation even if you are not actively doing anything in MATLAB. Pick as long as you need to do your job.
- Node type: “any”, “any GPU”, or “Large memory”. If you pick “any GPU” you cannot also chose “Number of cores”. The other options (for any CPU or for large memory nodes) means you also pick number of cores.
- Number of cores: This is only shown if you pick “any” or “Large memory” for “Node type”. You can pick 1-28 cores.
- Working Directory: Pick the working directory to start in. This will be $HOME unless you pick something else (for instance, maybe you prefer to start in your project storage directory). You can either type in the path or you can click the button “Select Path” and choose from the directory tree.
You can tick the box “I would like to receive an email when the session starts” if you want that. Depending on your choices (mainly number of hours and number of cores), it can take longer or shorter to launch your job.
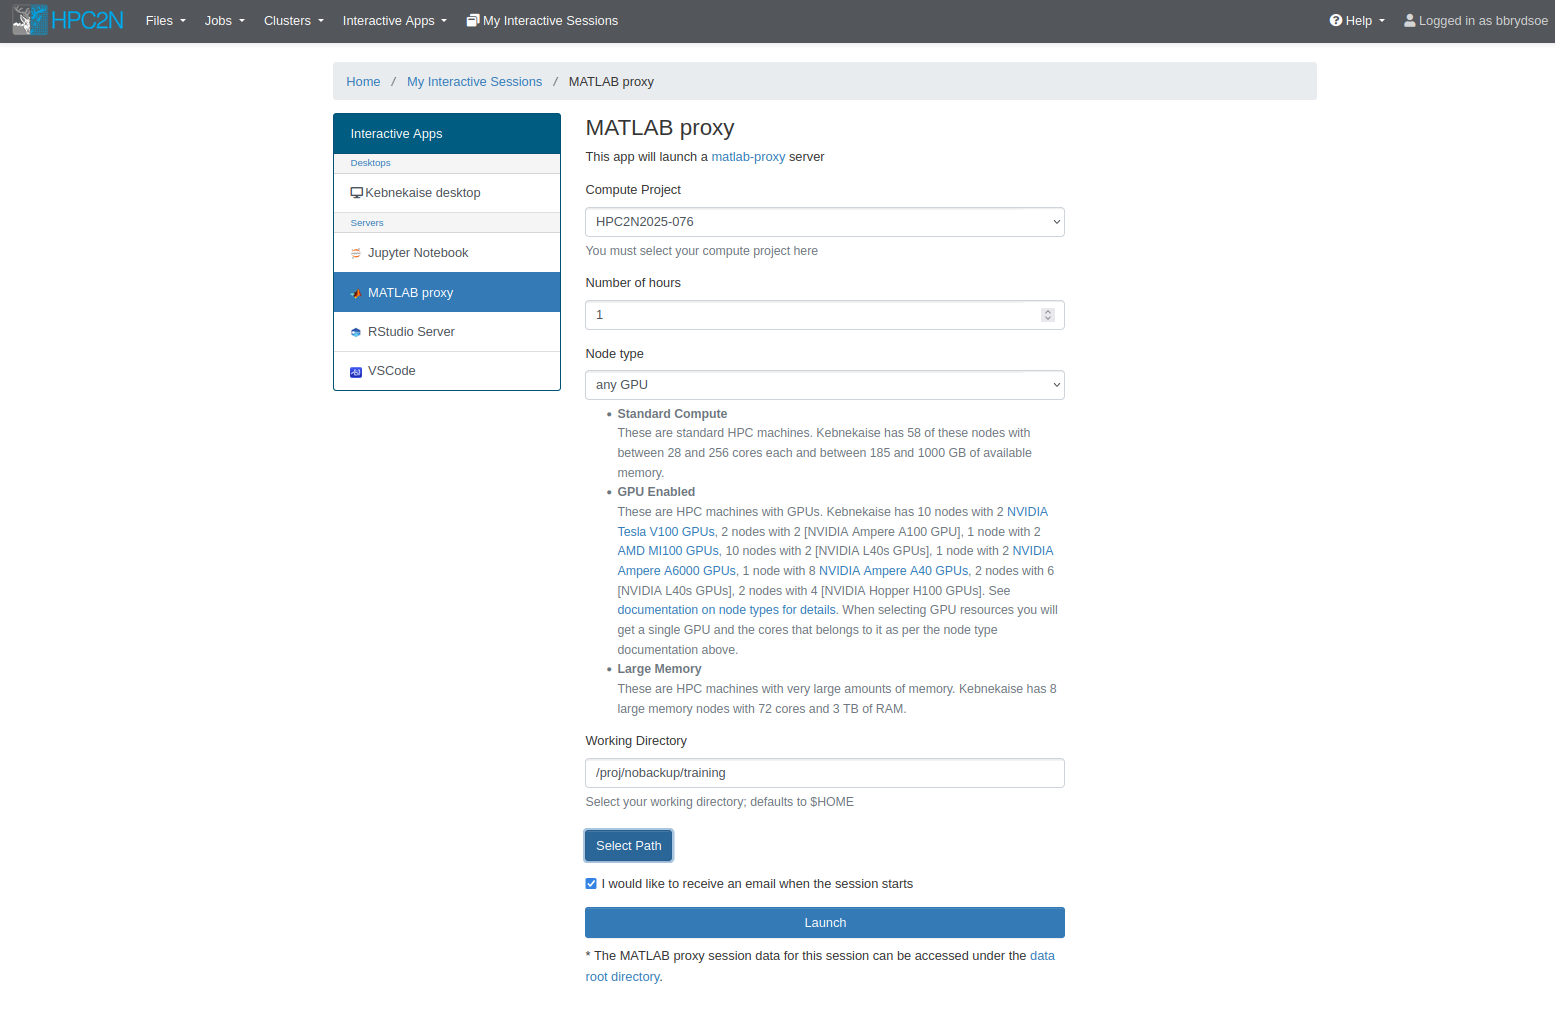
Simple example
In this example we start MATLAB for 1 hour, with 1 GPU.
Filling options
This is how it could look, for 1 hour, 1 GPU. Using a project storage directory of mine.
Waiting to launch
It may then sit in a queue for a time, waiting to launch. Meanwhile, it will show “Your session is currently starting… Please be patient as this process can take a few minutes.”
NOTE that it may instead take several minutes or more to change screen after clicking “Launch” on your options, and then the MATLAB session start immediately after instead.
Ready
Then, when the resources have been allocated and you can go to MATLAB, it will look like this. As you can see, a host node is assigned.
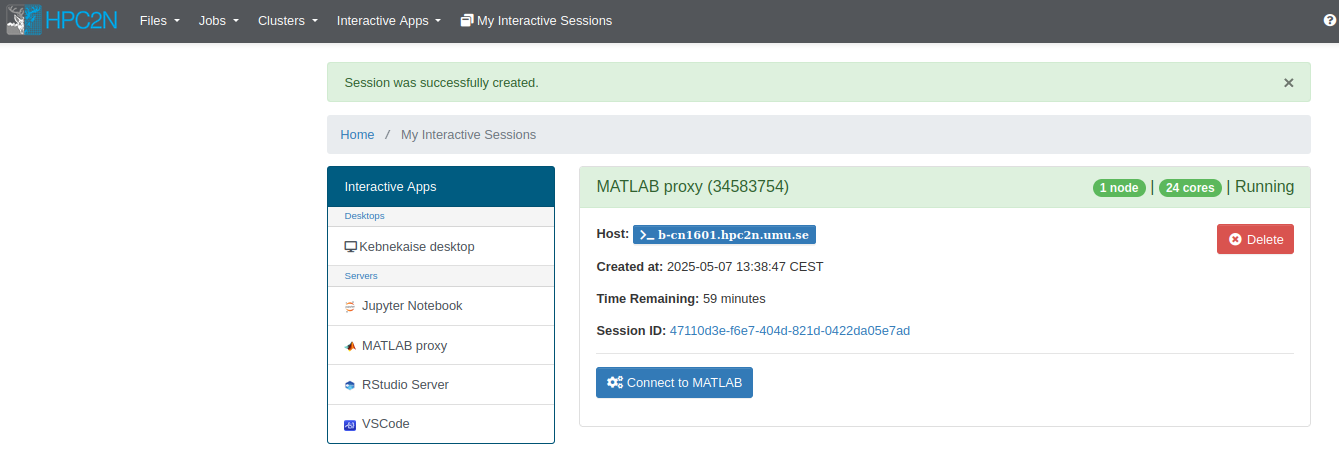
Click “Connect to MATLAB” to go to MATLAB.
Inside MATLAB when running
After connecting, you can work in MATLAB.
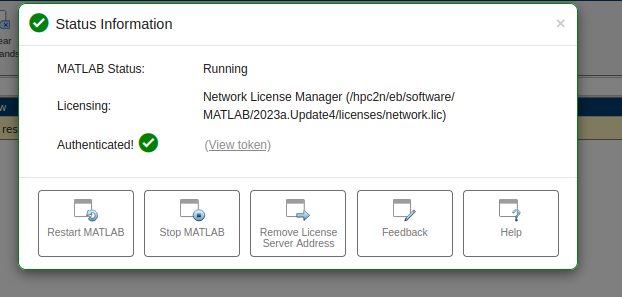
NOTE as you can see there is small control panel shown that you can close and that you can use to disconnect/shutdown the MATLAB server.
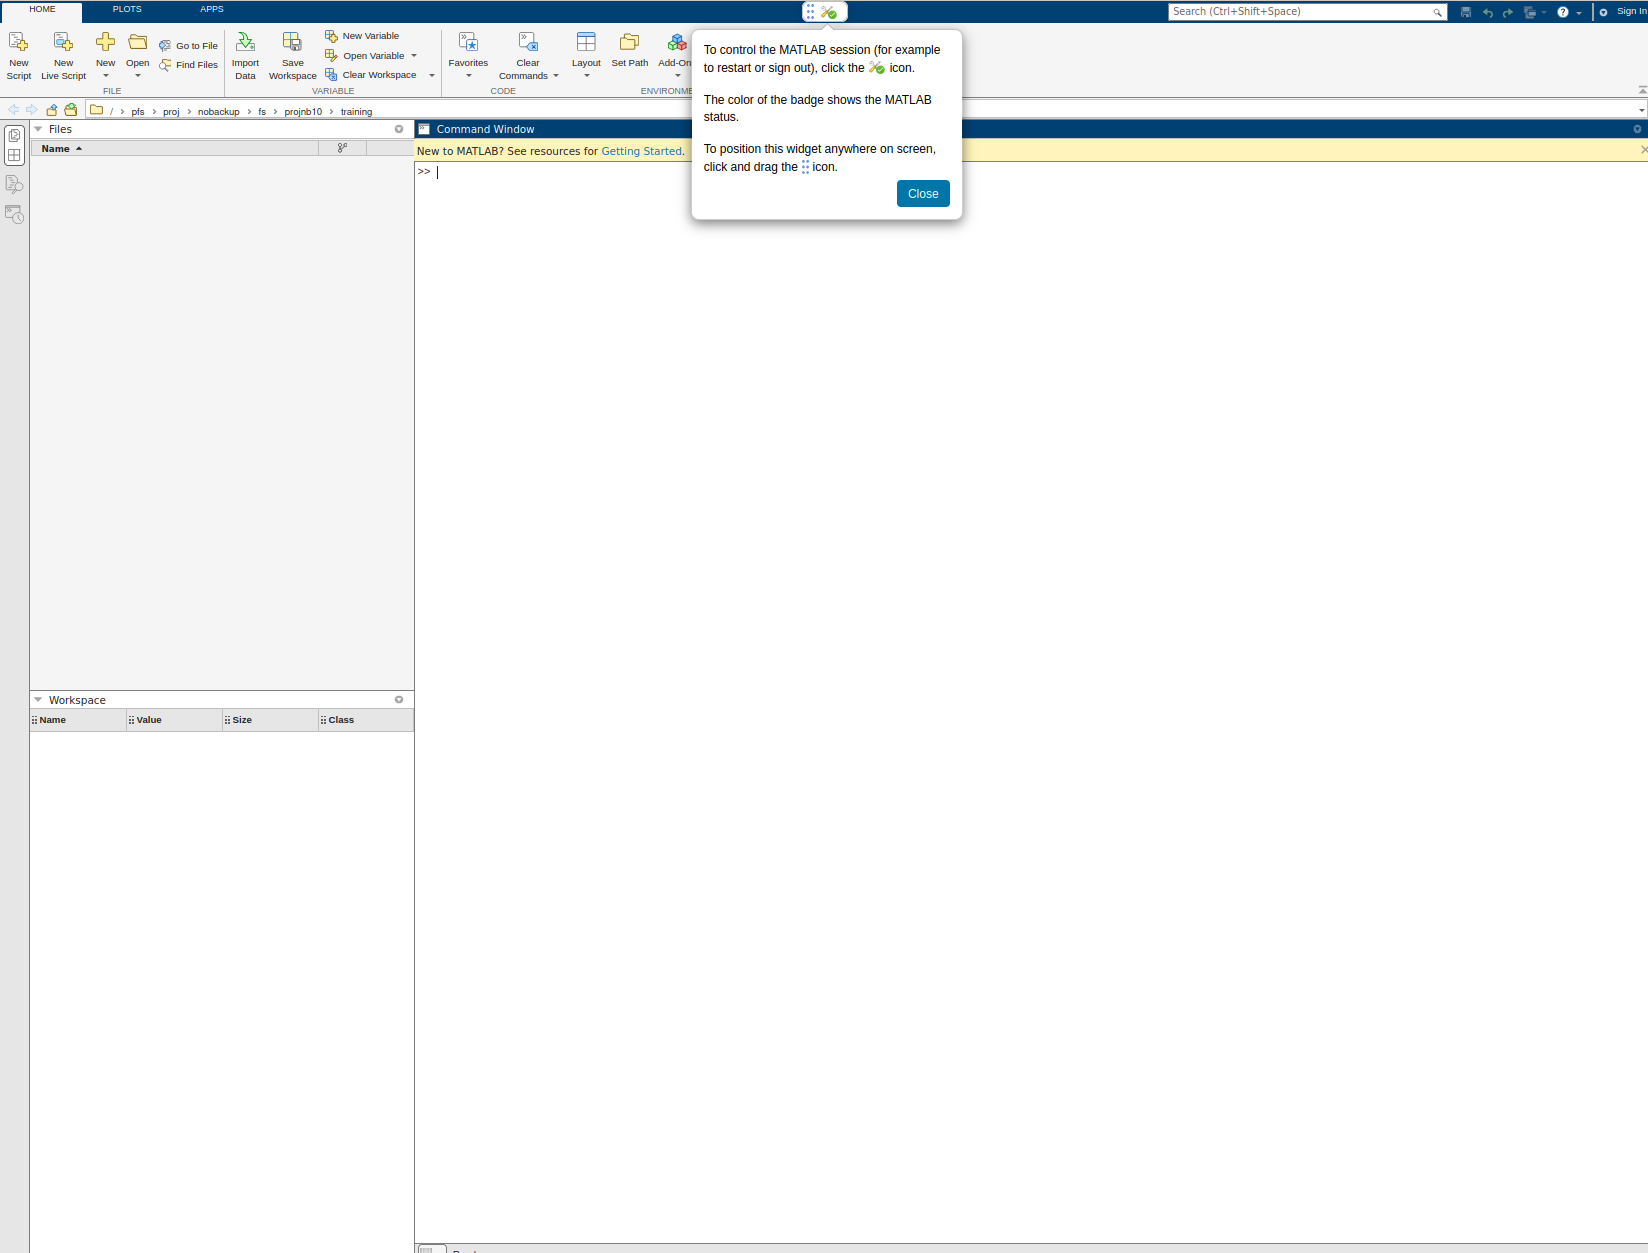
This is shown the controls:
Closing/shutting down MATLAB
You will at most keep the connection for as long as you asked for when you launched it.
However, if you want to shut down the MATLAB server before that, you can use the above-mentioned control panel. Just click it and then choose “Stop MATLAB”.
If you just close the window, then the session keeps running and can be found under “My Interactive Sessions” for as long as you asked for when you started it, and you can re-enter MATLAB by just clicking “Connect to MATLAB” again.
Example - running multicore job
- First we start a MATLAB proxy session as shown under the simple example. We start one with 4 CPU cores for this example.
- In the menu, “Parallel” -> “Select parallel environment” -> “Processes”
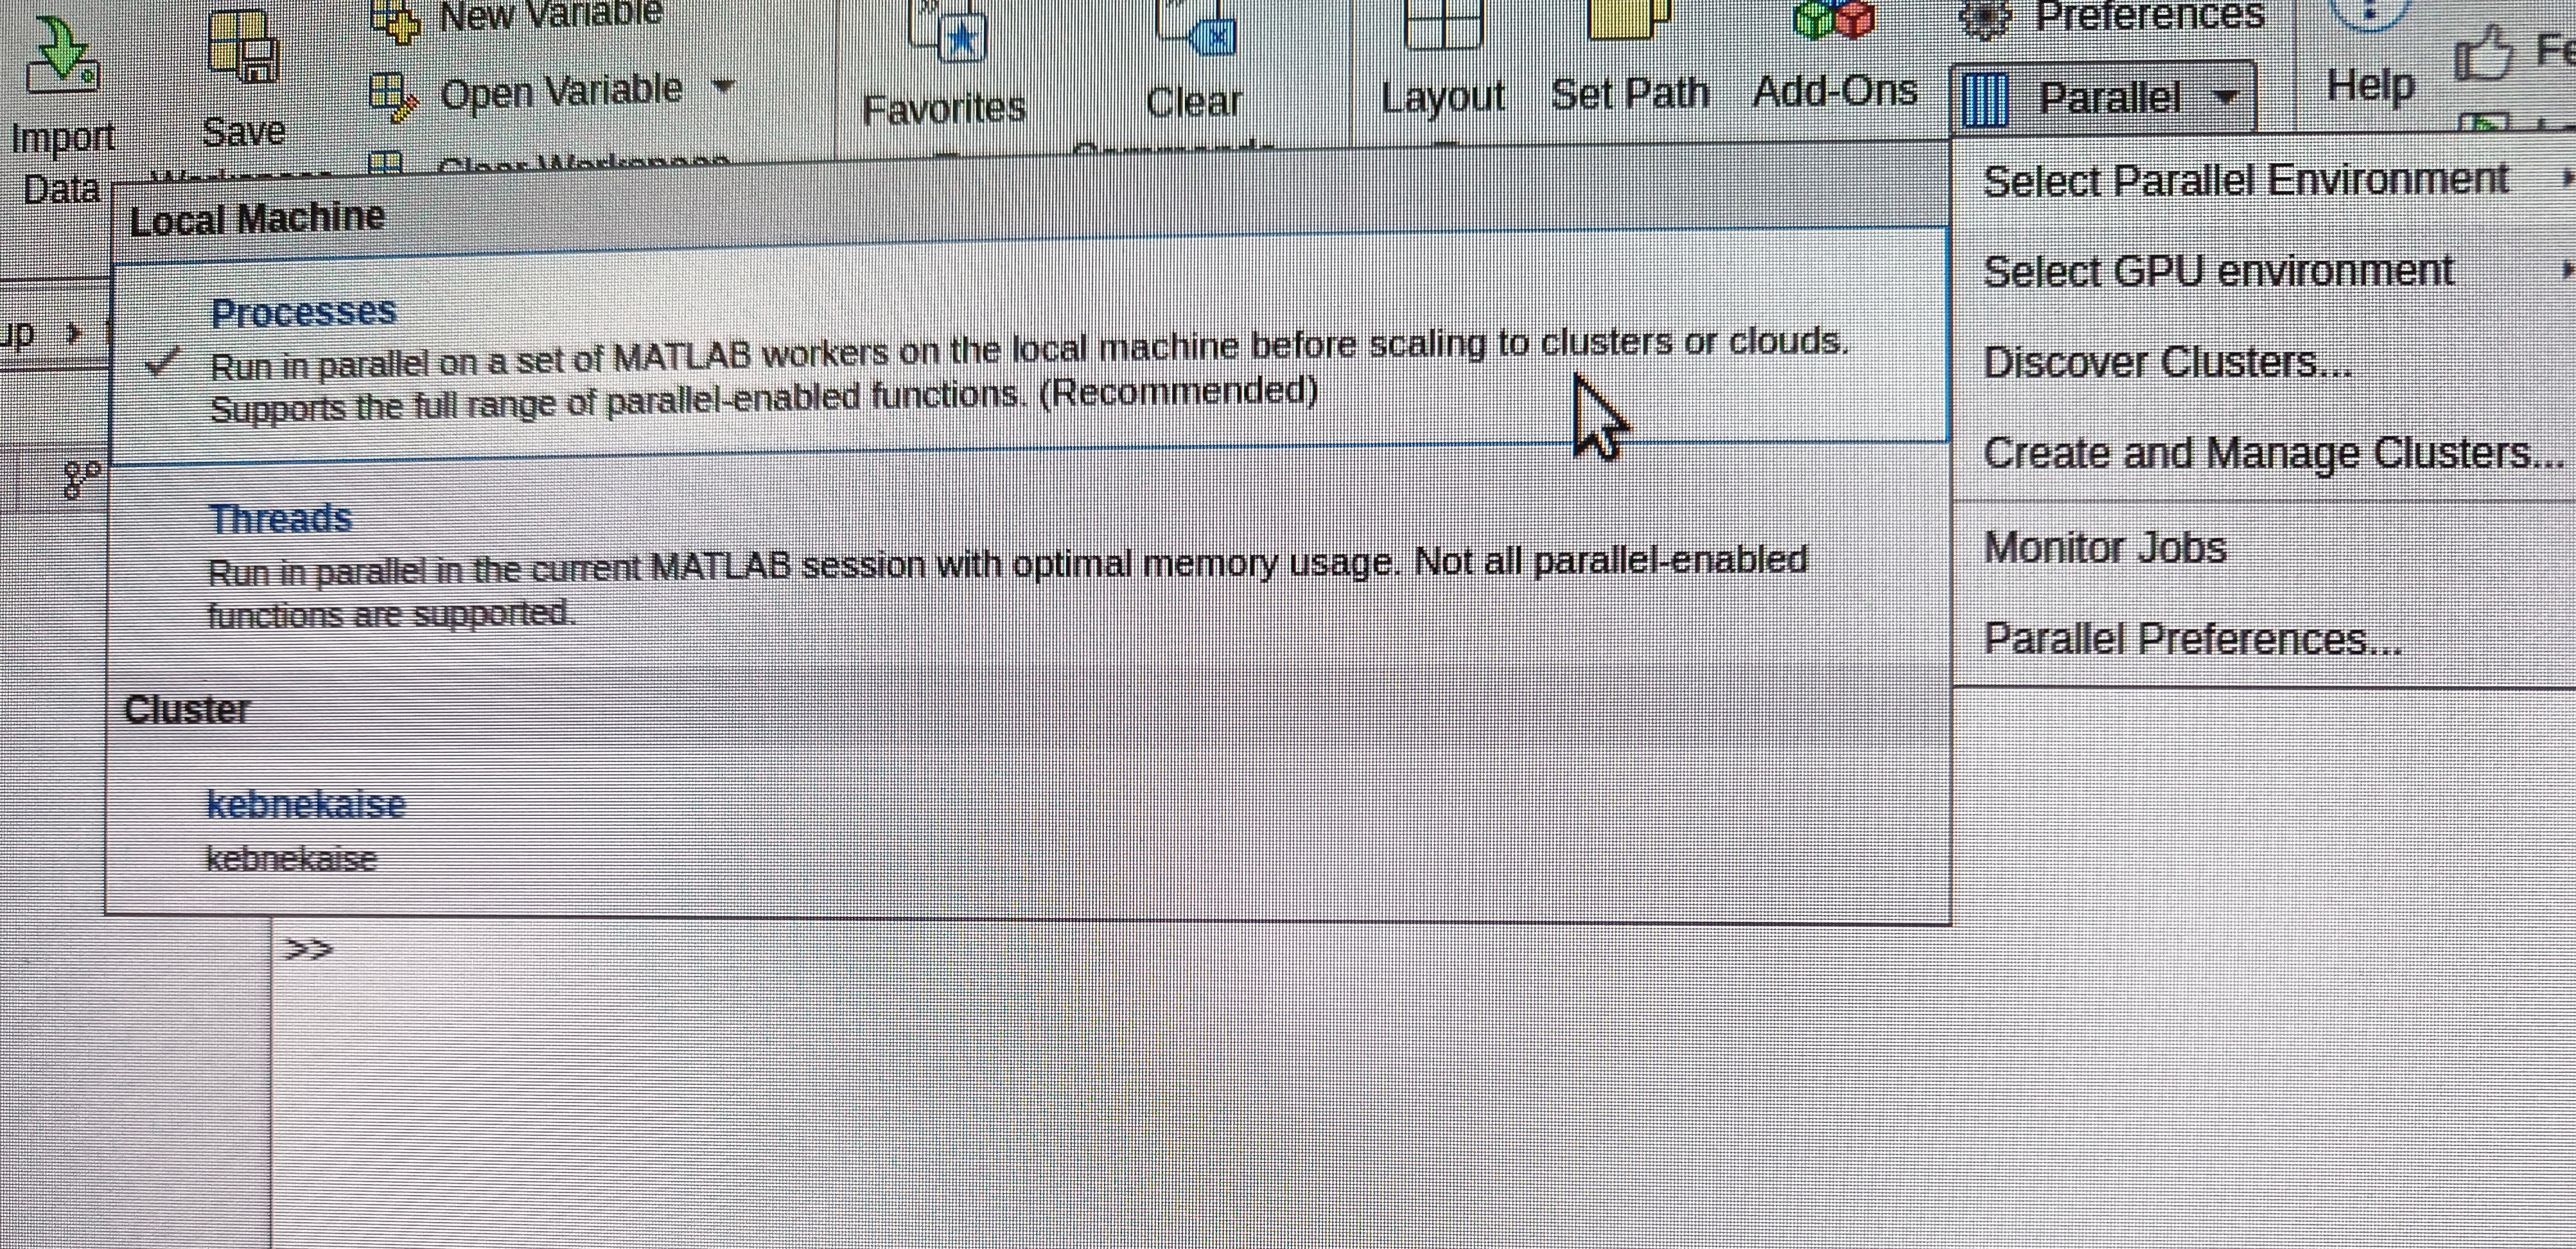
- Start a “Parallel pool”

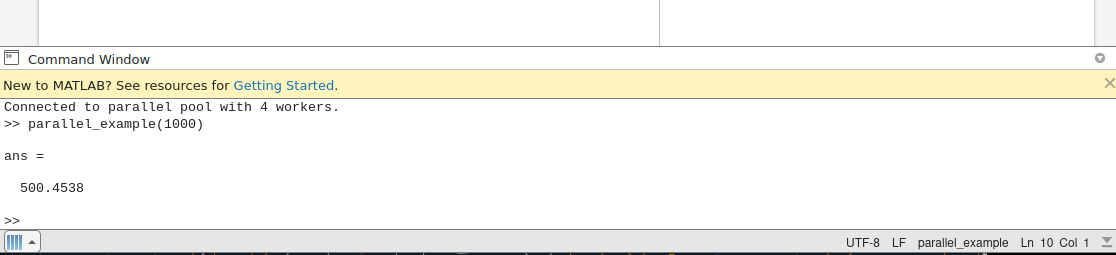
- You can now run parallelized MATLAB scripts on the recourses allocated. As you can see, it is using four processes.
- Open your MATLAB script and run it (here I used parallel_example.m. Since I need to add an input parameter, I pick “Run: type code to run”.
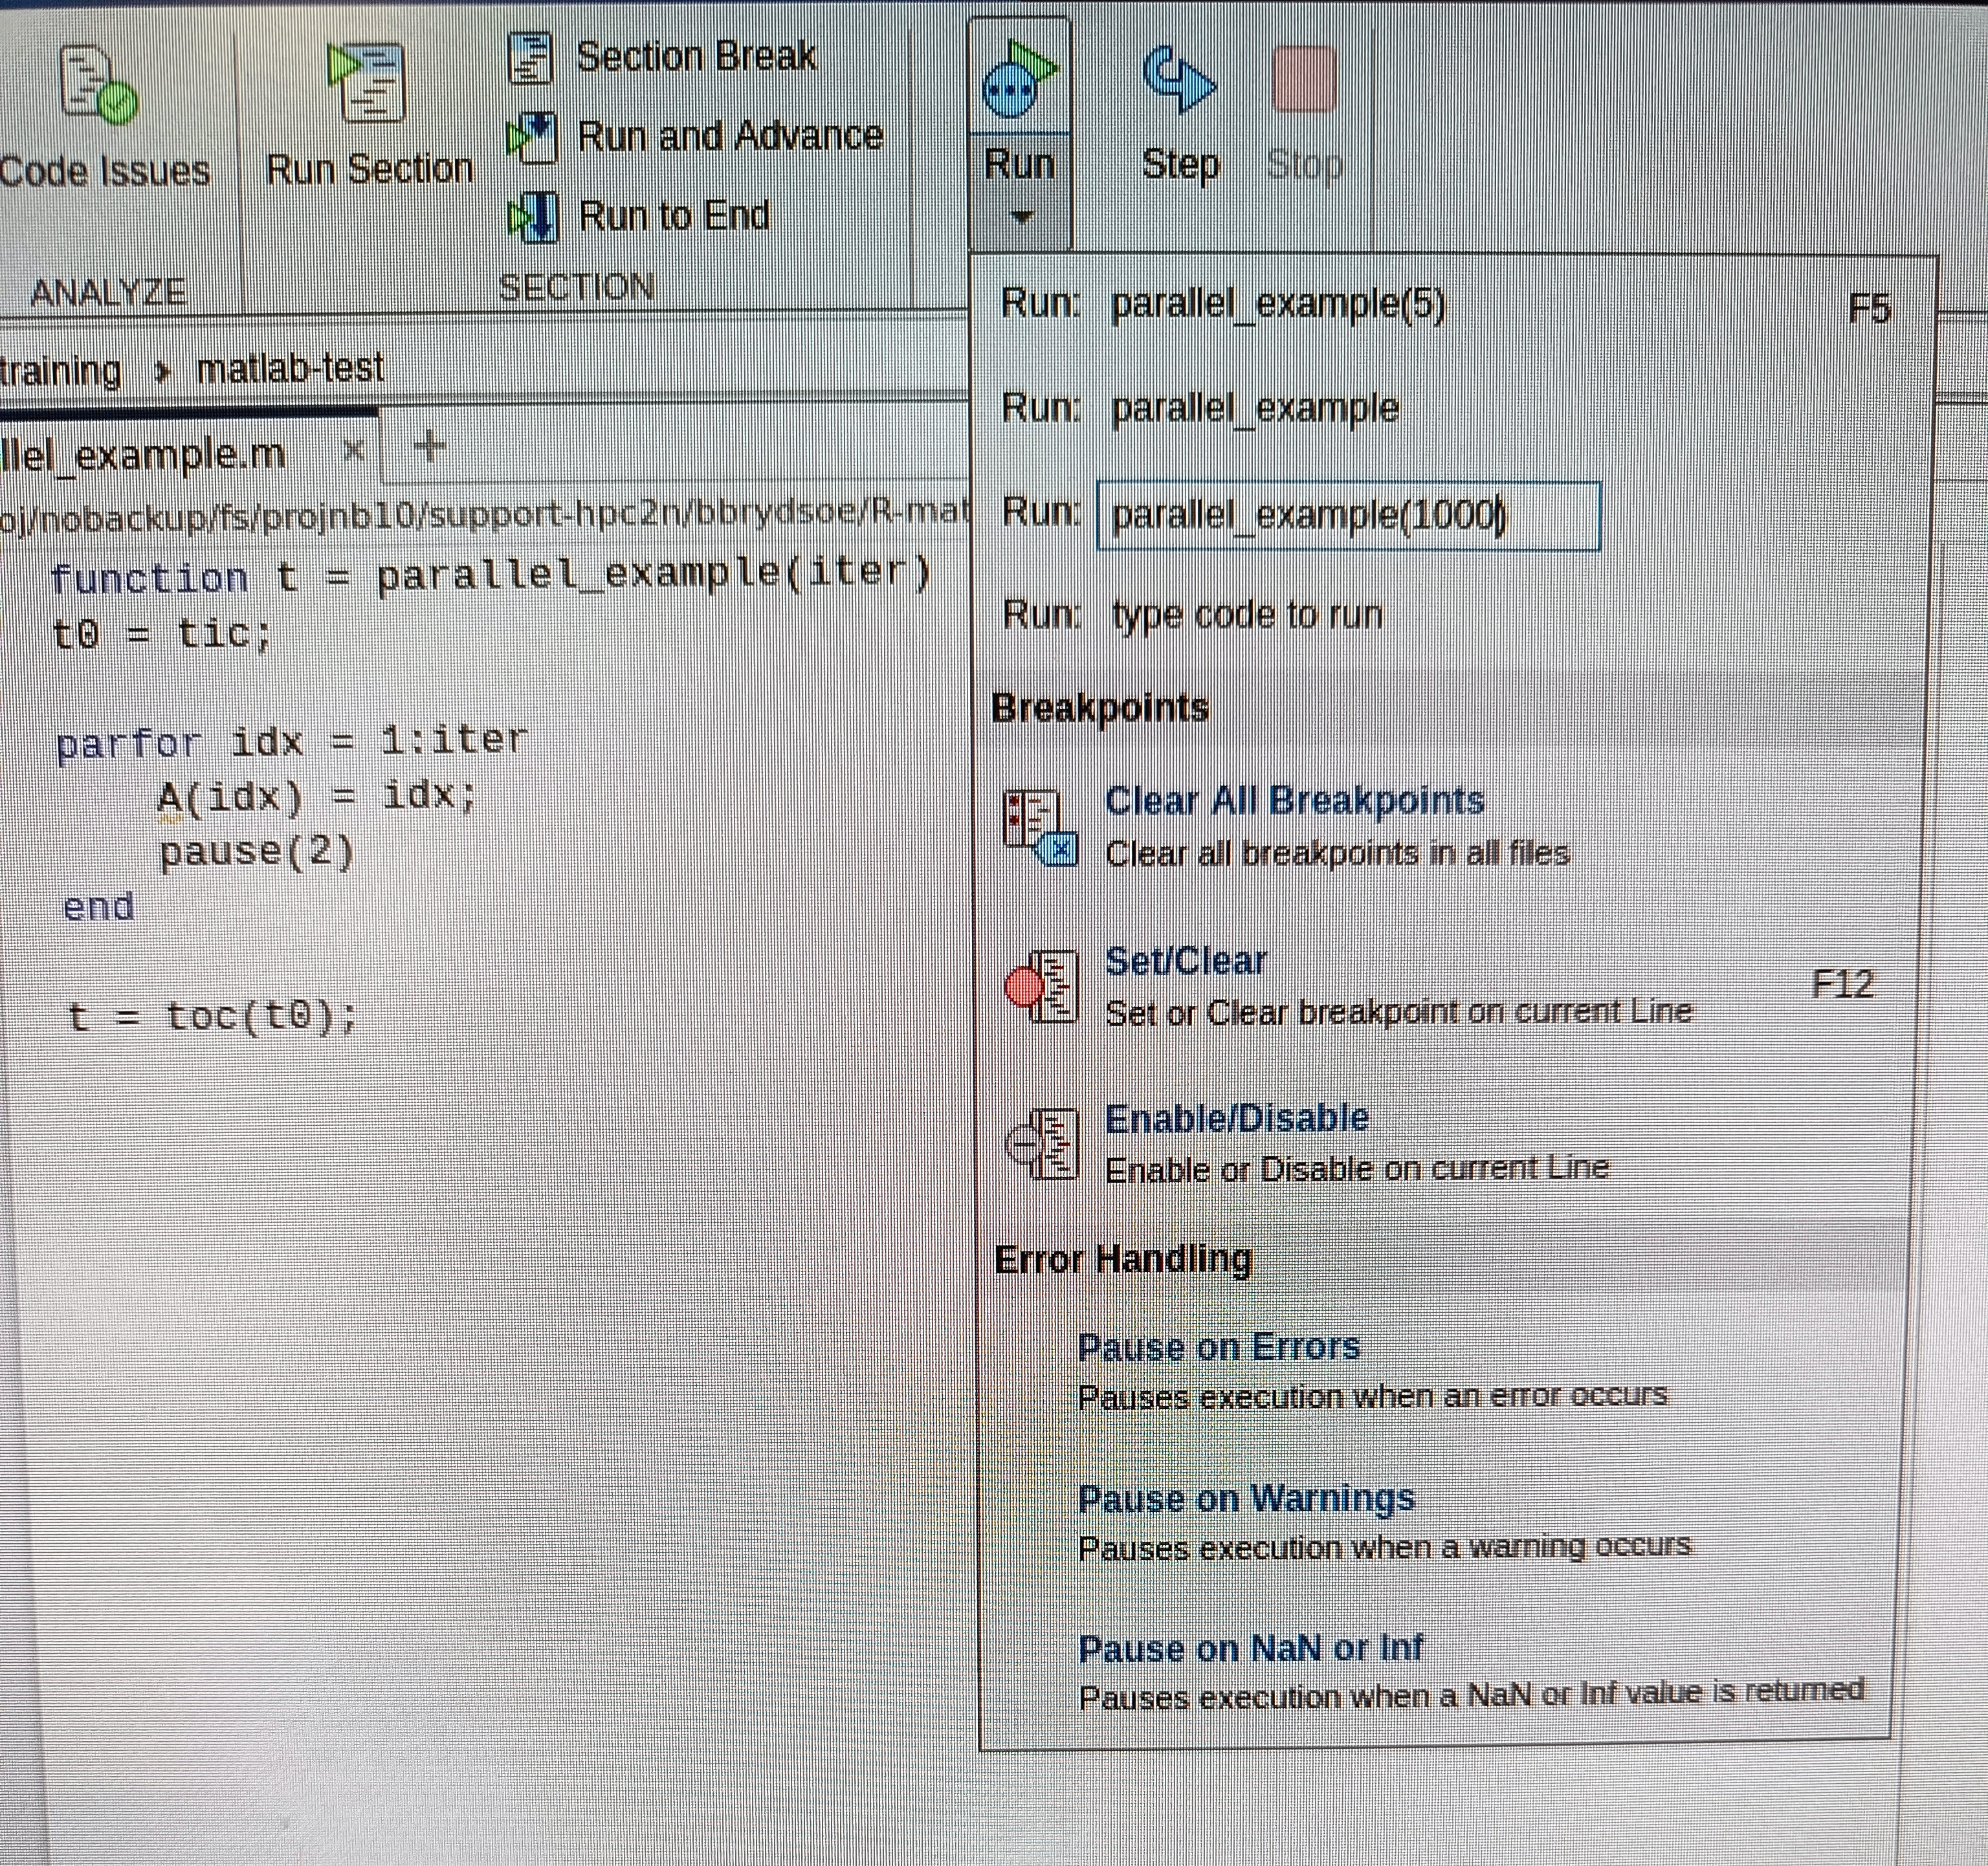
- It starts running in the parallel pool:
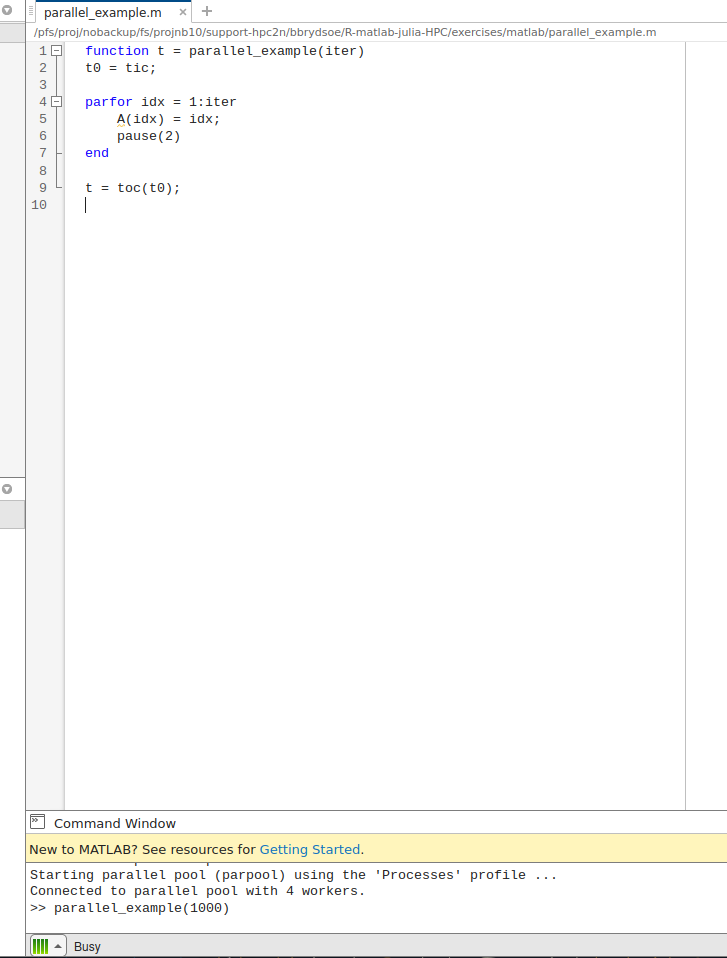
- After some time you get the answer:
Interactive Apps - RStudio Server
If you choose “Interactive Apps” -> “RStudio Server”, you will get an app that can launch an RStudio Server on one or more nodes.
Note
This is used to start RStudio server on one (or more) of the compute nodes after you have allocated resources.
This means you will be able to work as if on those resources. That means that anything you run from inside this RStudio immediately runs on the allocated resources, without you having to start (another) job.
Very useful if you want to work interactively.
NOTE: it is also possible to run RStudio by starting it inside ThinLinc.
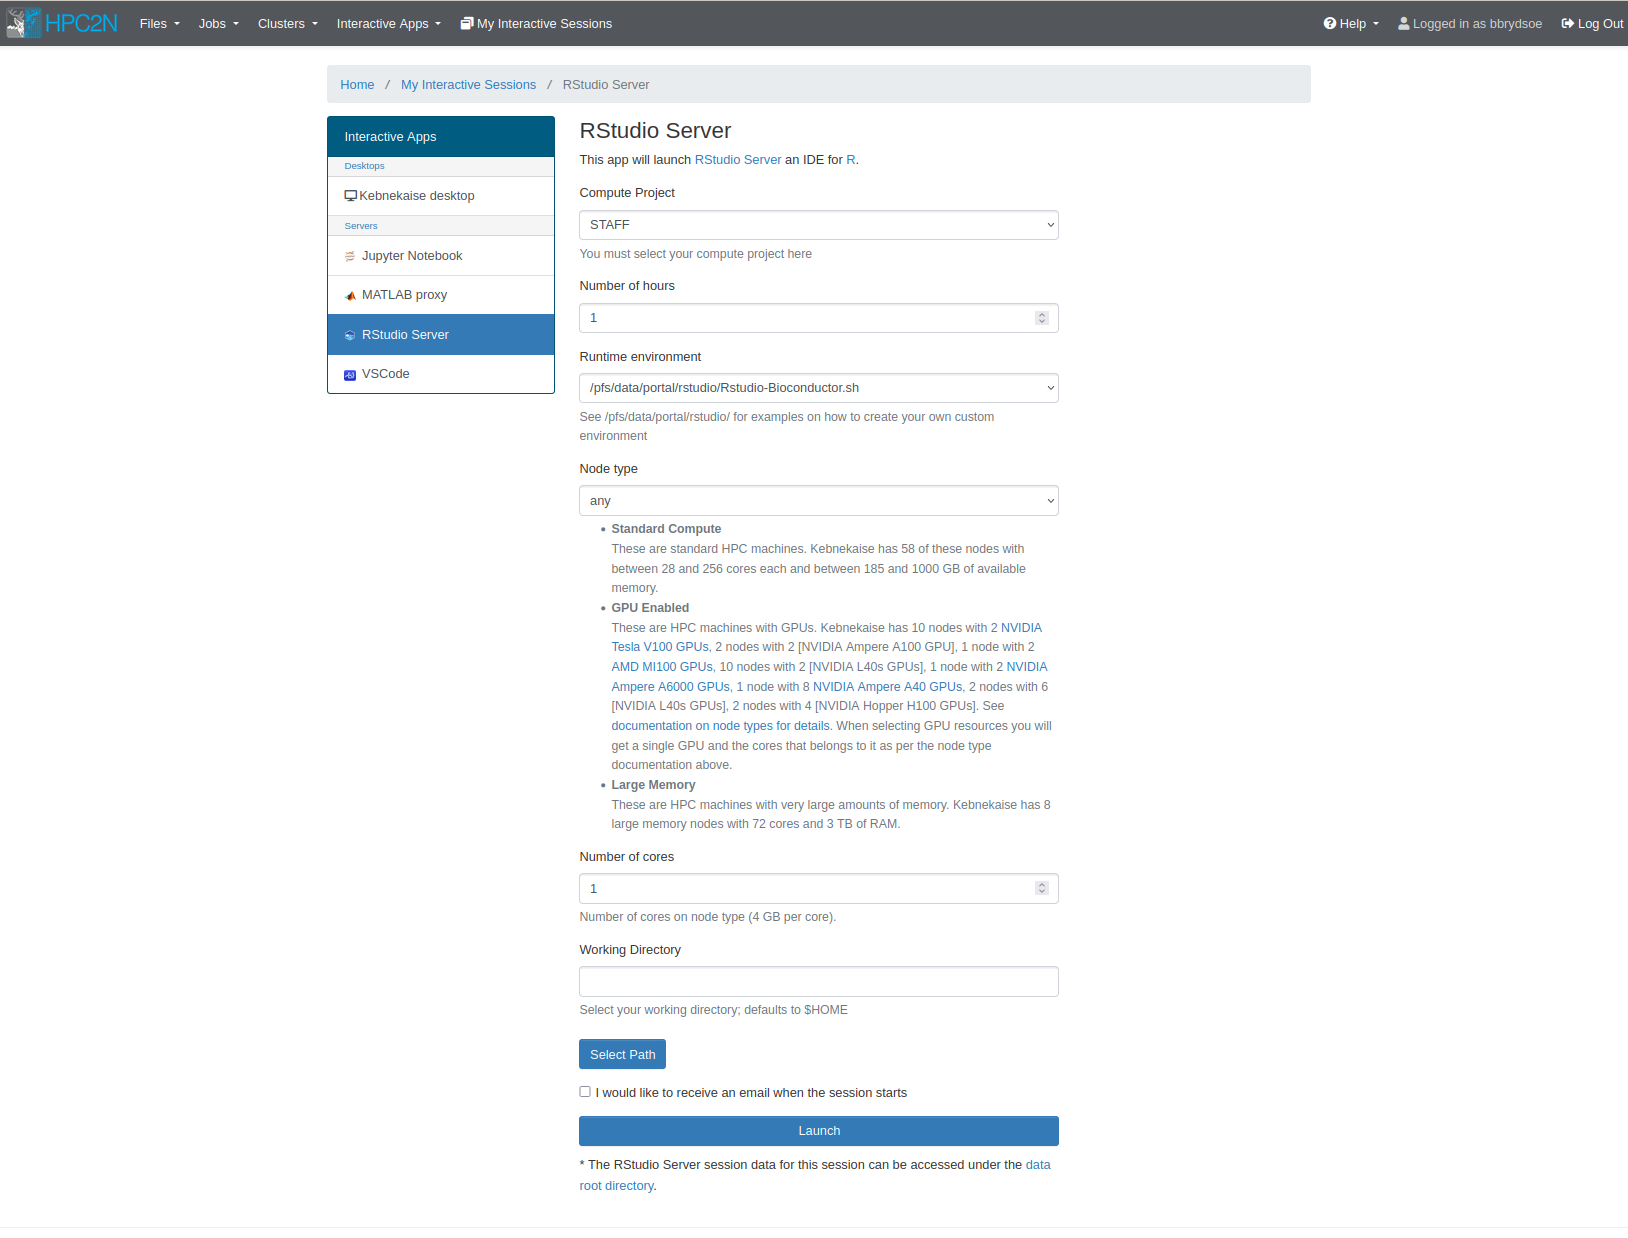
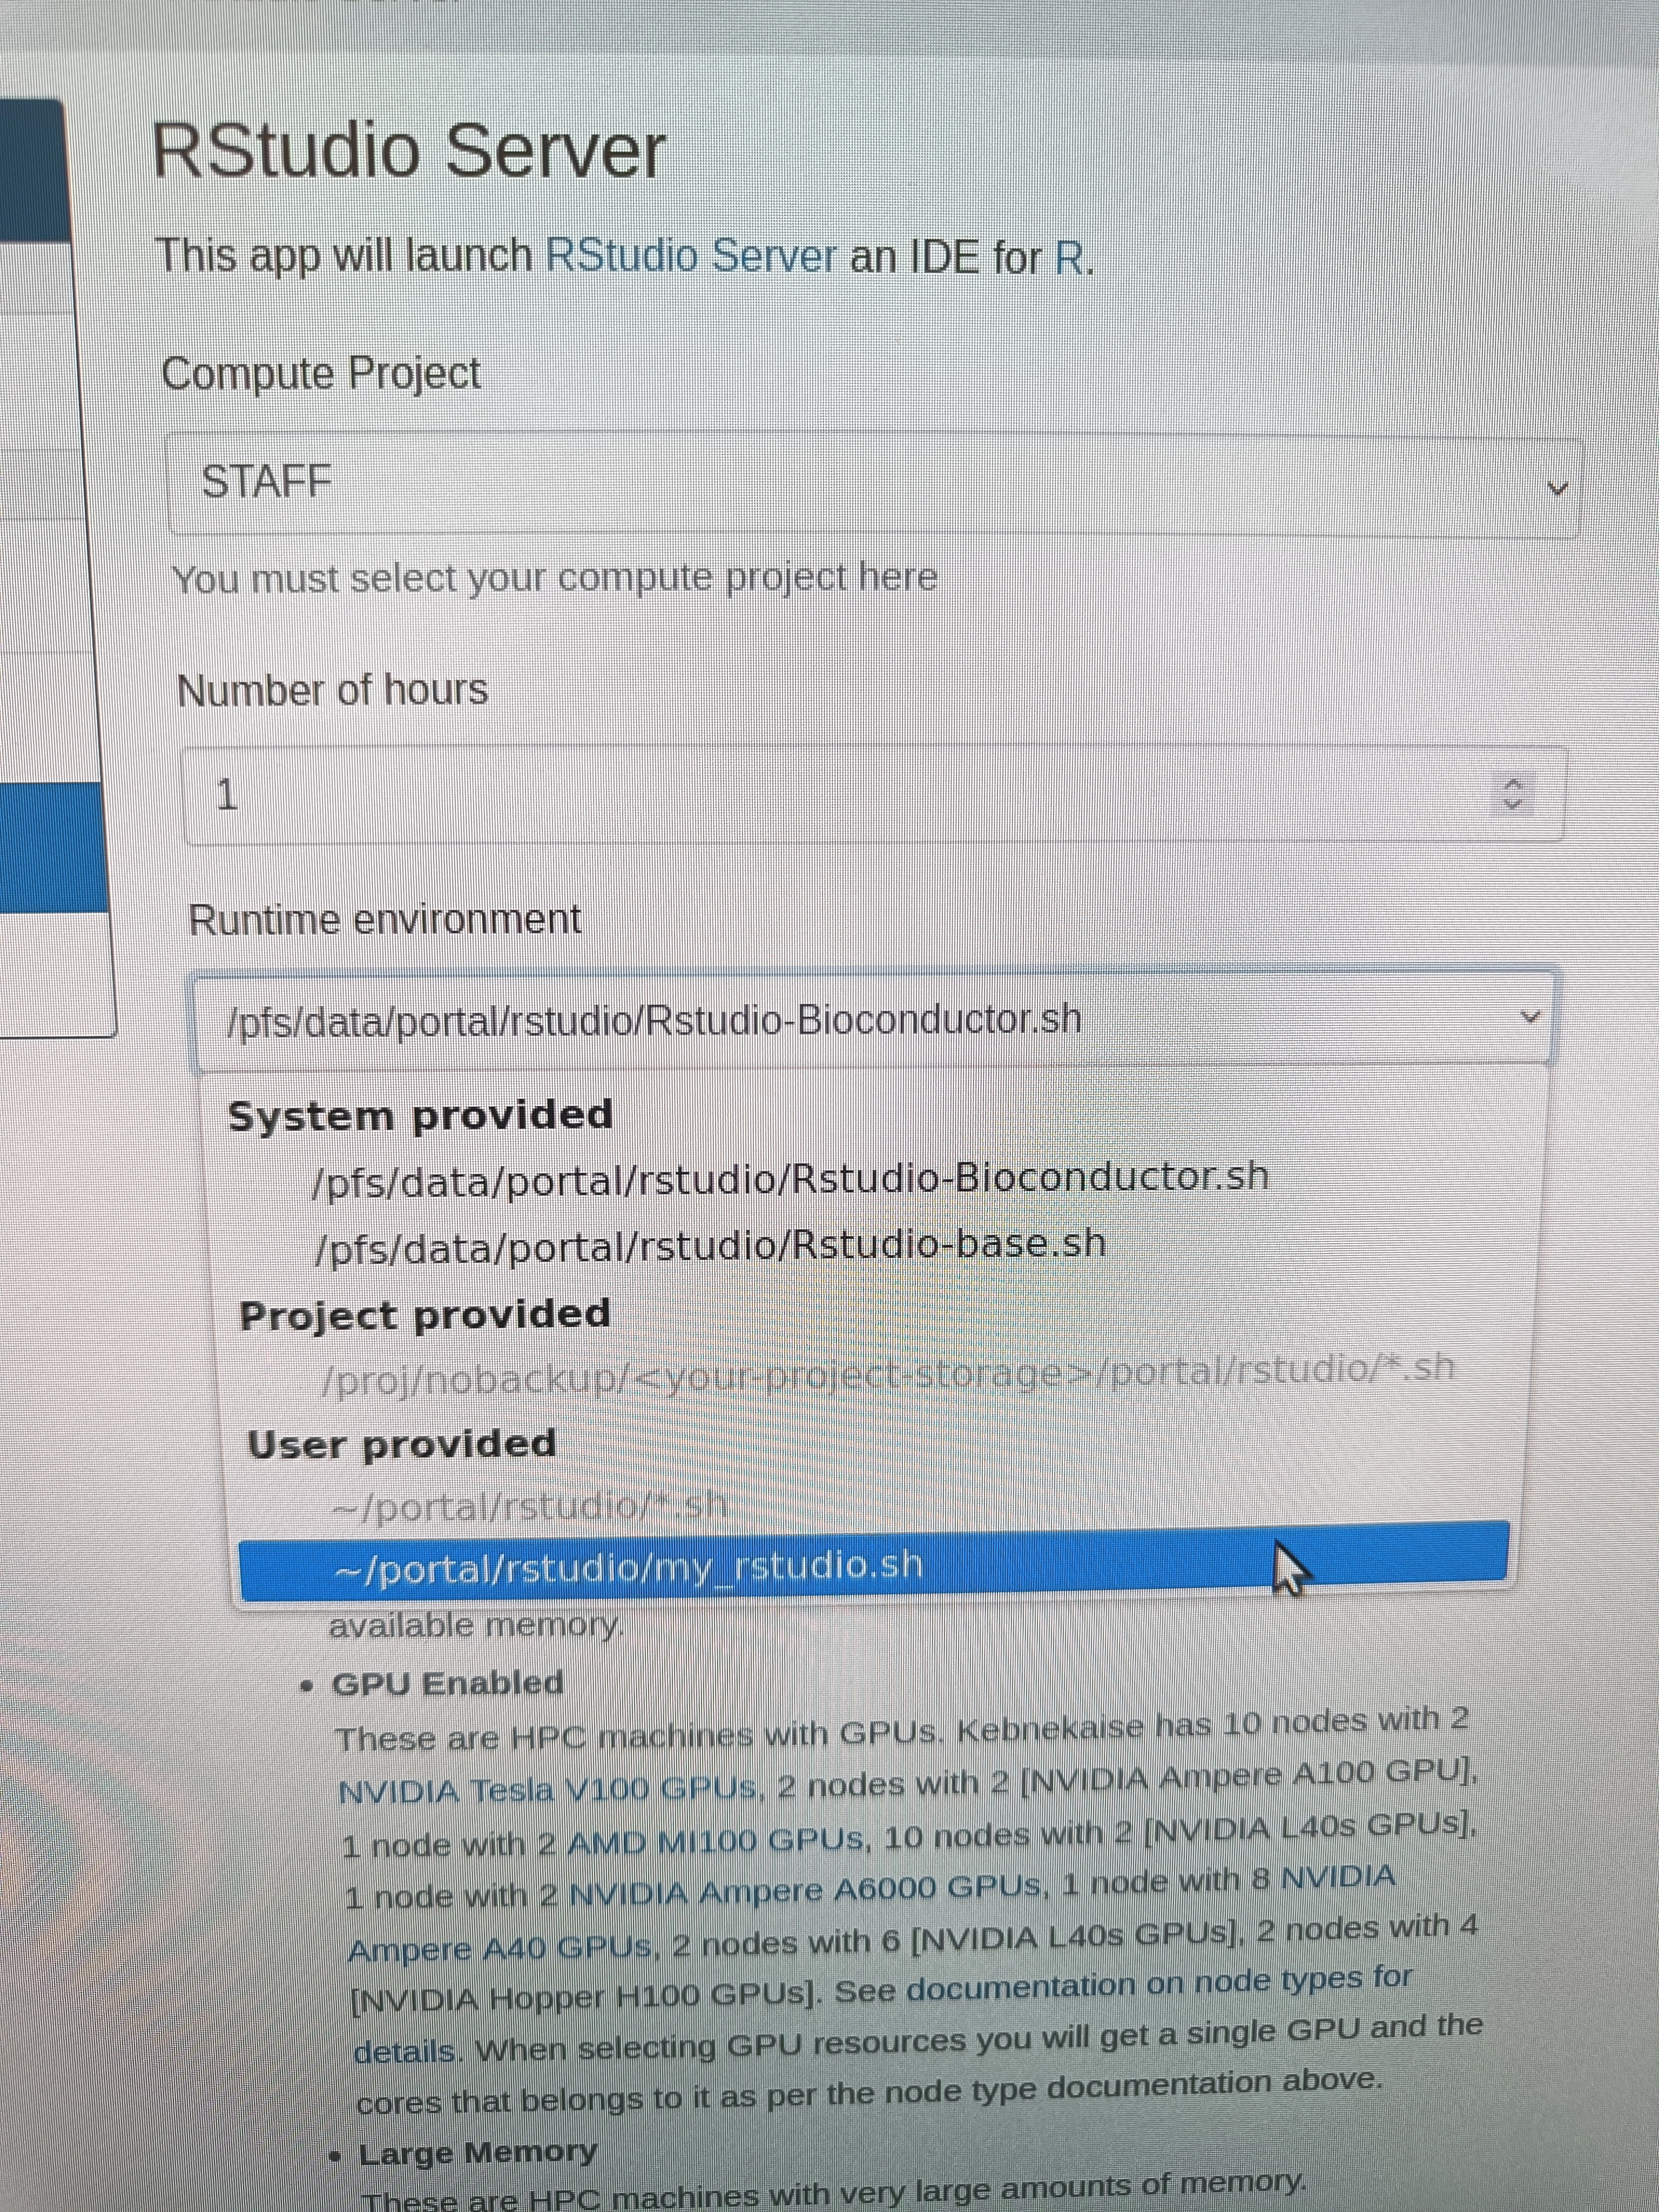
Let us look at the options for launching this, one by one:
- Compute Project: Dropdown menu where you can choose (one of) your compute projects to launch with.
- Number of hours: How long you want the job available for. Here you can choose 1-12 hours, but beware that it is a bad idea to pick longer than you need. Not only will it take longer to start, but it will also use up your allocation even if you are not actively doing anything in RStudio. Pick as long as you need to do your job.
- Runtime environment: Here you can pick “System provided”, “Project provided”, or “User provided”. If you or your project do not have a custom RStudio environment (for instance with specific packages/libraries or such), then just go with the “System provided”. See examples in the directory at the path
/pfs/data/portal/rstudio/for how to create your own. - Node type: “any”, “any GPU”, or “Large memory”. If you pick “any GPU” you cannot also chose “Number of cores”. The other options (for any CPU or for large memory nodes) means you also pick number of cores.
- Number of cores: This is only shown if you pick “any” or “Large memory” for “Node type”. You can pick 1-28 cores.
- Working Directory: Pick the working directory to start in. This will be $HOME unless you pick something else (for instance, maybe you prefer to start in your project storage directory). You can either type in the path or you can click the button “Select Path” and choose from the directory tree.
You can tick the box “I would like to receive an email when the session starts” if you want that. Depending on your choices (mainly number of hours and number of cores), it can take longer or shorter to launch your job.
SImple example
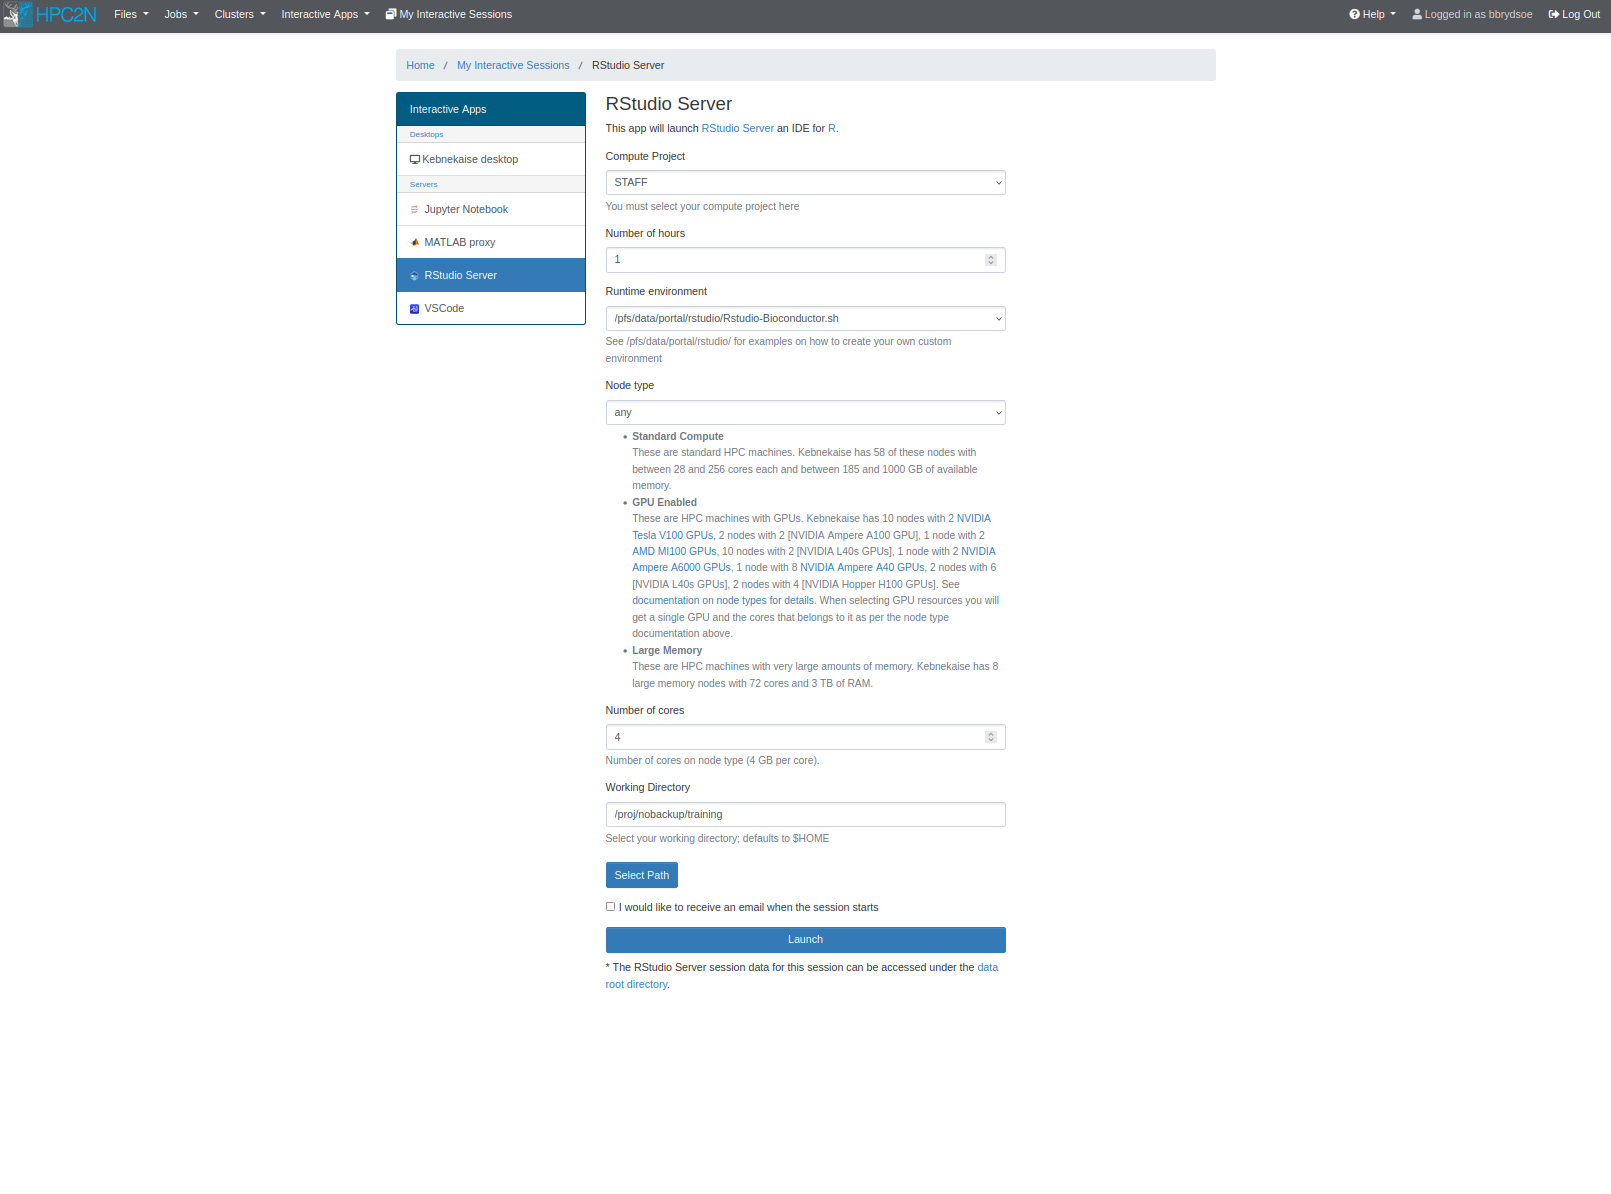
In this example we start an RStudio server for 1 hour, and with 4 cores.
Filling options
This is how it could look, for 1 hour, 4 cores. Using the system runtime environment and chosing a project storage directory of mine.
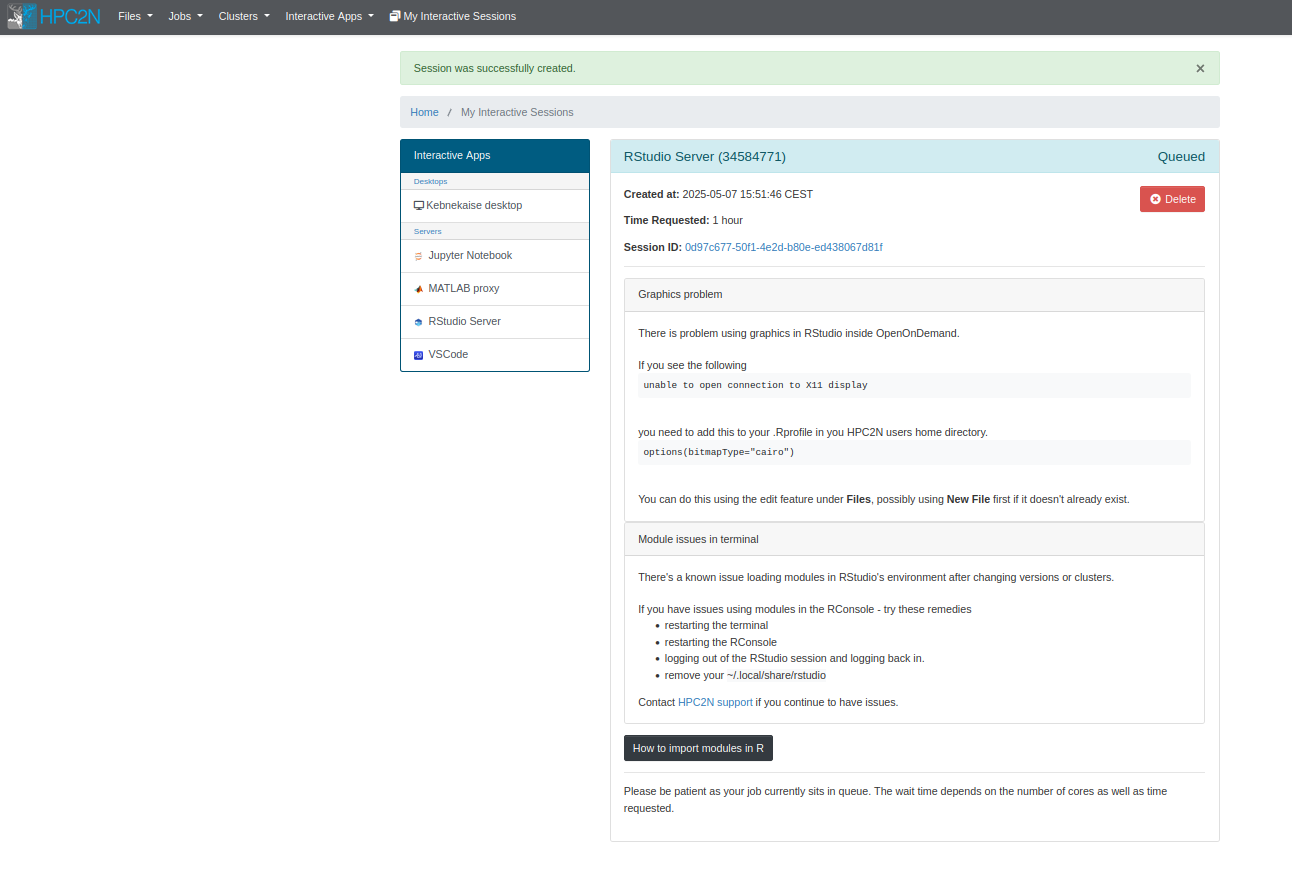
Waiting to launch
It may then sit in a queue for a time, waiting to launch. Meanwhile, it will show “Your session is currently starting… Please be patient as this process can take a few minutes.”
Ready
Then, when the resources have been allocated and you can go to RStudio bt clicking “Connect to RStudio Server”
As you can see, a host node is assigned and it tells you how many nodes and cores, and that it is running.
NOTE: If you click the black button “How to import modules in R”, there is a note about how to do this from inside RStudio.
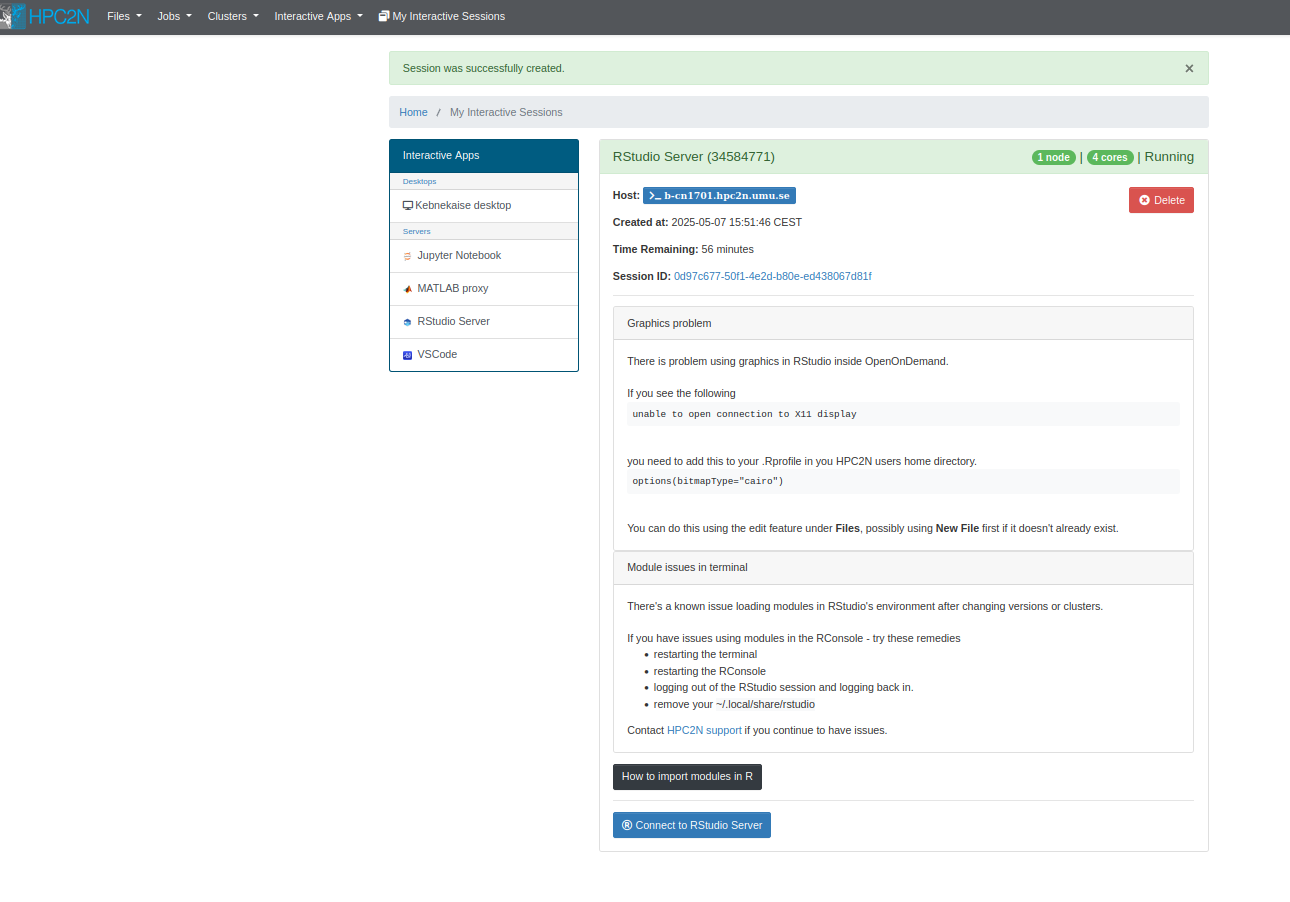
NOTE: there are a couple warnings about graphics and modules:
- Graphics: If you see the following
you need to add this to your
.Rprofilein you HPC2N users home directory. You can do this using the “edit” feature under “Files”, possibly using “New File” first if it doesn’t already exist. - Modules: There’s a known issue loading modules in RStudio’s environment after changing versions or clusters.
If you have issues using modules in the RConsole - try these remedies
- restarting the terminal
- restarting the RConsole
- logging out of the RStudio session and logging back in.
- remove your
~/.local/share/rstudio
- Contact HPC2N support if you continue to have issues.
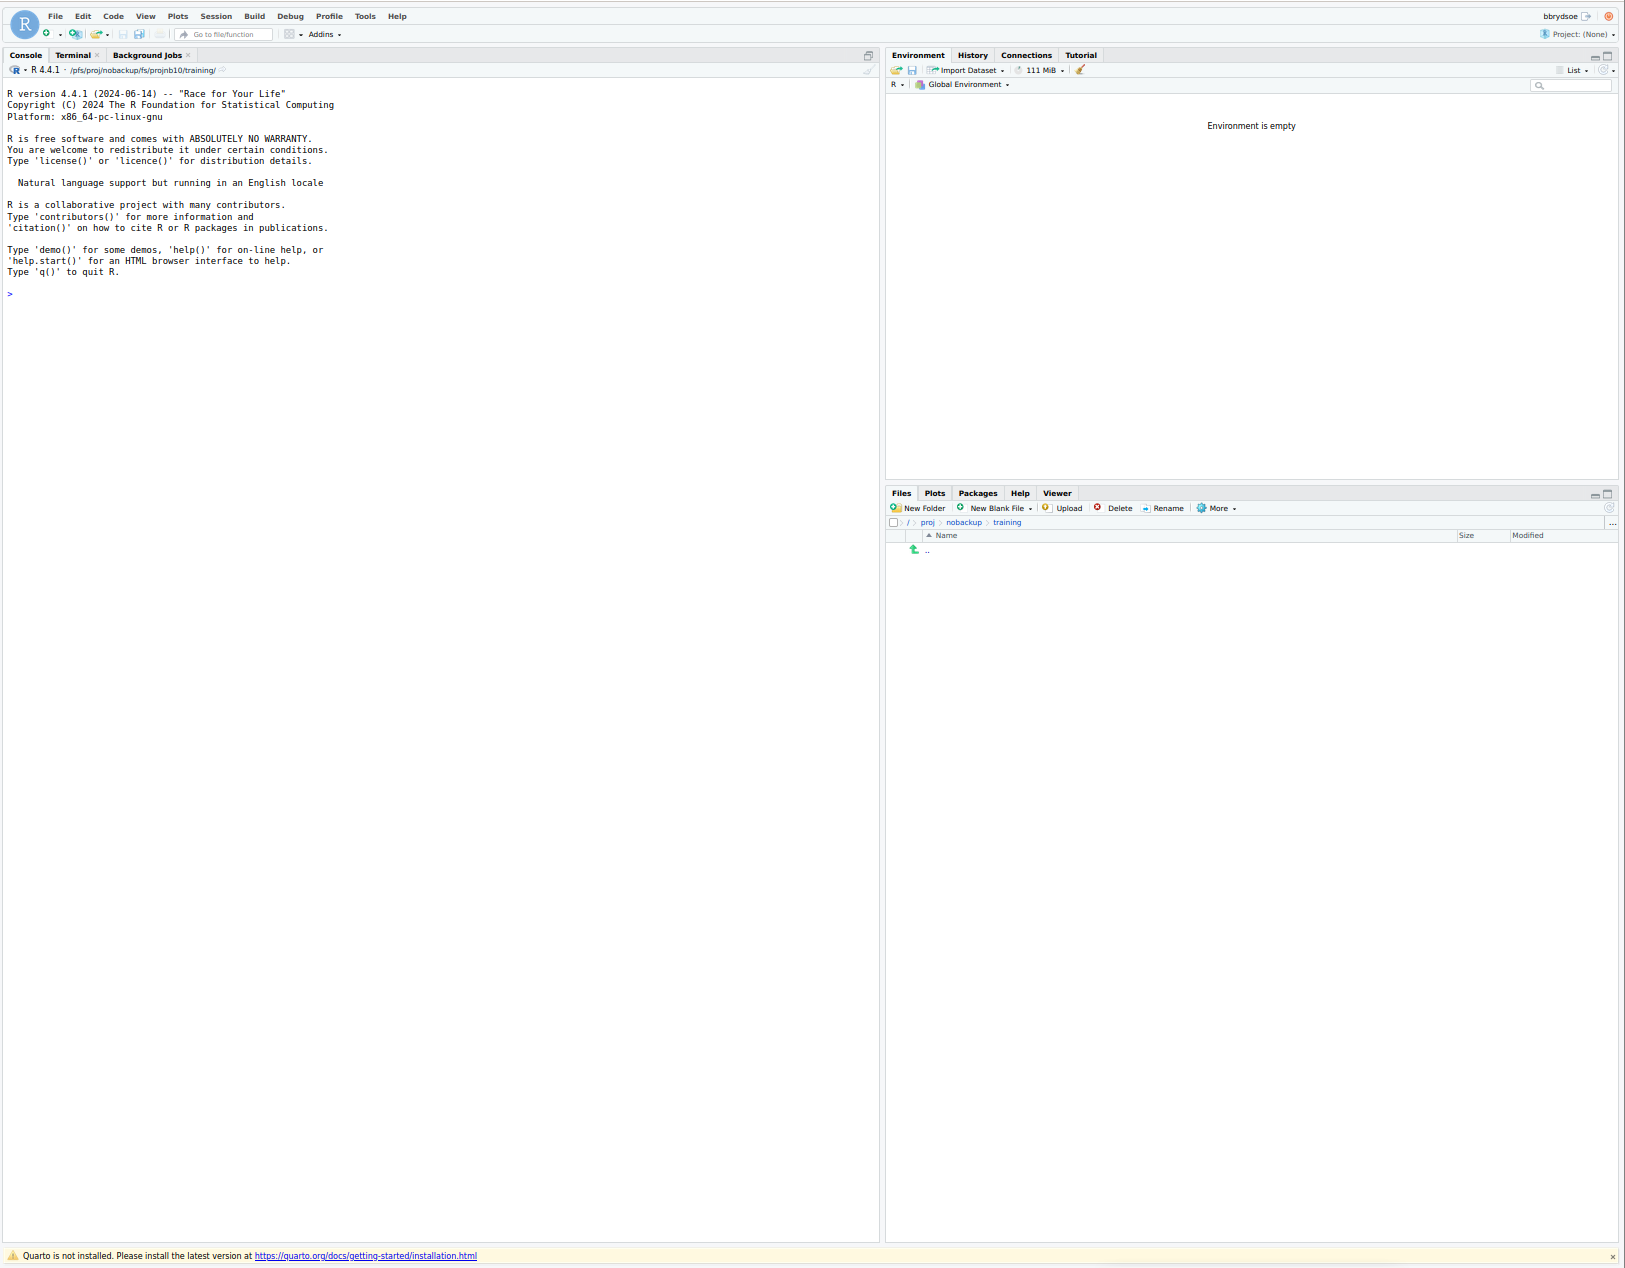
RStudio running
After connecting, you can work in RStudio.
Closing/Shutting down RStudio server
You will at most keep the connection for as long as you asked for when you launched it.
However, if you want to shut down the RStudio server before that, you can user “File” -> “Quit session” or Sign out (top right of the menu), then dekete the interactive session.
Just quitting the sessions/signing out will not close the active session/allocation you have on the compute nodes, and you can restart it from “My Interactive Sessions” for as long as the time you asked for. You need to use “Delete” on the active session in order to end it.
Example - running on the multicore allocation
Running on 4 cores and with own runtime environment.
- We start by editing our runtime environment. Login to Kebnekaise (either of SSH, ThinLinc, Kebnekaise Desktop through Open OnDemand). Start a terminal/shell if you did not login with SSH.
- Copy
/pfs/data/portal/rstudio/Rstudio-Bioconductor.sh(or/pfs/data/portal/rstudio/Rstudio-base.shif you do not need bioconductor packages) to a specific directory under your home directory, which you also need to create first:mkdir -p $HOME/portal/rstudio;cp /pfs/data/portal/rstudio/Rstudio-Bioconductor.sh $HOME/portal/rstudio/my_rstudio.sh - I am going to add the module
R-bundle-CRAN- remember not to add version here, and also that GCC, R, OpenMPI, etc. are already loaded. - I am editing it with “nano”:
nano $HOME/portal/rstudio/my_rstudio.sh. Close and save withCTRL-x(hold down CTRL and press “x”).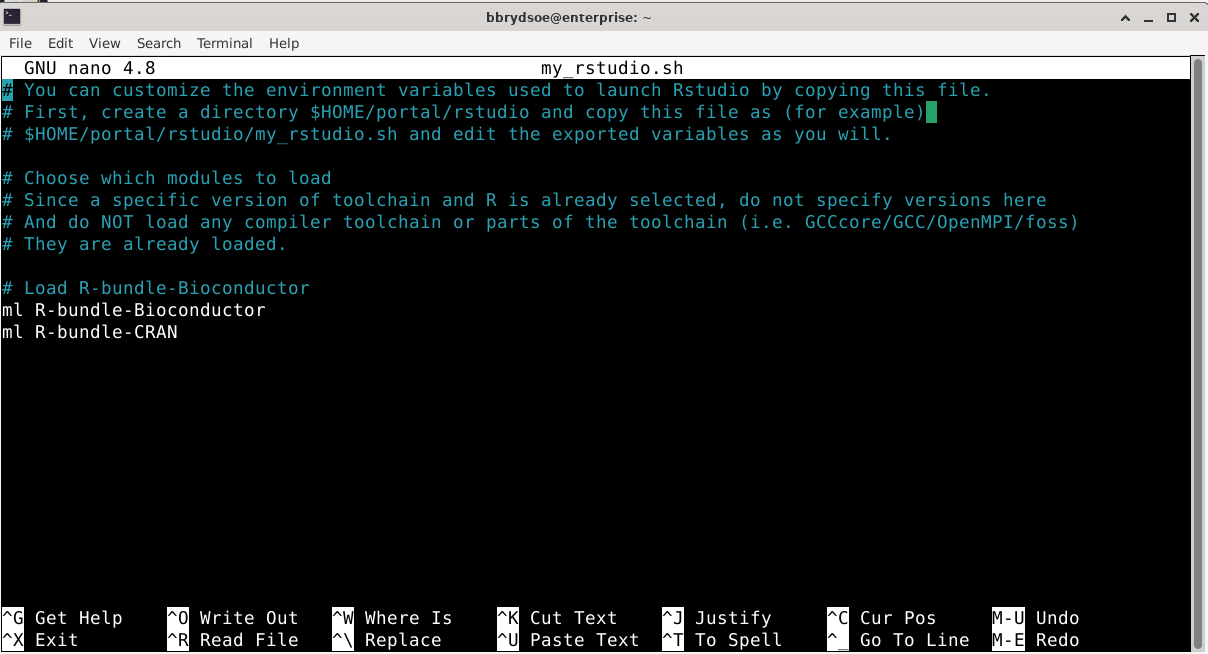
- Let us also make sure we can use graphics in RStudio inside OpenOnDemand, even though we are not going to do that here. Open
$HOME/.Rprofilewith nano:nano $HOME/.Rprofileand add the lineoptions(bitmapType="cairo"). Save and quit (CTRL-x) - Now start a RStudio Server like under “Simple example”. Pick your own environment, any node-type, and 4 cores.
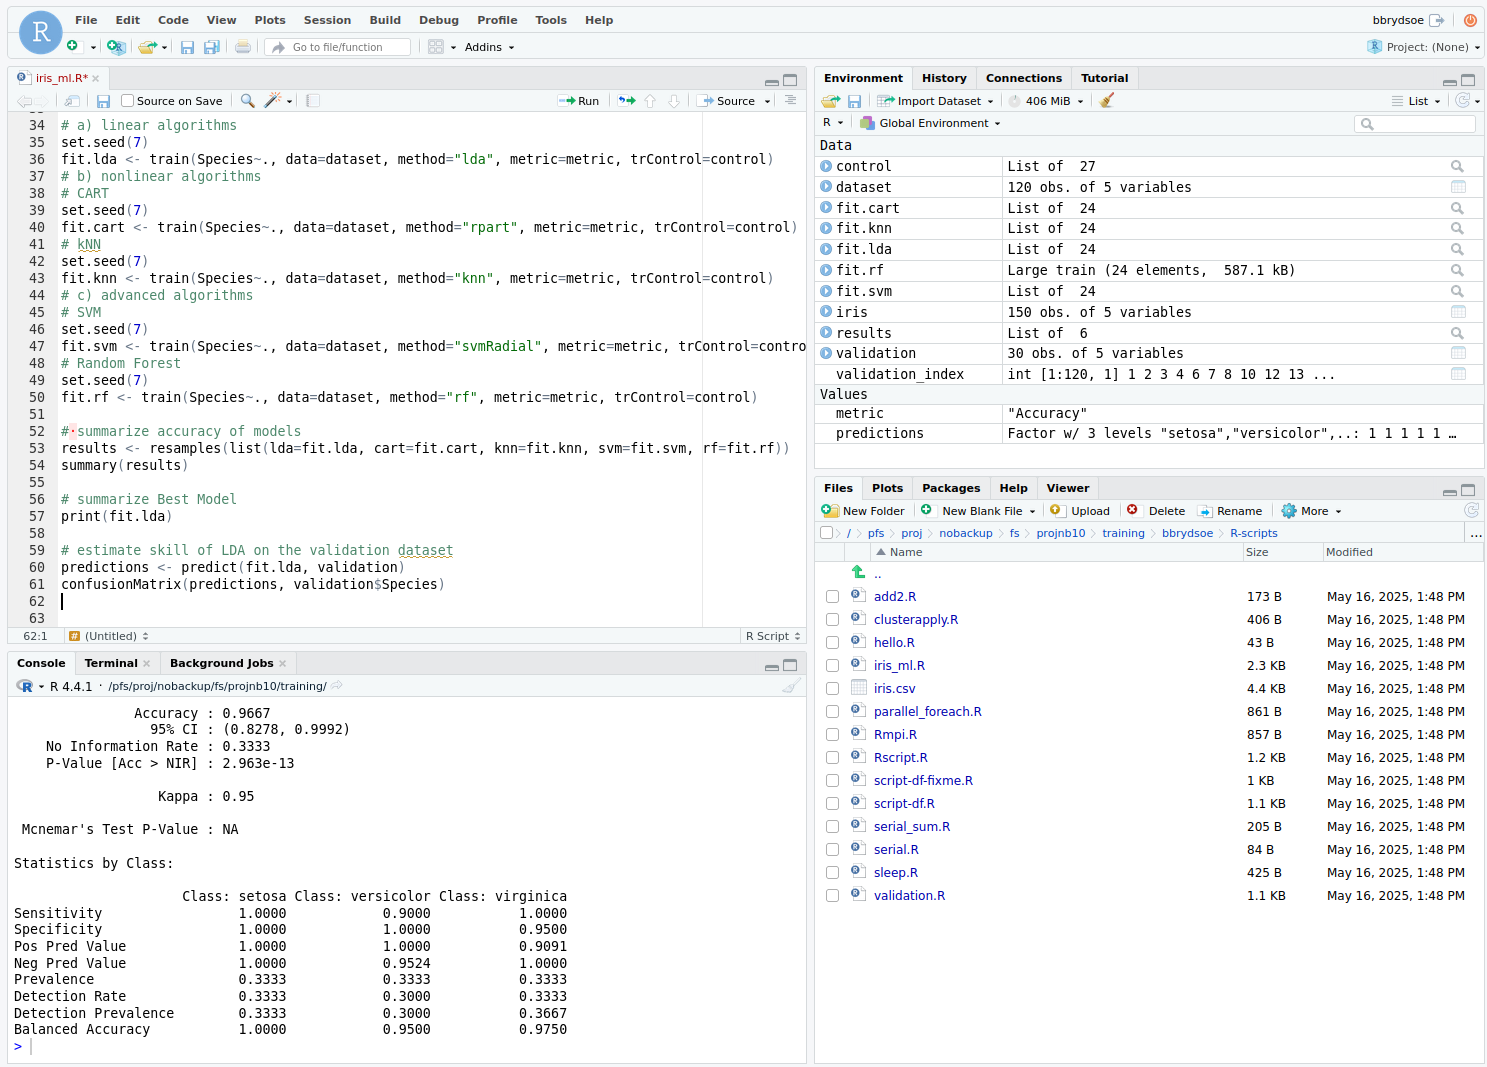
- Connect to the R server and upload the R script iris_ml.R and the data set iris.csv.
- Run the script!
Interactive Apps - VSCode
If you choose “Interactive Apps” -> “VSCode”, you will get an app that can launch a VSCode server on one node.
Note
This is used to start a VSCode server on one of the compute nodes after you have allocated resources.
This means you will be able to work as if on those resources. That means that anything you run/do from inside this VSCode immediately runs on the allocated resources, without you having to start (another) job.
Very useful if you want to work interactively.
Let us look at the options for launching this, one by one:
- Compute Project: Dropdown menu where you can choose (one of) your compute projects to launch with.
- Number of hours: How long you want the job available for. Here you can choose 1-12 hours, but beware that it is a bad idea to pick longer than you need. Not only will it take longer to start, but it will also use up your allocation even if you are not actively doing anything in VSCode. Pick as long as you need to do your job.
- Codeserver Version: right now only one version here
- Runtime environment: Here you can pick “System provided”, “Project provided”, or “User provided”. If you or your project do not have a custom environment, then just go with the “System provided”. See examples in the directory at the path
/pfs/data/portal/vscode/for how to create your own. - Node type: “any”, “any GPU”, or “Large memory”. If you pick “any GPU” you cannot also chose “Number of cores”. The other options (for any CPU or for large memory nodes) means you also pick number of cores.
- Number of cores: This is only shown if you pick “any” or “Large memory” for “Node type”. You can pick 1-28 cores.
- Working Directory: Pick the working directory to start in. This will be $HOME unless you pick something else (for instance, maybe you prefer to start in your project storage directory). You can either type in the path or you can click the button “Select Path” and choose from the directory tree.
You can tick the box “I would like to receive an email when the session starts” if you want that. Depending on your choices (mainly number of hours and number of cores), it can take longer or shorter to launch your job.
Example
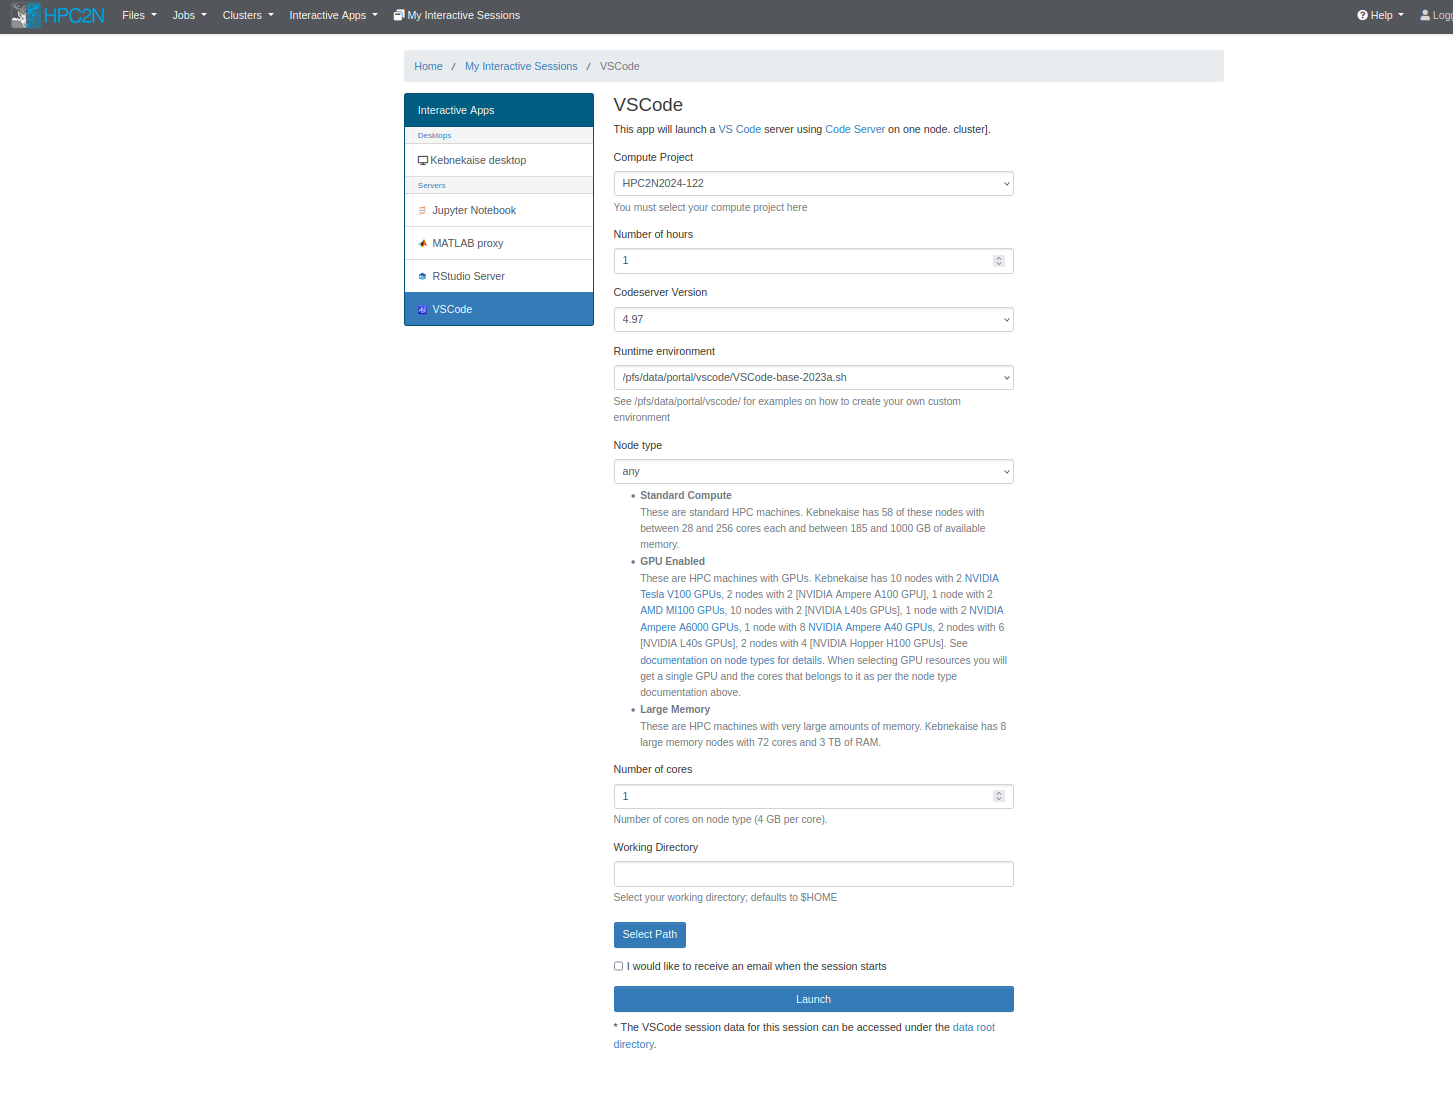
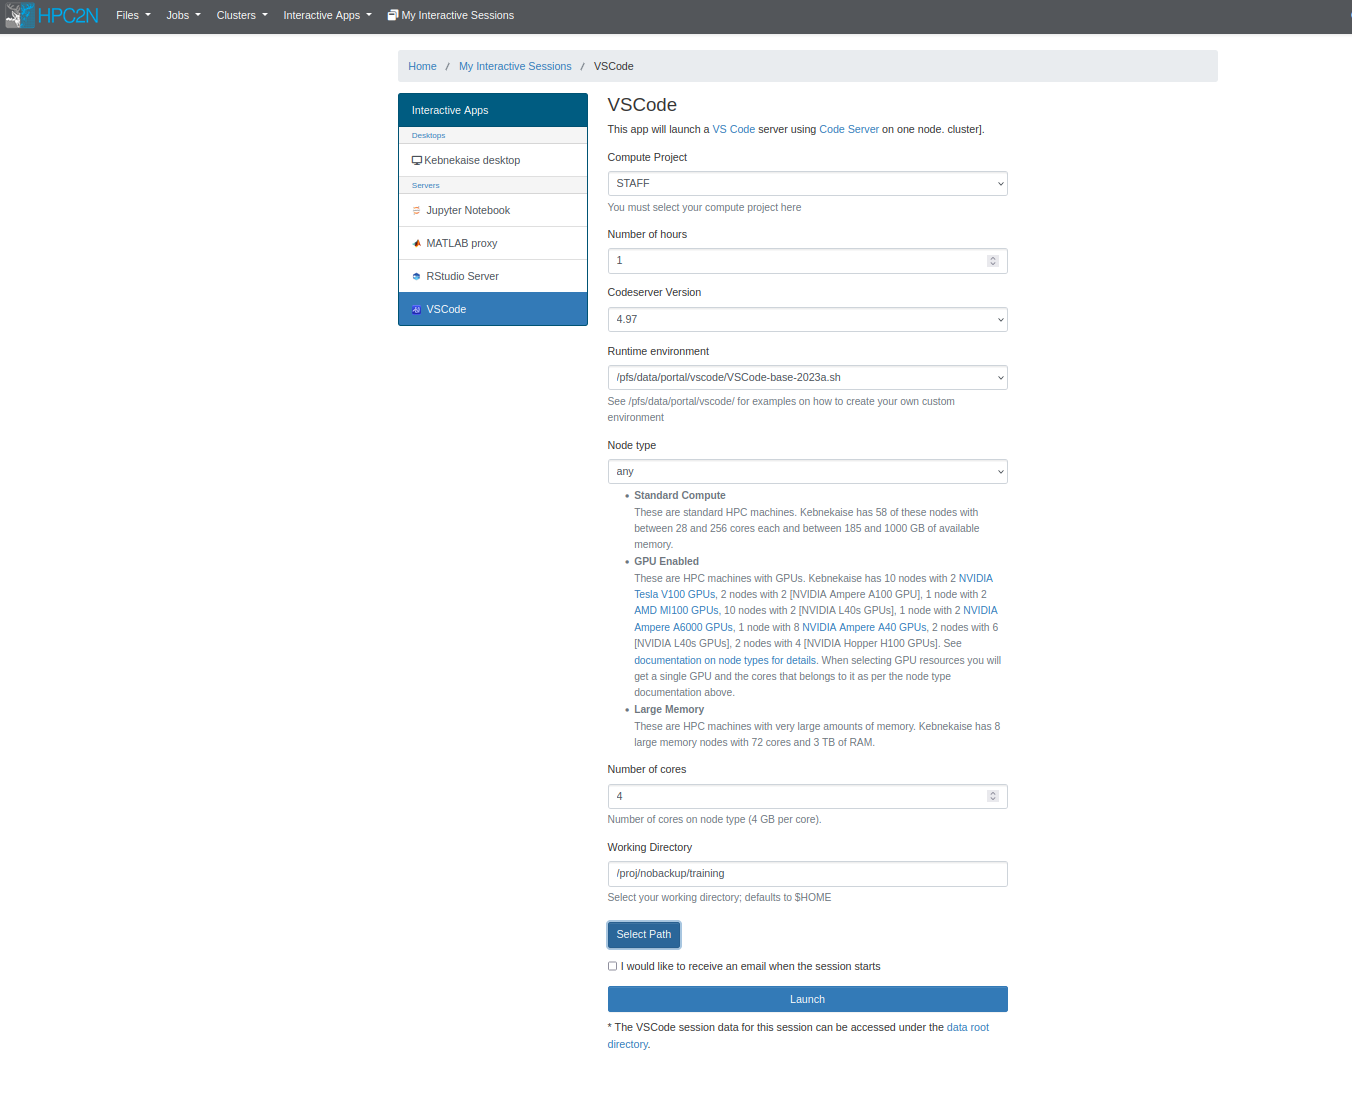
In this example we start an VSCode server for 1 hour, and with 4 cores.
Filling options
This is how it could look, for 1 hour, 4 cores. Using the system runtime environment and chosing a project storage directory of mine.
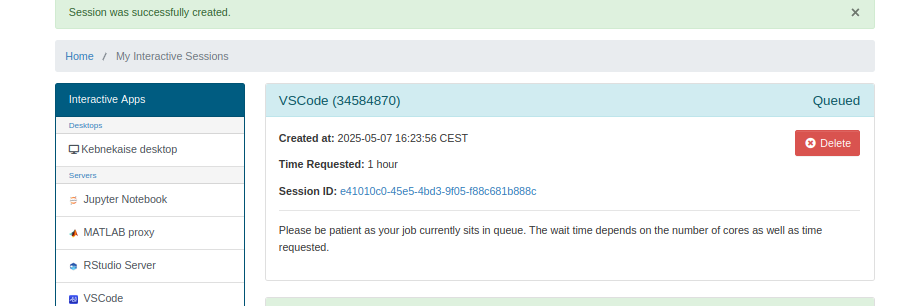
Waiting to launch
It may then sit in a queue for a time, waiting to launch. Meanwhile, it will show “Your session is currently starting… Please be patient as this process can take a few minutes.”
Ready
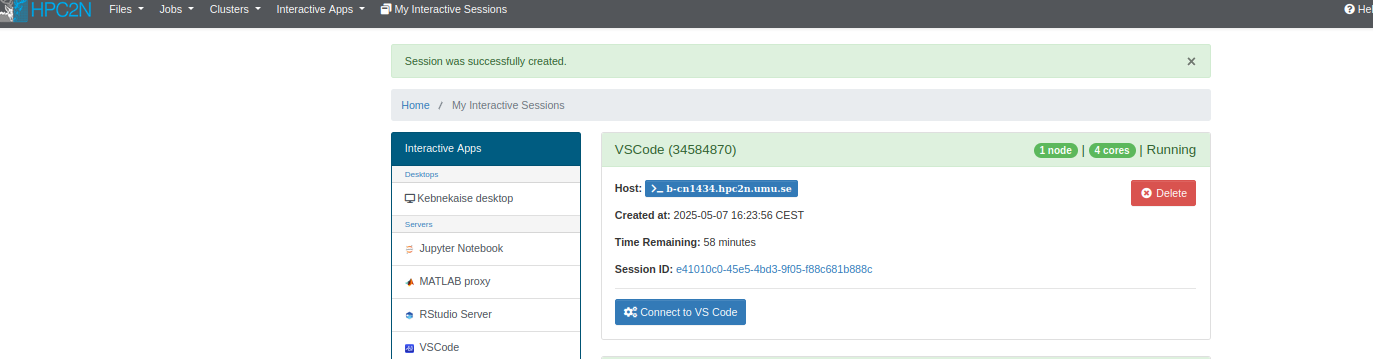
Then, when the resources have been allocated you can go to VSCode by clicking “Connect to VS Code”
As you can see, a host node is assigned and it tells you how many nodes and cores, and that it is running.
VS Code running
After connecting, you can work in VS Code. Start by choosing a theme and doing other setups:
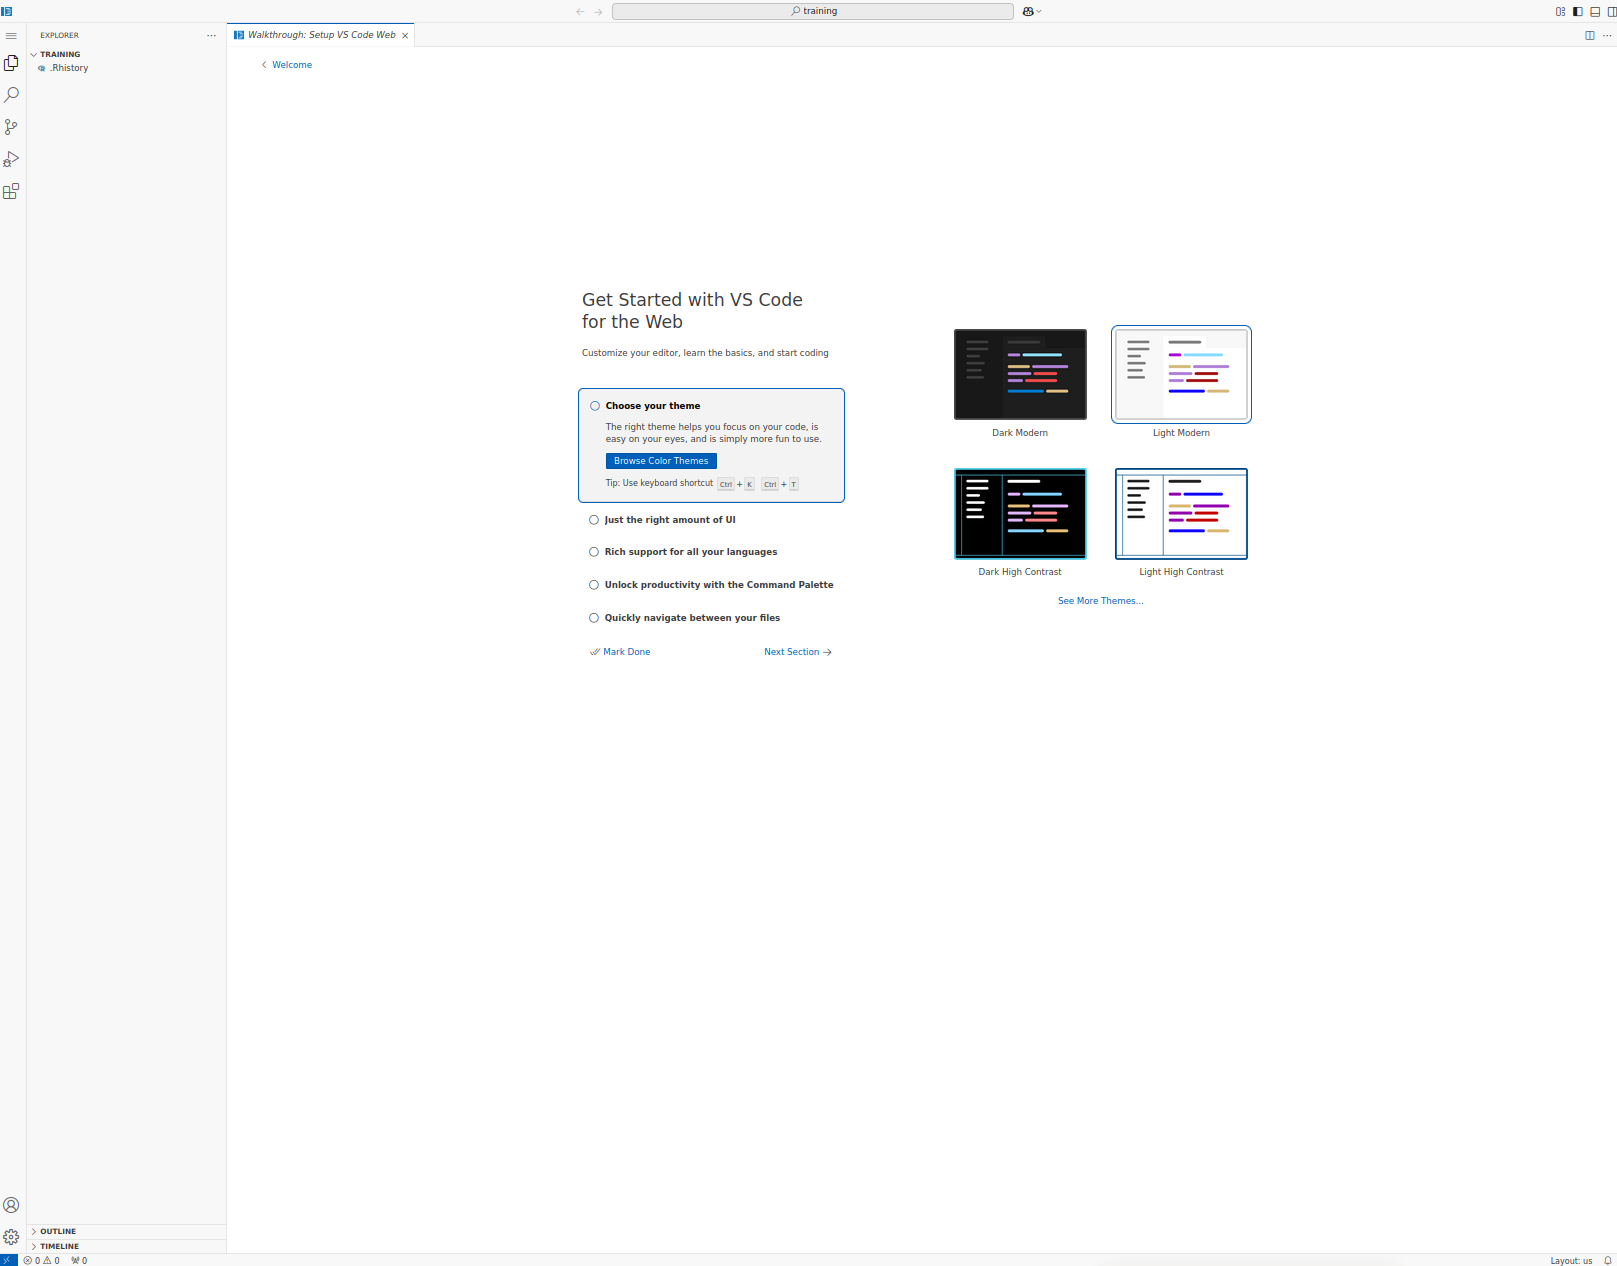
NOTE: You may get a pop-up window saying “Do you trust the authors of the files in this folder?” about the folder you chose as your “Working Directory”. Assuming you do trust the authors in your own/your project storage, click “Yes, I trust the authors”.
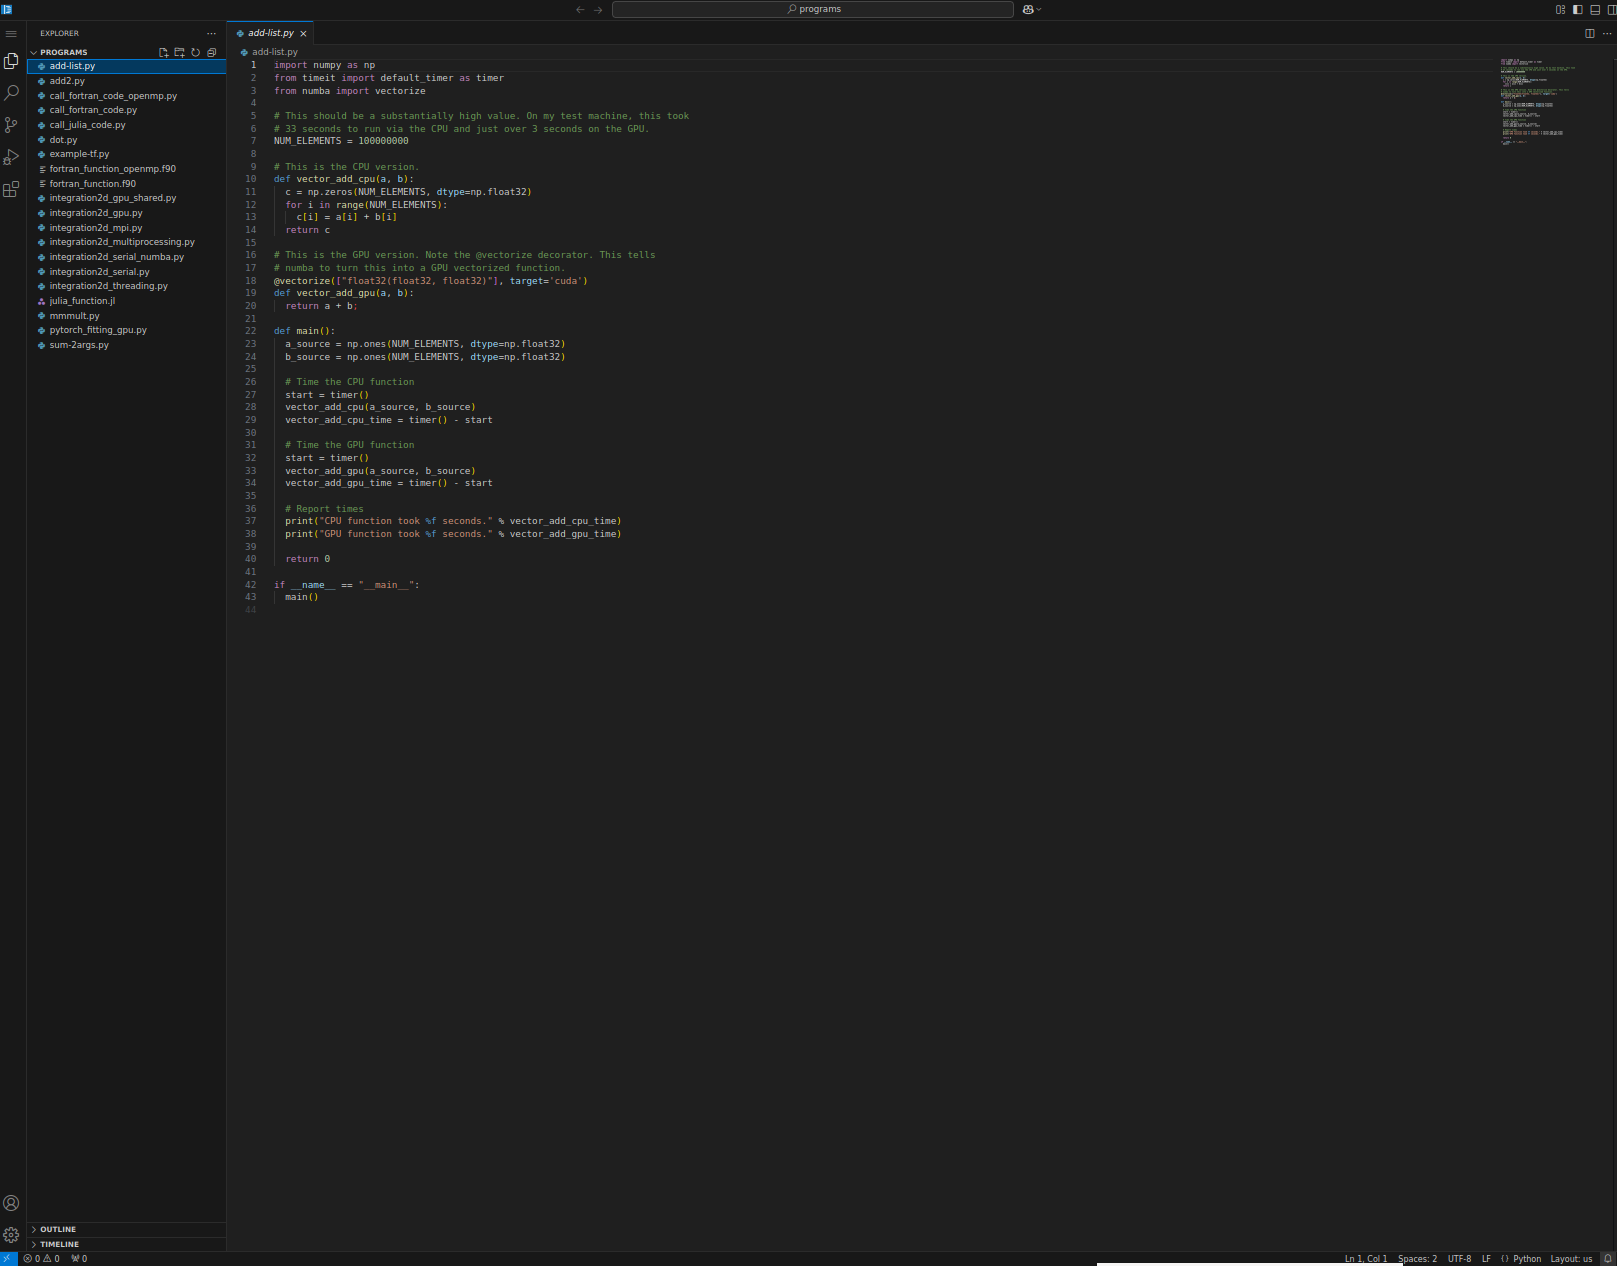
And up and running:
Closing/shutting VS Code down
You will at most keep the connection for as long as you asked for when you launched it.
However, if you want to shut down the VS Code server before that, then just click “Delete” on the VS Code session under “My Interactive Sessions”.
Closing the tab with VS Code in will not shut it down, and you can re-open it by again clicking “Connect to VS Code” in “My Interactive Sessions” for as long as the time you asked for when you launched the job.
Connecting from Windows
If you are connecting to HPC2N from a Windows system, you need to install an ssh client to connect. The recommended way is by using ThinLinc, but in some cases using just a terminal window is preferred, and this section looks at SSH clients for that. Several exists, both commercial and free. Here are some of the more common ones:
If you want to be able to open graphical displays (say for opening the Matlab graphical interface), you need an X11 server. These are commonly used:
You also need to transfer files between your own home computer and HPC2N’s systems. You need to use a secure protocol, so either sftp or scp will work, but not standard ftp.
- WinSCP (Commercial)
- FileZilla (only sftp) (free)
- PSCP/PSFTP (free)
- Cyberduck (free)
- MobaXterm (Commercial. The free version has limits to the file transfers)
In this section we will give brief examples for Cyberduck, WinSCP, MobaXterm, PuTTy, Cygwin, and Xming.
In all cases, we strongly advice against saving passwords.
The simplest way to connect to HPC2N is to use either PuTTy together with Xming, or to use MobaXterm, unless you need a Linux-like environment on your Windows machine (CygWin).
Note
Remember that the accounts at HPC2N and SUPR are separate.
In the welcome mail you got when your HPC2N account was created, there was a link to create a first, temporary password. When you have logged in using that, please change the password.
SSH clients and X11 servers
PuTTY
- Download PuTTY from here.
- Get the Zip file which contains all of PuTTY, PSCP, and PSFTP.
- Unzip the downloaded zip-file, then run “putty.exe”.
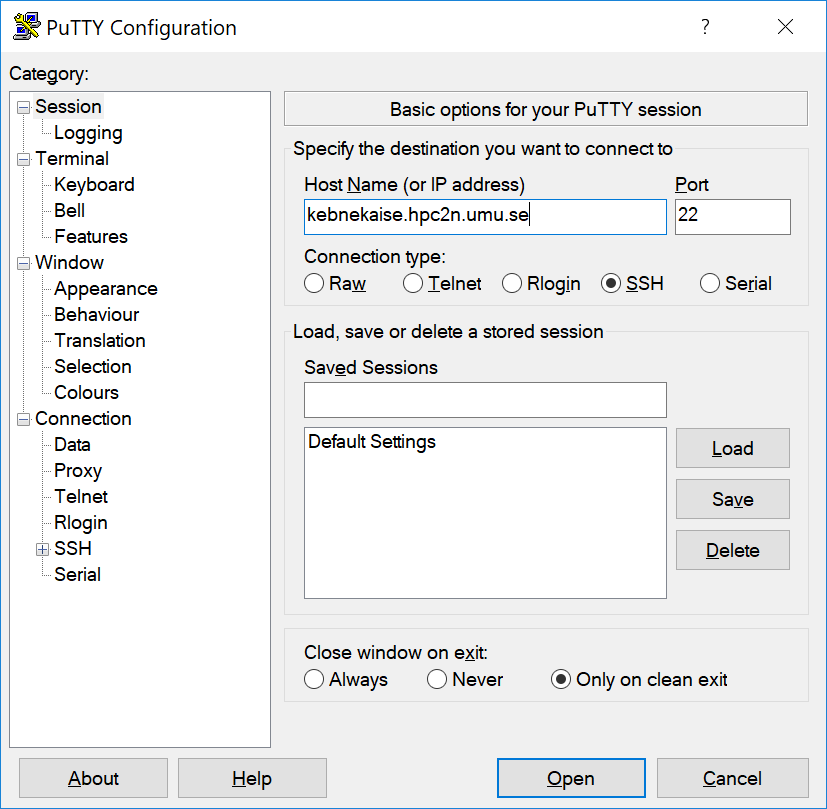
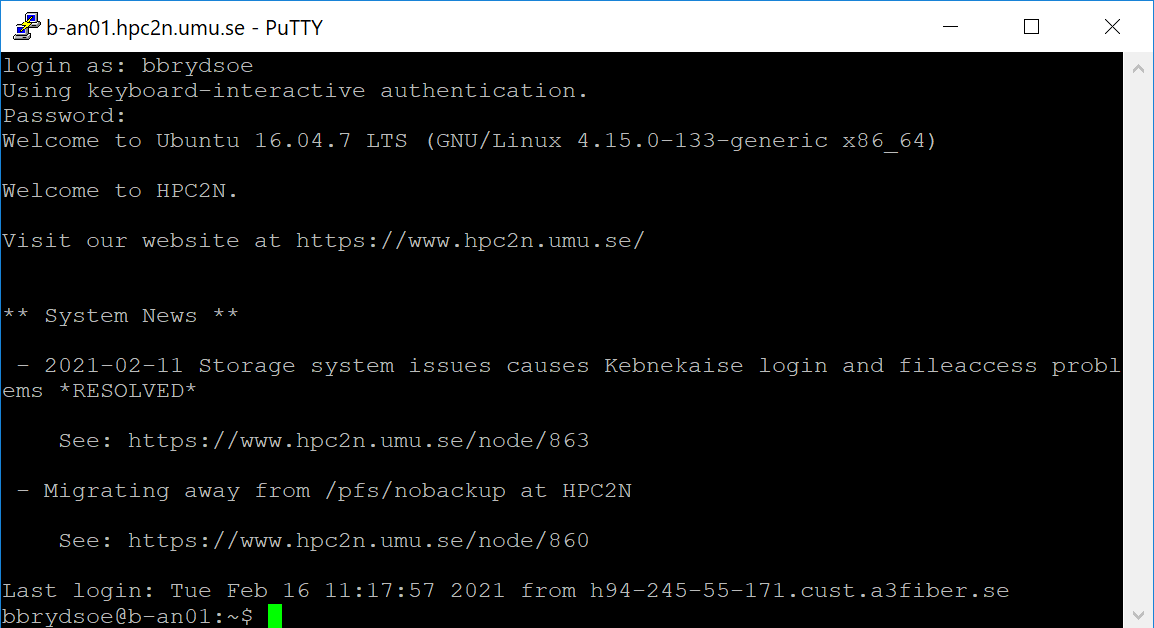
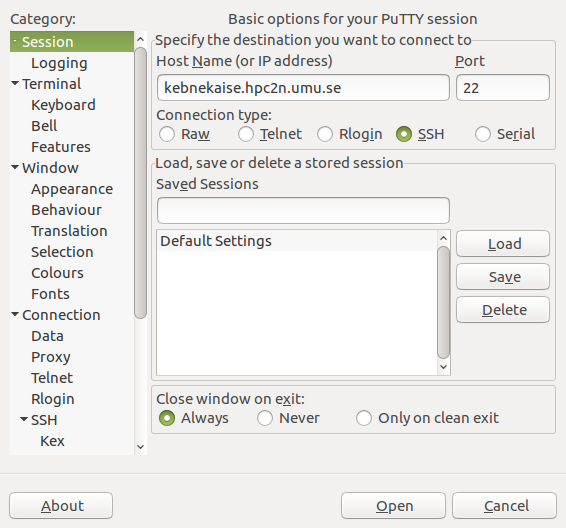
- In the window that opens, under ‘Session’ enter the host name.
- In the picture, it is entered for Kebnekaise (kebnekaise.hpc2n.umu.se).
- When you click ‘Open’ you will be prompted for your HPC2N username and password.
- In the picture below, you can see how it can look when logged in.
PuTTy and X11 forwarding
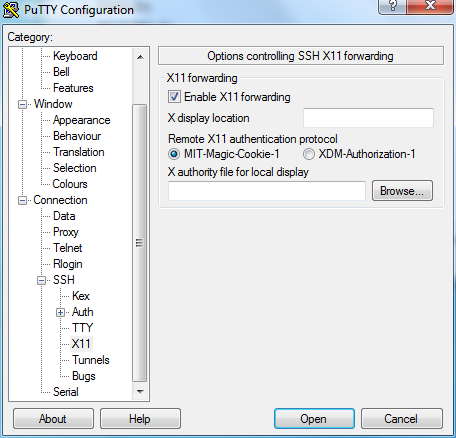
If you need to open graphical interfaces from the remote system on your home computer then you need to enable X11 forwarding.
Example for Xming
- Download and install an X server (for instance Xming)
- Start PuTTy
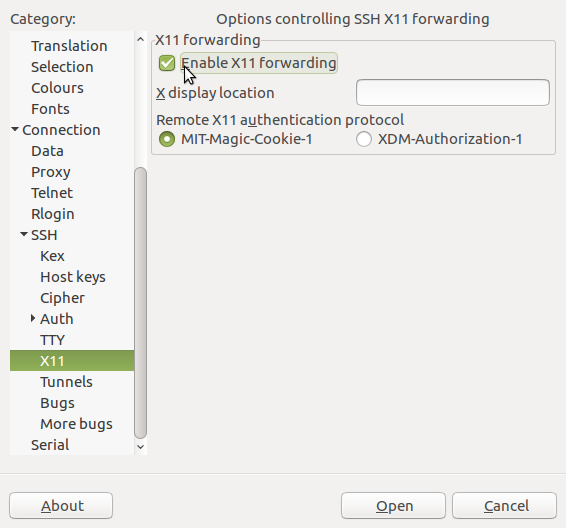
- On the left side, scroll down to ‘Connection’ and click to open the tree if it is not opened already
- Click to open the ‘SSH’ subcategory, and then click on ‘X11’.
- Make sure ‘Enable X11 forwarding’ is checked. Note that this needs to be done for each saved session.
- Some older versions of PuTTY does not work correctly with X11 forwarding from our systems. Try upgrading to version 0.69 (known to work) or newer.
Xming X server
In order to use X11 forwarding in PuTTy (or similar), you need to run Xming before starting PuTTy.
- Download from the Xming page or directly from Sourceforge
- Install (default options should work)
- Launch Xming
You can now launch (for instance) PuTTY SSH client and enable X11 forwarding as shown earlier on this page.
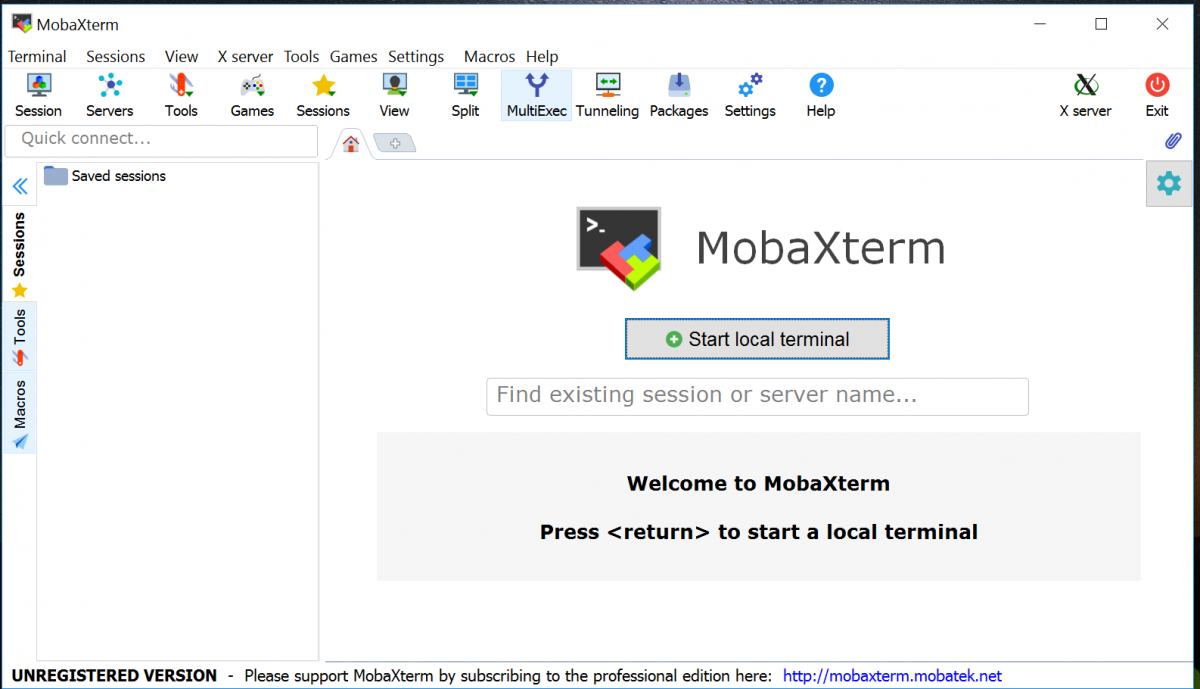
MobaXterm
This program has both a freeware and a paid version. The freeware version works well for most users. It combines SSH client, X11 server, and SFTP file browser. NOTE that the free version has a number of limits, such as a time-limit on the filebrowser. You may therefore wish to use either FileZilla or WinScp for file transfers instead because of that.
It exists both as an installable version and as a single executable that can be run from an USB stick.
- Download from here.
- Get the Free / Home edition
- Extract it
There is a demo on their homepage, but here are the basic steps to connect to HPC2N’s systems.
- Start the MobaXterm program
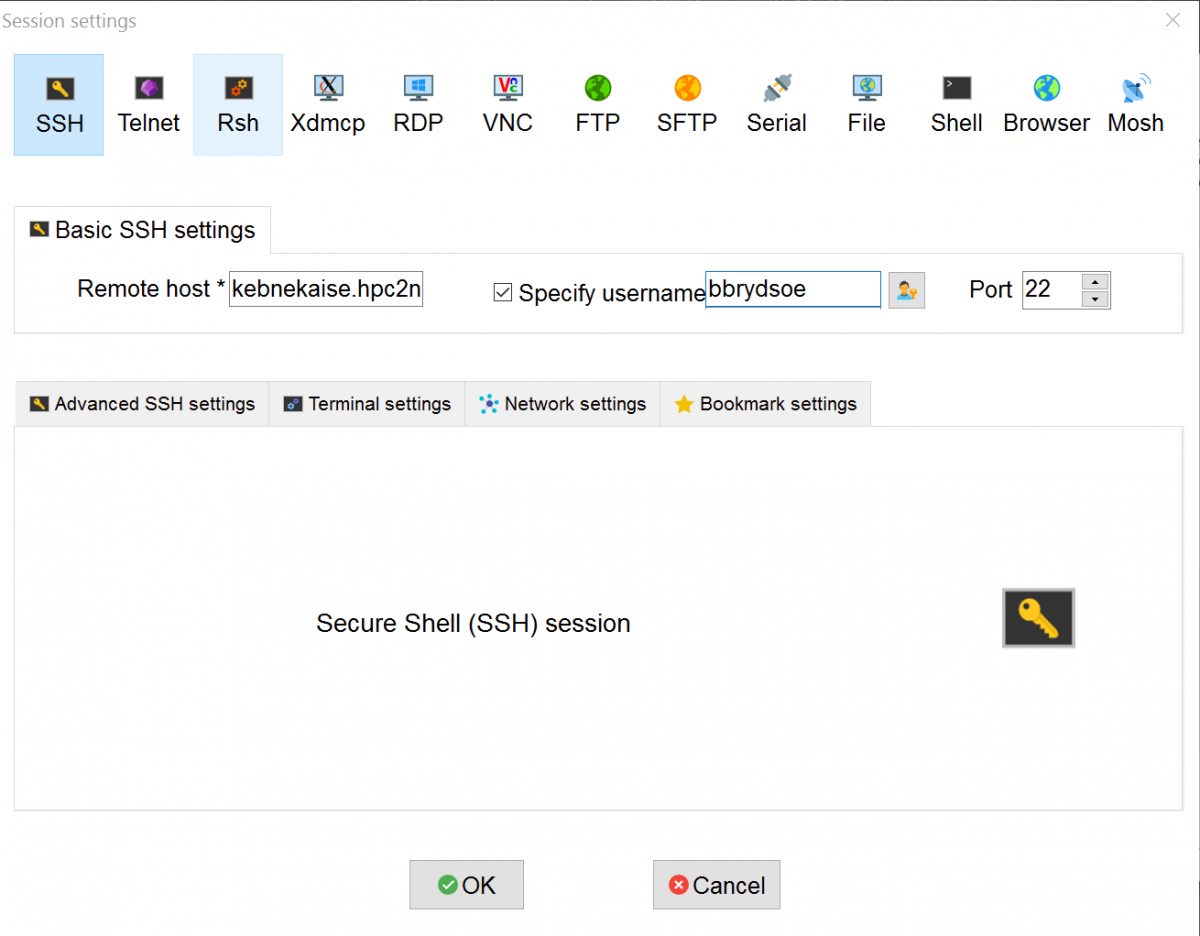
- Click ‘Session’ and then click ‘SSH’ in the new window that opens. Fill in the name of the remote host (kebnekaise.hpc2n.umu.se). Check ‘Specify username’ and fill in your own username (otherwise it will ask for your username when you connect to the system). Click ‘OK’. (Your settings will be saved and you can login again by clicking on the host name under ‘Saved sessions’ on the start up window).
- A new window will open, asking for your HPC2N password.
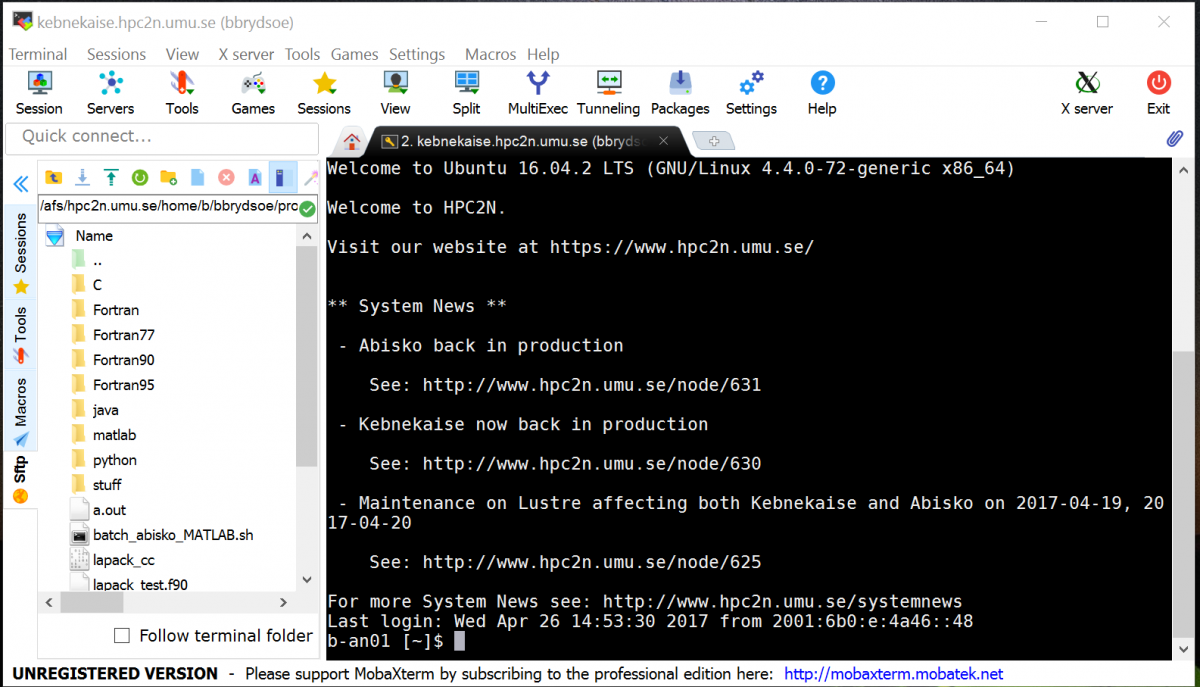
- When you have entered that, you will be logged on to the system (Kebnekaise). Note that there is a file browser on the left with your files on the HPC2N system.
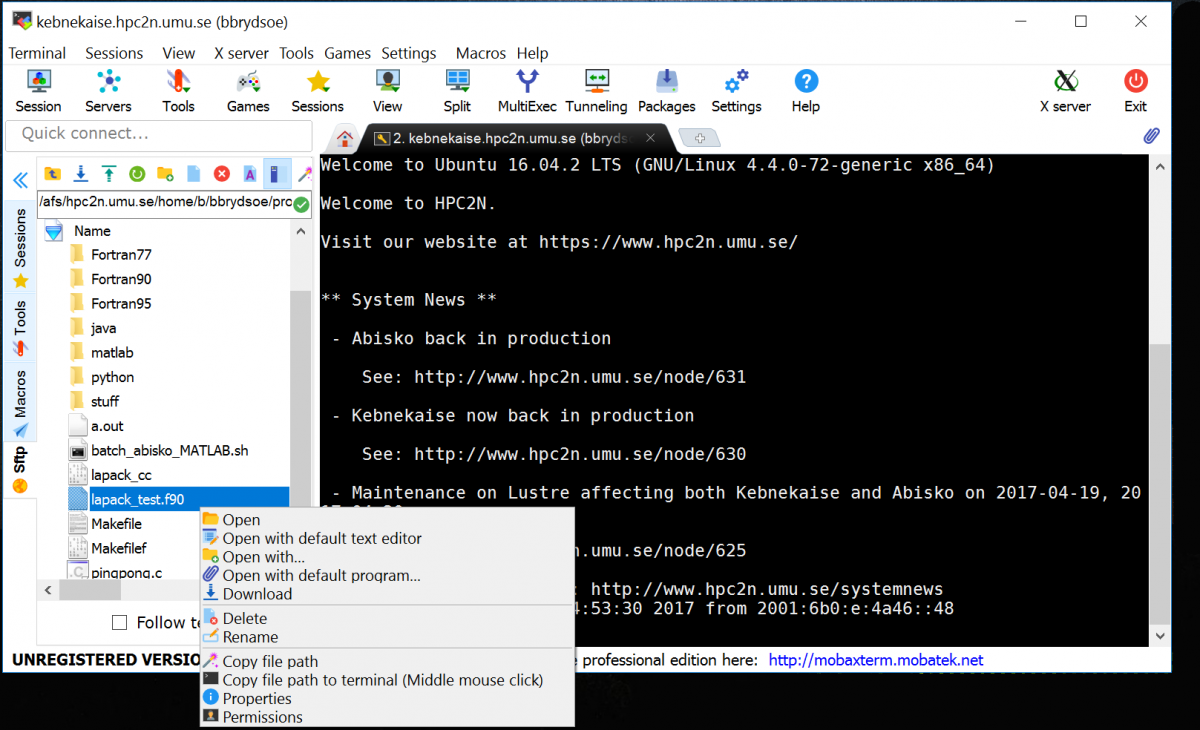
- Since an X11 server is running and the display is sat automatically, you can now open new windows/displays/graphical interfaces from the host you are logged in to, on your own local screen. - You can also transfer files between your local system and the remote system (HPC2N) by using the file browser. Choosing download/upload or just drag-drop works. You can also do things like editing files on the remote system by double-clicking on a file in the file browser or right-clicking and choosing what to do. NOTE that there is a time-limit on the file browser in the free version, and you can not expect to do anything but minor edits through it this way.
Cygwin - installation
This is somewhat more involved, and mostly only worth it if you intend to use Cygwin locally on your Windows computer, in order to run a Linux-like environment. A longer description of the installation process can be found on Cygwin’s pages.
- Download “setup.exe” from the Cygwin page
- After the initial file downloads, you will get the option to ’Select Package’. Go through and check any you think you would like, as long as you make sure the ones below are selected from “X11” category
xorg-server(required, the Cygwin/X X Server)xinit(required, scripts for starting the X server:xinit,startx,startwin(and a shortcut on the Start Menu to run it),startxdmcp.bat)xorg-docs(optional, man pages)X-start-menu-icons(optional, adds icons for “X Clients” to the Start menu)- You may also select any X client programs you want to use, and any fonts you would like to have available.
- You may also want to ensure that the
inetutilsoropensshpackages are selected if you wish to usetelnet(not at HPC2N) orsshconnections to run remote X clients.
- Under “Graphics”, it is recommended to select
openglpackages. - Install
Cygwin - connecting
The custom XWin startup utility startxwin starts the X server in multiwindow mode. startxwin is included in the xinit package, which you should have installed if you followed the description above.
Run startxwin by doing one of:
- Using the “XWin Server” shortcut under “Cygwin-X” on the Start Menu
- Starting
/usr/bin/startxwinin a Cygwin shell, by typingstartxwin
You can get more documentation for startxwin by typing man startxwin in the Cygwin shell.
File transfers
There are many options, some free, some commercial. Some of the more common ones are:
WinSCP
- Download from here. Pick ‘Installation package’.
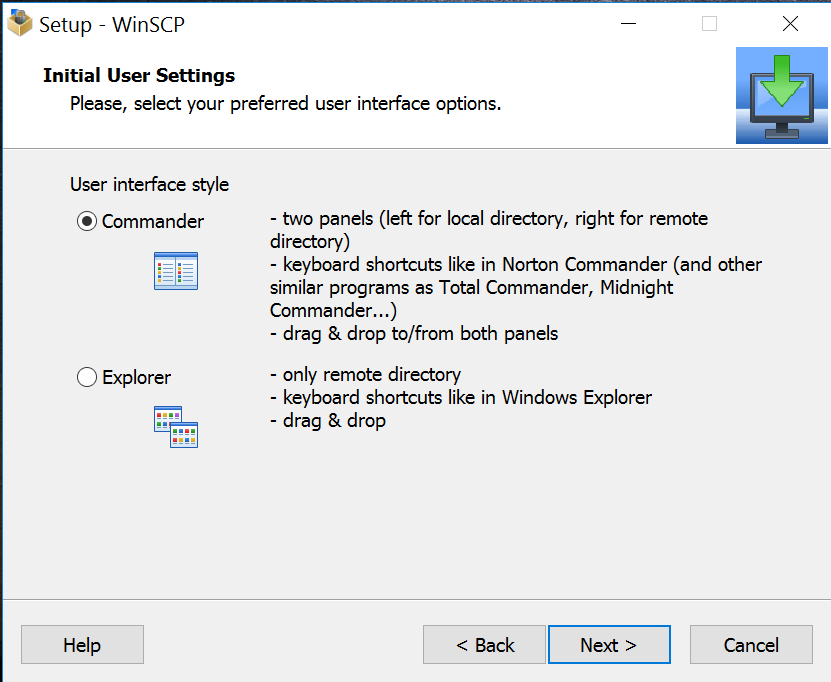
- Install. During the setup you will be asked to choose between ‘Commander’ and ‘Explorer’. ‘Commander’ is probably the best for most people, but it is your choice.
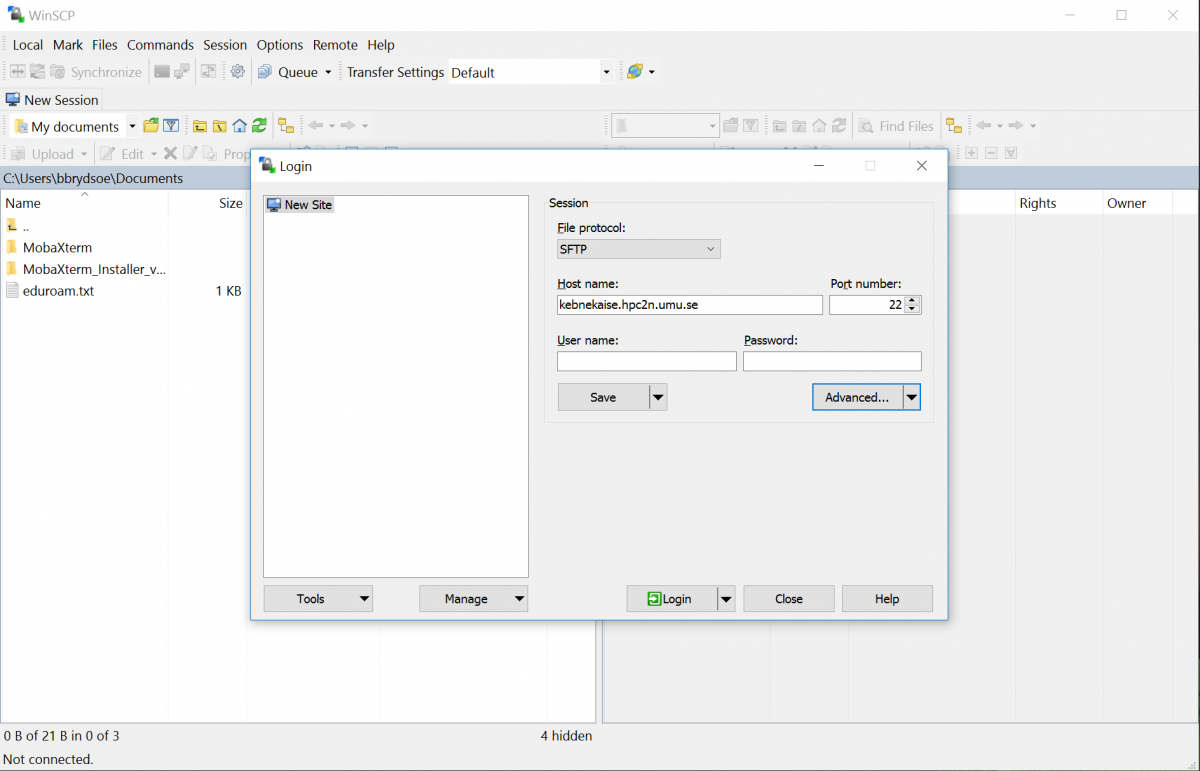
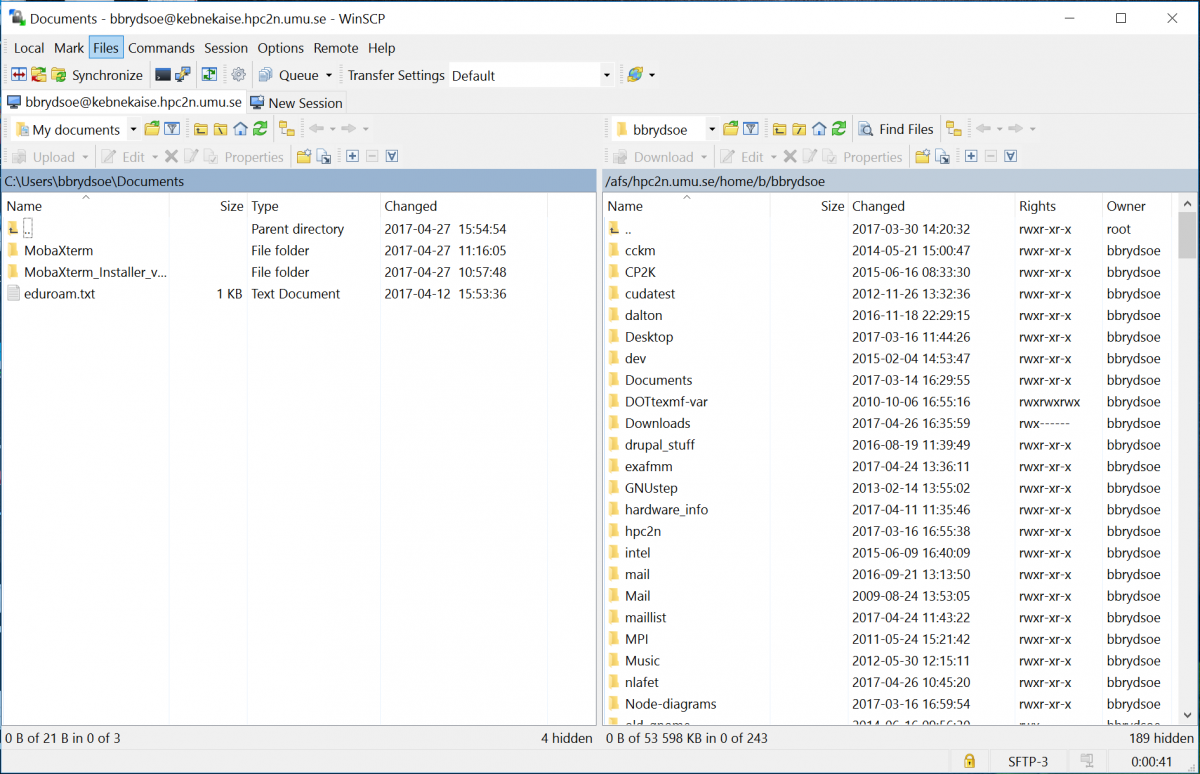
- When the program has installed, start it. Click ‘New Session’. Enter the name of the remote host (kebnekaise.hpc2n.umu.se or abisko.hpc2n.umu.se). Put in your username and password. You can save the session settings so you do not have to enter it next time, but can just click it in the list that will be on the left, but we strongly recommend that you in that case do not save the password.
- When you log on to a remote host for the first time you will be asked if you want to continue connecting to an unknown server and add its host key to a cache. Say ‘Yes’. You will now be logged in to HPC2N, to your home directory. You can change directories by clicking, and you can upload/download files with drag-drop.
Cyberduck
- Download from here. Pick the “Cyberduck for Windows” even if you have Windows 10
- Install
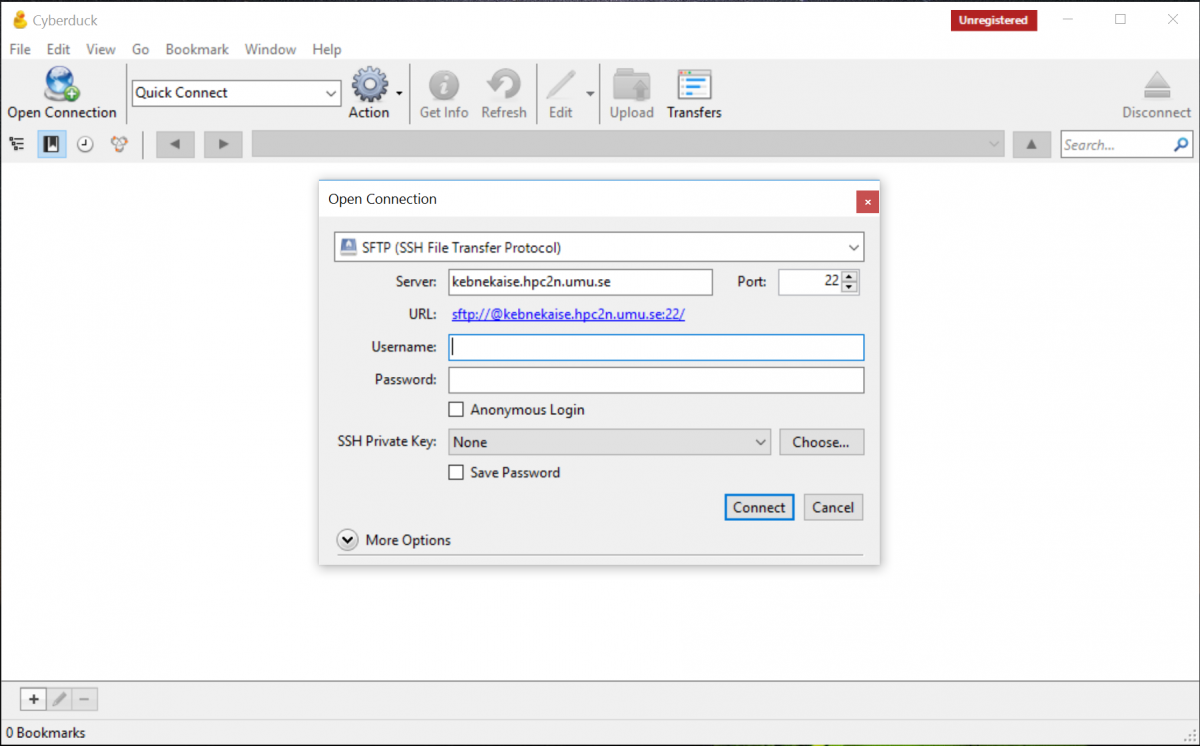
- Start the program
- Click ‘Open Connection’ and enter the name of the remote host (kebnekaise.hpc2n.umu.se), Change the drop-down from ‘FTP’ to ‘SFTP’. Enter your username and password for HPC2N. We strongly recommend that you do NOT save the password.
- When you connect the first time to a remote host, you will be asked if you want to “Allow” or “Deny” an unknown fingerprint. Allow it.
- You are now logged in. You will end up in your home directory. You can change directories and you can upload/download files with drag-drop.

FileZilla
The FileZilla Client is free and supports FTP, FTP over TLS (FTPS) and SFTP. It is open source software distributed free of charge under the terms of the GNU General Public License. To connect to HPC2N, you need to use SFTP.
- Go to the FileZilla homepage and pick “Download FileZilla Client”.
- You will get to a page where you can pick “Download FileZilla Client” for your OS.
- Download and install.
Connecting from macOS
If you are connecting to HPC2N from a Mac, you have a number of options, aside from the built in SSH client “Terminal”. Several exists, both commercial and free. Here are some of the more common ones:
ssh(built-in in “Terminal”)iTerm2(free)
If you want to be able to open graphical displays (say for opening the Matlab graphical interface), you need an X11 server. It may or may not be installed as standard on Mac, depending on your version, but you can get it by installing XQuartz.
Another option would be to use ThinLinc which exists for all OS and gives you a desktop on Kebnekaise.
You also need to transfer files between your own home computer and HPC2N’s systems. You need to use a secure protocol, so either sftp or scp will work, but not standard ftp. These are some of the options:
On this page we will give brief examples for ssh, Cyberduck and iTerm2, and also tell you how to get FileZilla.
In all cases, we strongly advice against saving passwords.
The simplest way to connect to HPC2N is to use the built-in ssh from “Terminal”.
Note
Remember that the accounts at HPC2N and SUPR are separate. In the welcome mail you got when your HPC2N account was created was a link to create a first, temporary password. When you have logged in using that, please change the password.
SSH clients
ssh
- Launch “Terminal”
- Connect to Kebnekaise by doing:
ssh -l username kebnekaise.hpc2n.umu.se
where username is your username at HPC2N. - If you need to open displays from the remote host on your local machine (say, for graphical interfaces to some software), you need to make sure XQuartz is installed and running. It should be set up automatically during install.
iTerm2
- Download iTerm2
- Install and launch
- Connect to Kebnekaise by doing:
ssh -l username kebnekaise.hpc2n.umu.se
where username is your username at HPC2N. - You now have access to a number of nice features, like split panes, search, paste history, etc. Read more about that here.
File transfers
Cyberduck
- Download from here or from the Mac App Store
- Install
- Launch the program
- In the Open Connection dialog:
- Select SFTP as protocol
- Enter Server: kebnekaise.hpc2n.umu.se
- Leave Port at default: 22
- Enter your Username and Password at HPC2N
- Click Connect

- When you connect the first time to a remote host, you will be asked if you want to “Allow” or “Deny” an unknown fingerprint. Allow it.
- You are now logged in. You will end up in your home directory. You can change directories and you can upload/download files with drag-drop. If you want, you can pick Bookmark -> New Bookmark from the top menu to save the connection settings for next time.

FileZilla
The FileZilla Client is free and supports FTP, FTP over TLS (FTPS) and SFTP. It is open source software distributed free of charge under the terms of the GNU General Public License. To connect to HPC2N, you need to use SFTP.
- Go to the FileZilla homepage and pick “Download FileZilla Client”.
- You will get to a page where you can pick “Download FileZilla Client” for your OS.
- Download and install.
Connecting from Linux/Unix
If you are connecting to HPC2N from a computer running Linux or Unix, you have a number of options. The most obvious and commonly used one is probably the built-in SSH client SSH. Several others exist, here are some of the more common ones:
ssh(built-in in Linux terminal)PuTTY(free)
If you want to be able to open graphical displays (say for opening the Matlab graphical interface), you need an X11 server. It is installed per default on Linux/Unix systems.
Another option would be to use ThinLinc which exists for all OS and gives you a desktop on Kebnekaise.
You also need to transfer files between your own home computer and HPC2N’s systems. You need to use a secure protocol, so either sftp or scp will work, but not standard ftp. These are some of the options:
On this page we will give brief examples for ssh, scp/sftp, PuTTY, and FileZilla.
Note
You can find more examples for file transfers in the File transfer section
In all cases, we strongly advice against saving passwords.
The simplest way to connect to HPC2N is to use the built-in ssh from the terminal.
Note
Remember that the accounts at HPC2N and SUPR are separate. In the welcome mail you got when your HPC2N account was created was a link to create a first, temporary password. When you have logged in using that, please change the password.
SSH clients
ssh
- Launch a terminal
- Connect to Kebnekaise by doing:
ssh username@kebnekaise.hpc2n.umu.se
where username is your username at HPC2N. - If you need to open displays from the remote host on your local machine (say, for graphical interfaces to some software), you must use the flag
-X(or-Yin some cases, if you need to type something in the display, like in MATLAB):
ssh -X username@kebnekaise.hpc2n.umu.se
PuTTY
- Download PuTTY
- Unpack the tarball (For version 0.81 - adjust to fit:
tar zxvf putty-0.81.tar.gz)cdinto the directory created by the above command (adjust to fit the version:
- It should build without problems. If you need the graphical utilities instead of just using it from the command line, you need Gtk+-1.2, Gtk+-2.0, or Gtk+-3.0 installed. More information can be found in the file README in the top putty directory.
- Launch the graphical interface with
./puttyfrom the unix directory under the PuTTY directory. - Enter kebnekaise.hpc2n.umu.se as the host:
- The first time you connect you will be asked to accept the host key. Do so. Then login with your HPC2N username and password.
- In order to use remote graphical interfaces, you need to enable X11 forwarding:
- Scroll down in the left side of the PuTTY window to SSH.
- Click the small arrow to get to the sub-options.
- Click X11.
- Check “Enable X11 forwarding”:
- Launch the graphical interface with
File transfers
scp/sftp
scpandsftpshould already be installed on your Linux installation
scp
scp - secure copy - copies files between hosts on a network. It uses ssh for data transfer.
scp examples
- Copy file from remote host to local host
- Copy file from local host to remote host
- Copy directory from local host to remote host (and renaming directory to new-directory)
- Copy multiple files from local host to your home directory on remote host
- Copy multiple files from remote host to current directory on local host
For more info about scp, type: man scp on the command line.
sftp
sftp - secure file transfer program. Similar to FTP, but with many of the features of SSH included.
sftp examples
Interactive
Retrieve files without interaction
For more info about sftp, type: man sftp on the command line.
FileZilla
- Ubuntu: download and install with package manager (
apt-get install filezilla) - You can also download from FileZilla homepage if you are not using Ubuntu. Pick the one for “All platforms”. There is one for Debian (the executable is in the bin subdiretory and is called filezilla). If you are not using Debian or Ubuntu, you will probably have to compile from source.
- When building from source (You also need to download and install libfilezilla in much the same way):
- uncompress the tarball (
tar zxvf FILENAME), enter the directory created mkdir compilecd compile../configuremakemake install
- uncompress the tarball (
- This is how it looks when FileZilla has started up:
- Connect by entering
kebnekaise.hpc2n.umu.sein the “Host” field, then put in your HPC2N username under “Username”. We strongly recommend not saving your password.